The Deerslayer's Wife
Embracing the Hunting Lifestyle
Too Many Coolers on a Camping Trip?
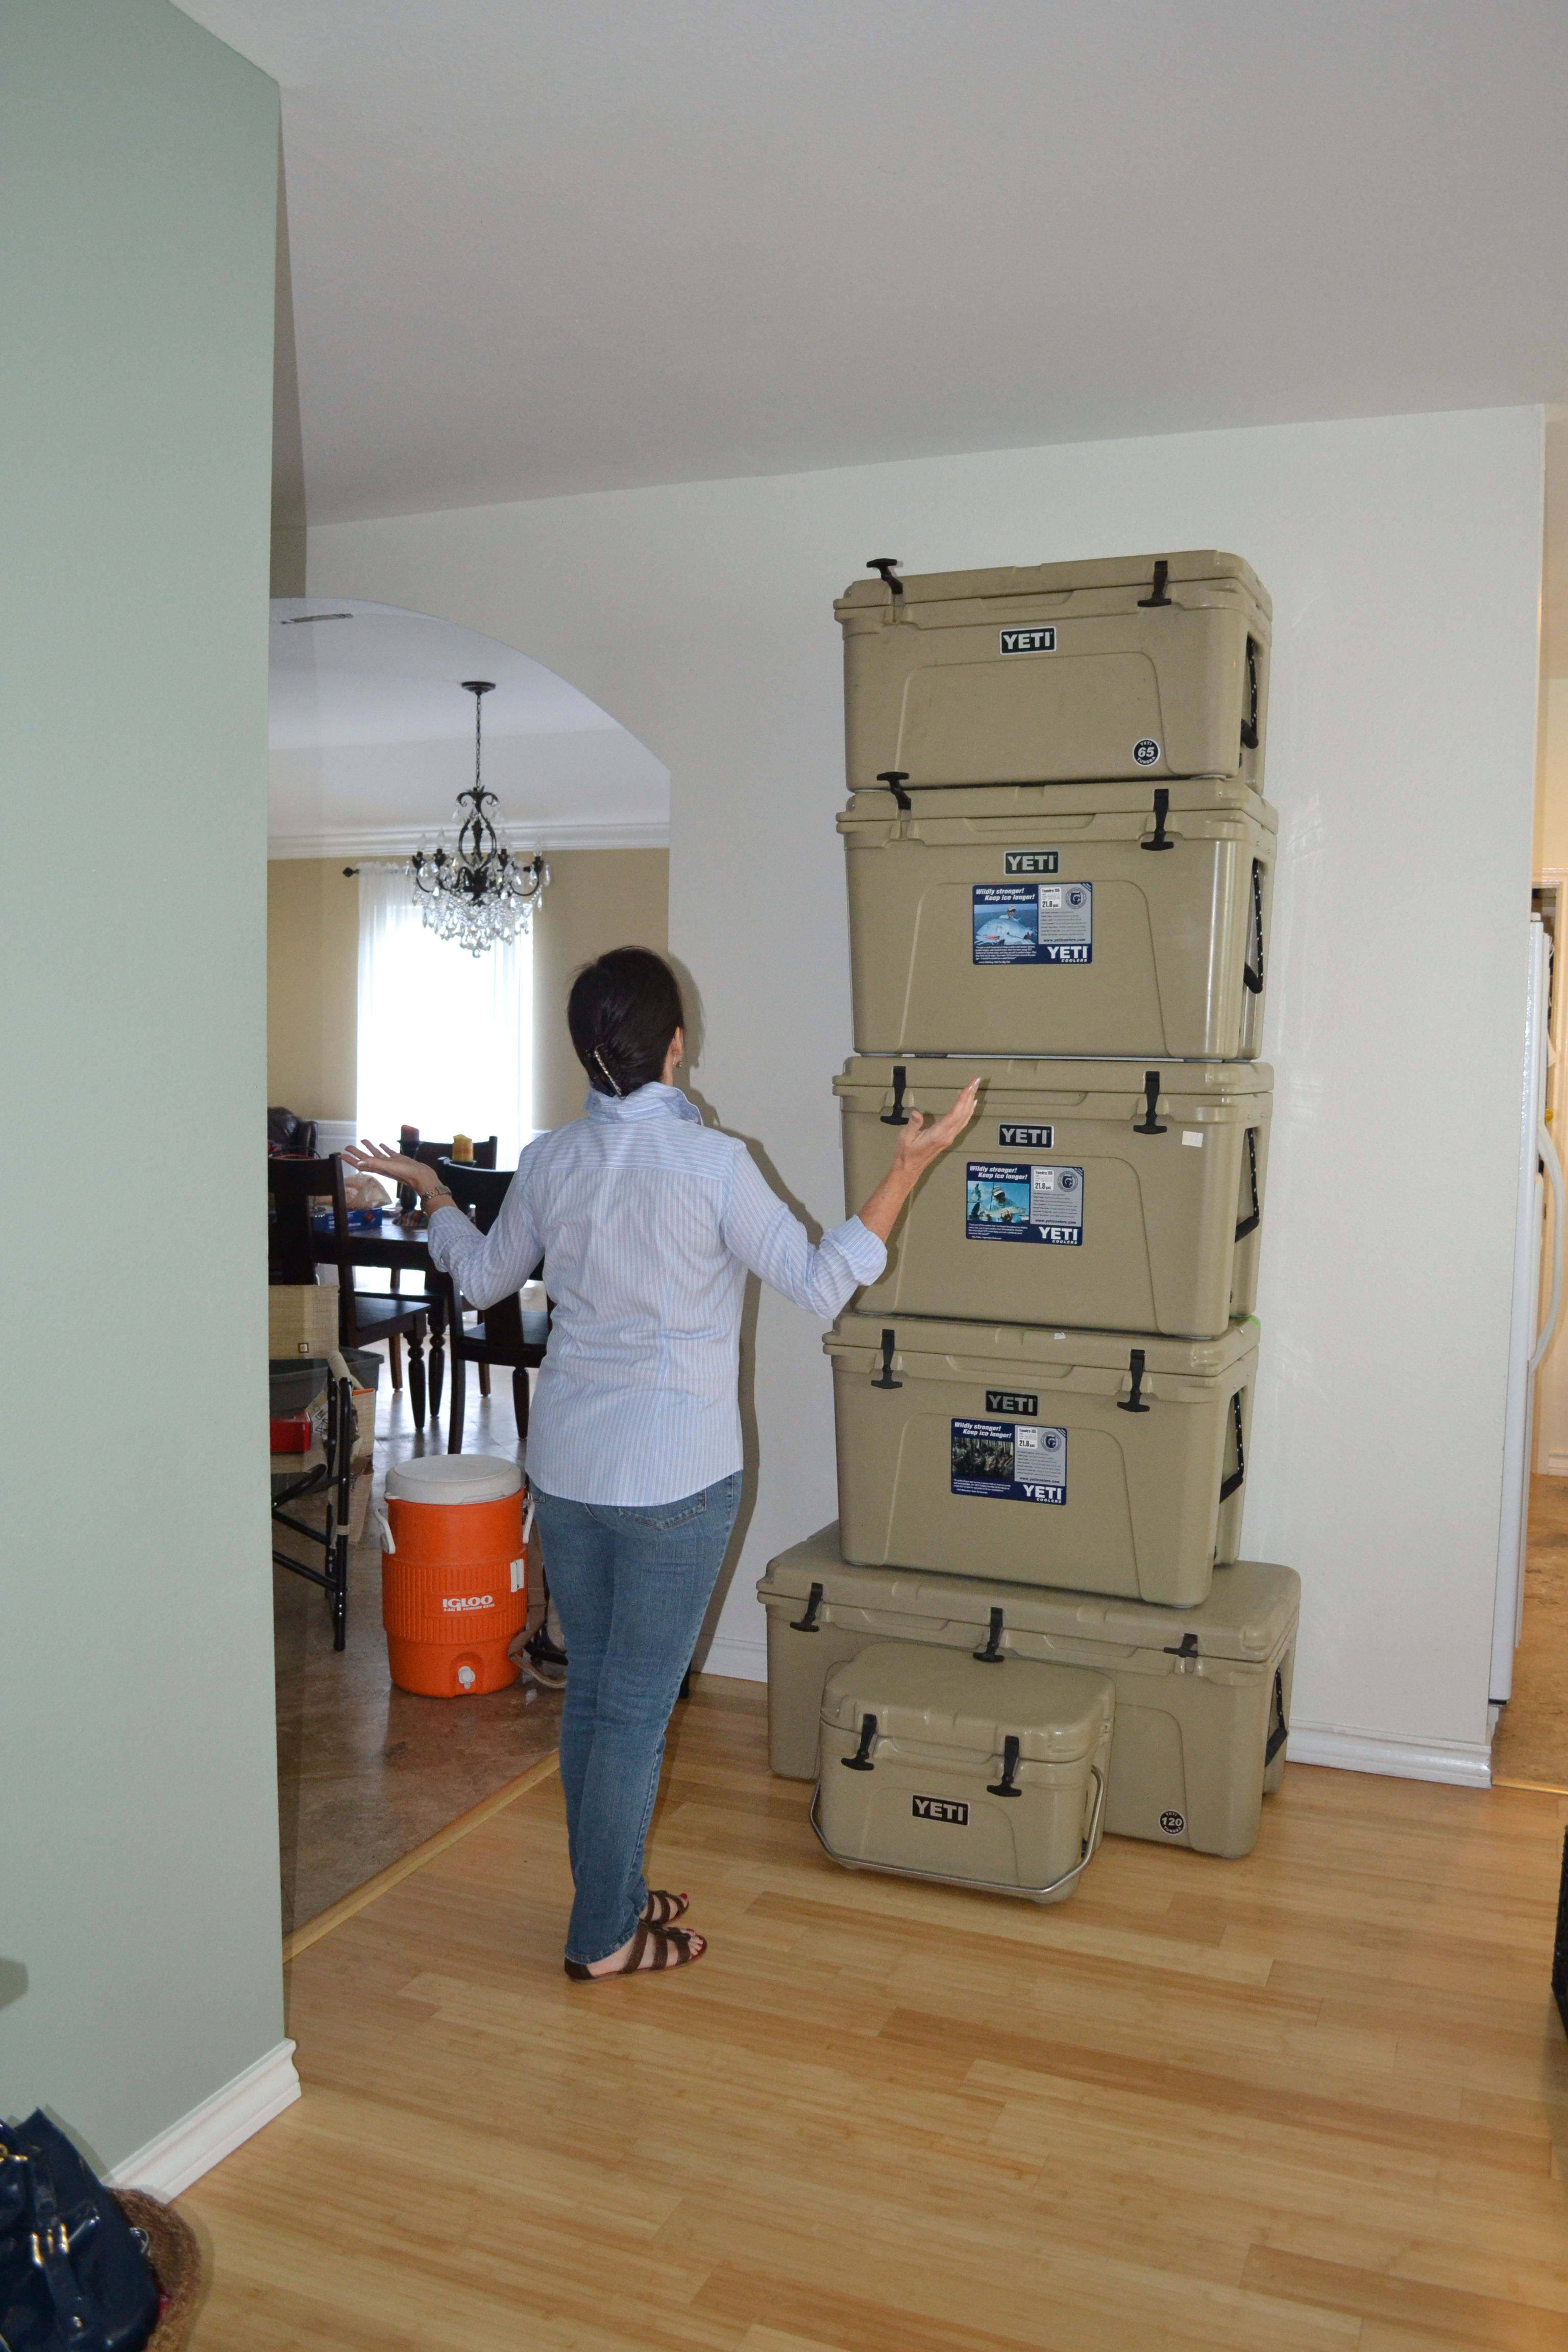 Welllllll… the Deerslayer’s wife would’ve said, “Yup!” I would’ve drawn the line at the 6 other Igloo coolers that we already own. But these are Yeti coolers! And they’re made in TEXAS. Talk to any hunter about coolers and a distinct reverence is suddenly detected. Mention Yeti coolers and hunters begin to cast their eyes down and genuflect.
I’d heard the talk, detected the reverence so I knew what my Deerslayer would get for Christmas a couple of years ago. I gotta tell ya, I really thought it would be just another cooler, a really upper-end cooler, but another cooler just the same. I hate to admit that even I now share the respect for these coolers. After years of melted ice, and lukewarm, waterlogged foods I was amazed by what the Yeti coolers can do. They keep frozen foods frozen for days, all the way to Wyoming from South Texas and several days after that as a matter of fact! Now, this entry was not intended to provide advertising for the Yeti company. However, when I find an amazing product that can so dramatically improve a hunting/camping experience, I’d be remiss not to share with my readers. While the Yeti coolers are pretty pricey, they really are worth a look at www.yeticoolers.com.

It’s already been definitively determined that there is no such thing as too much bacon for any camping and/or hunting trip. And while I haven’t discussed the fact, neither can there be too many enchiladas, gallons of beans or pico de gallo, pounds of fajitas or brisket or potato salad, (or Prosecco or beer)! Our recent trip to Wyoming was for 40+ people who were extremely appreciative of my cooking, availability and willingness to prepare fresh percolated coffee, and my willingness to make pancakes for the many teenaged family members in the mornings.
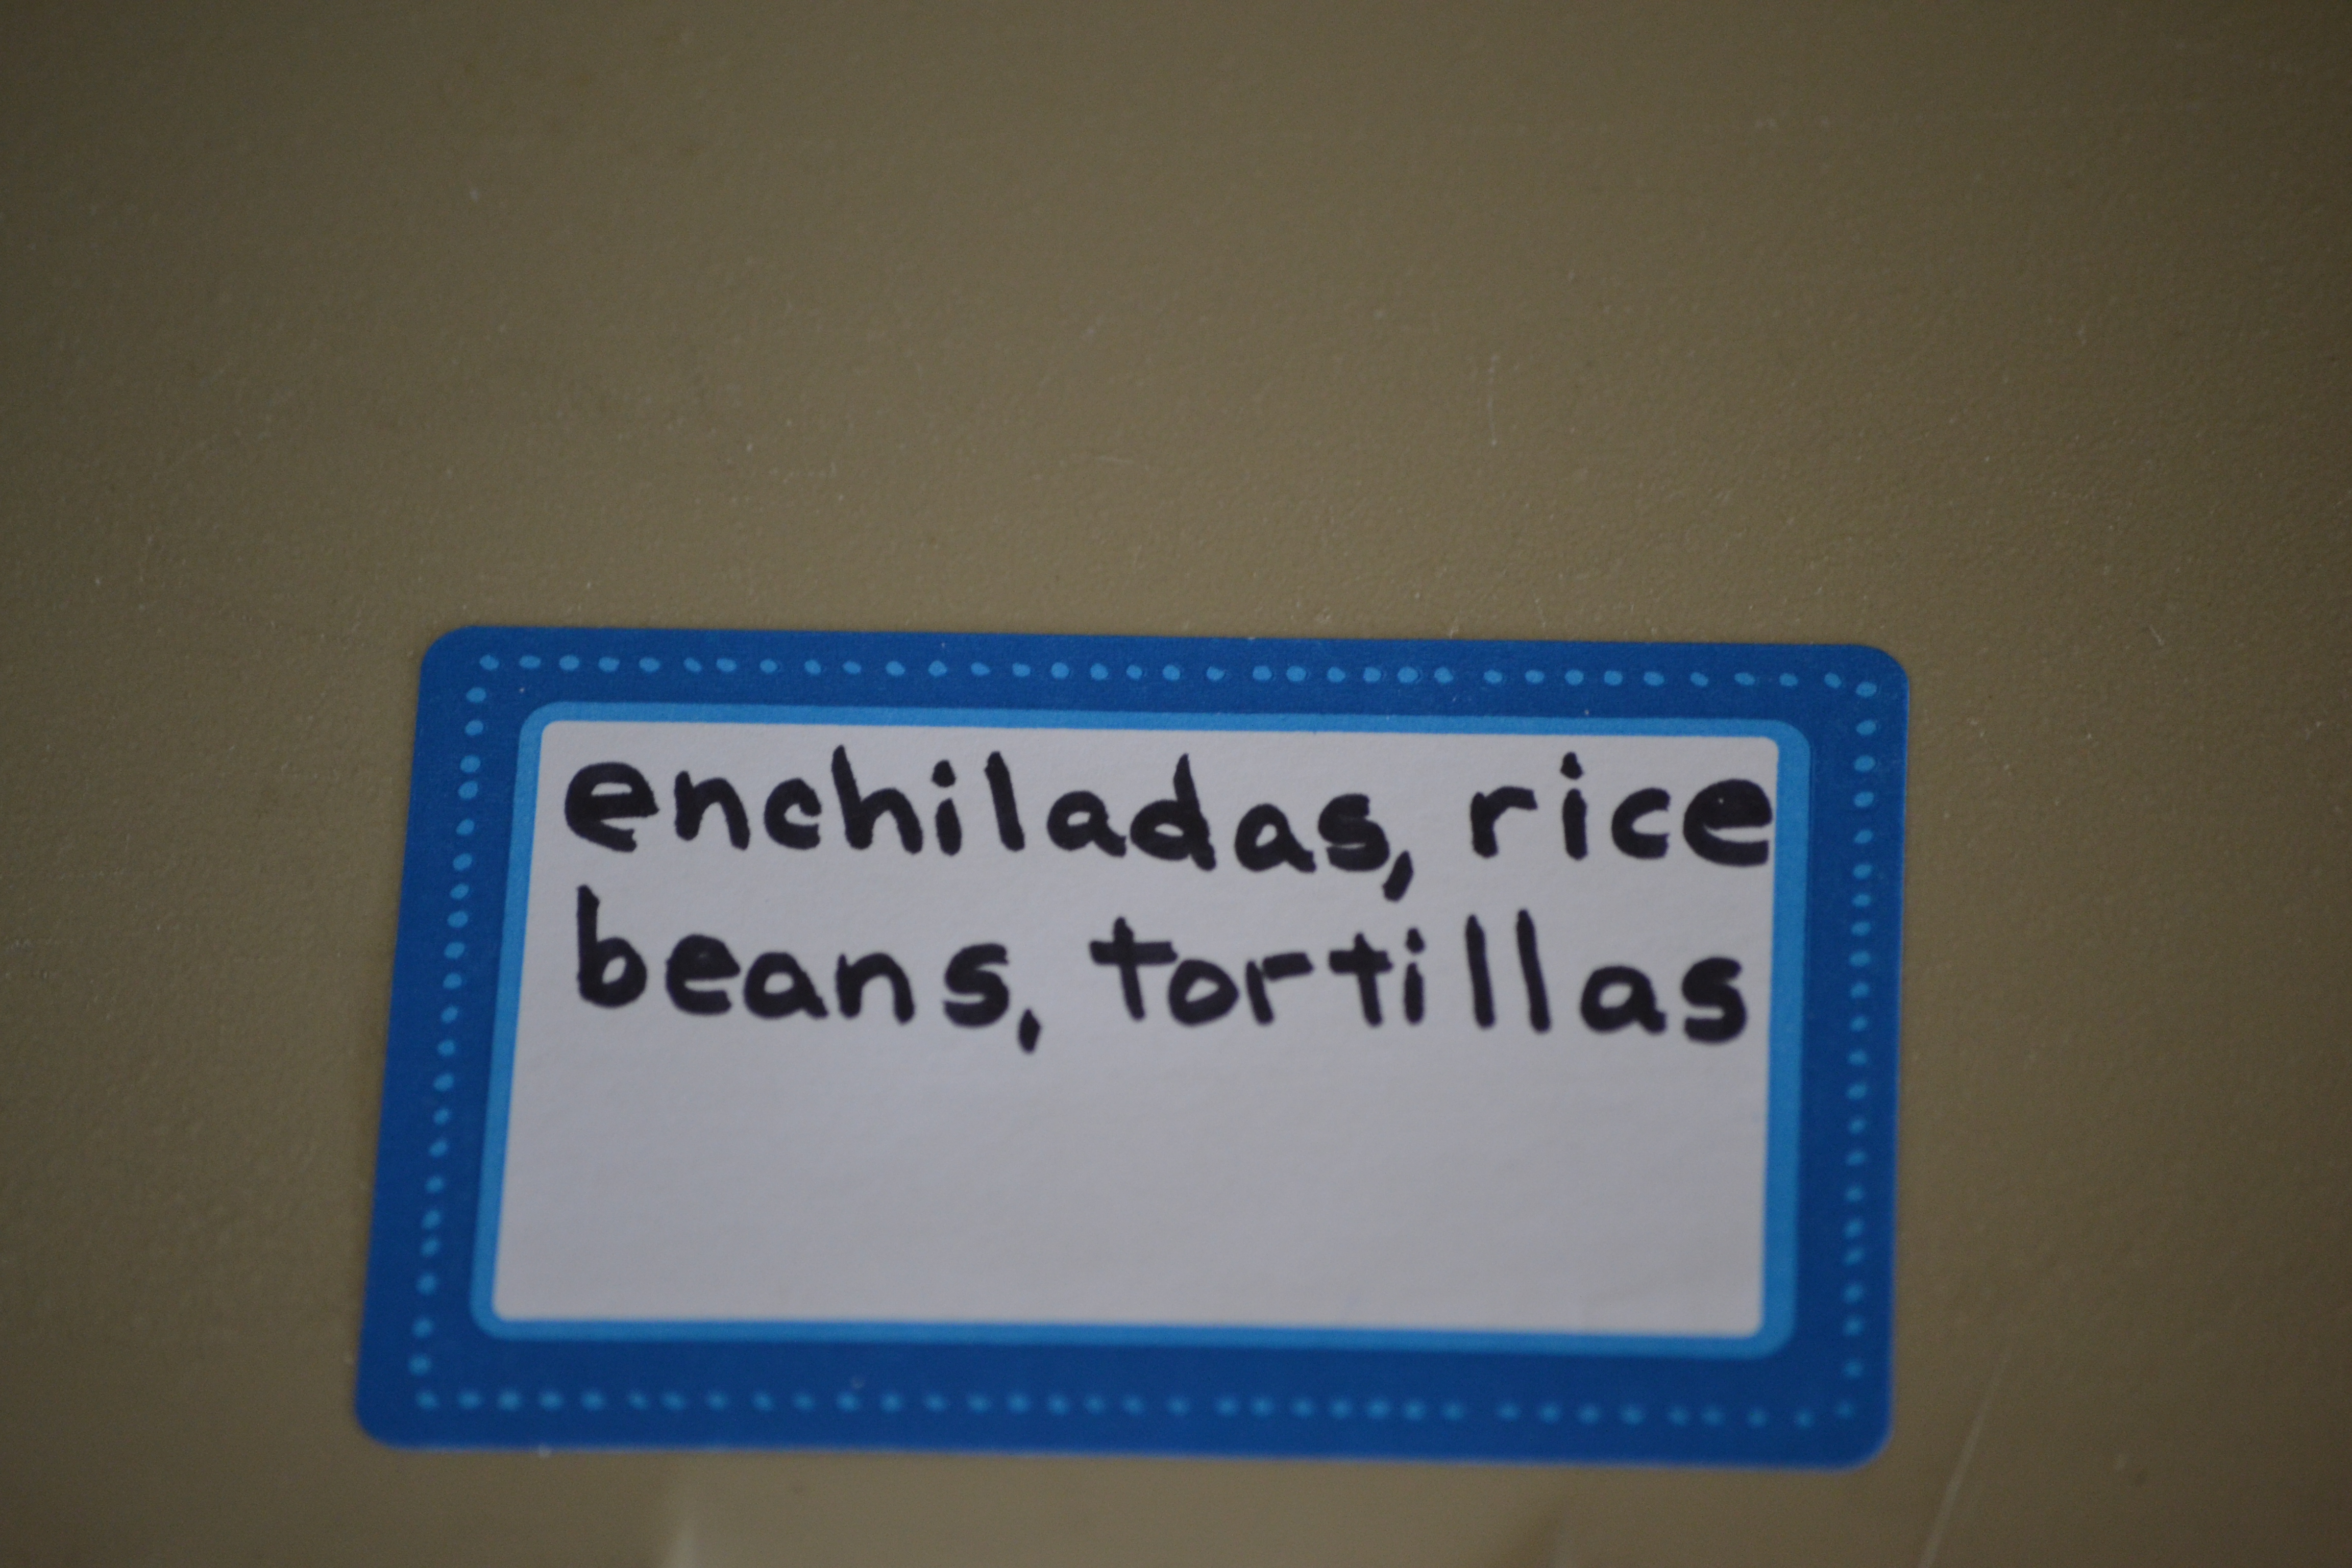
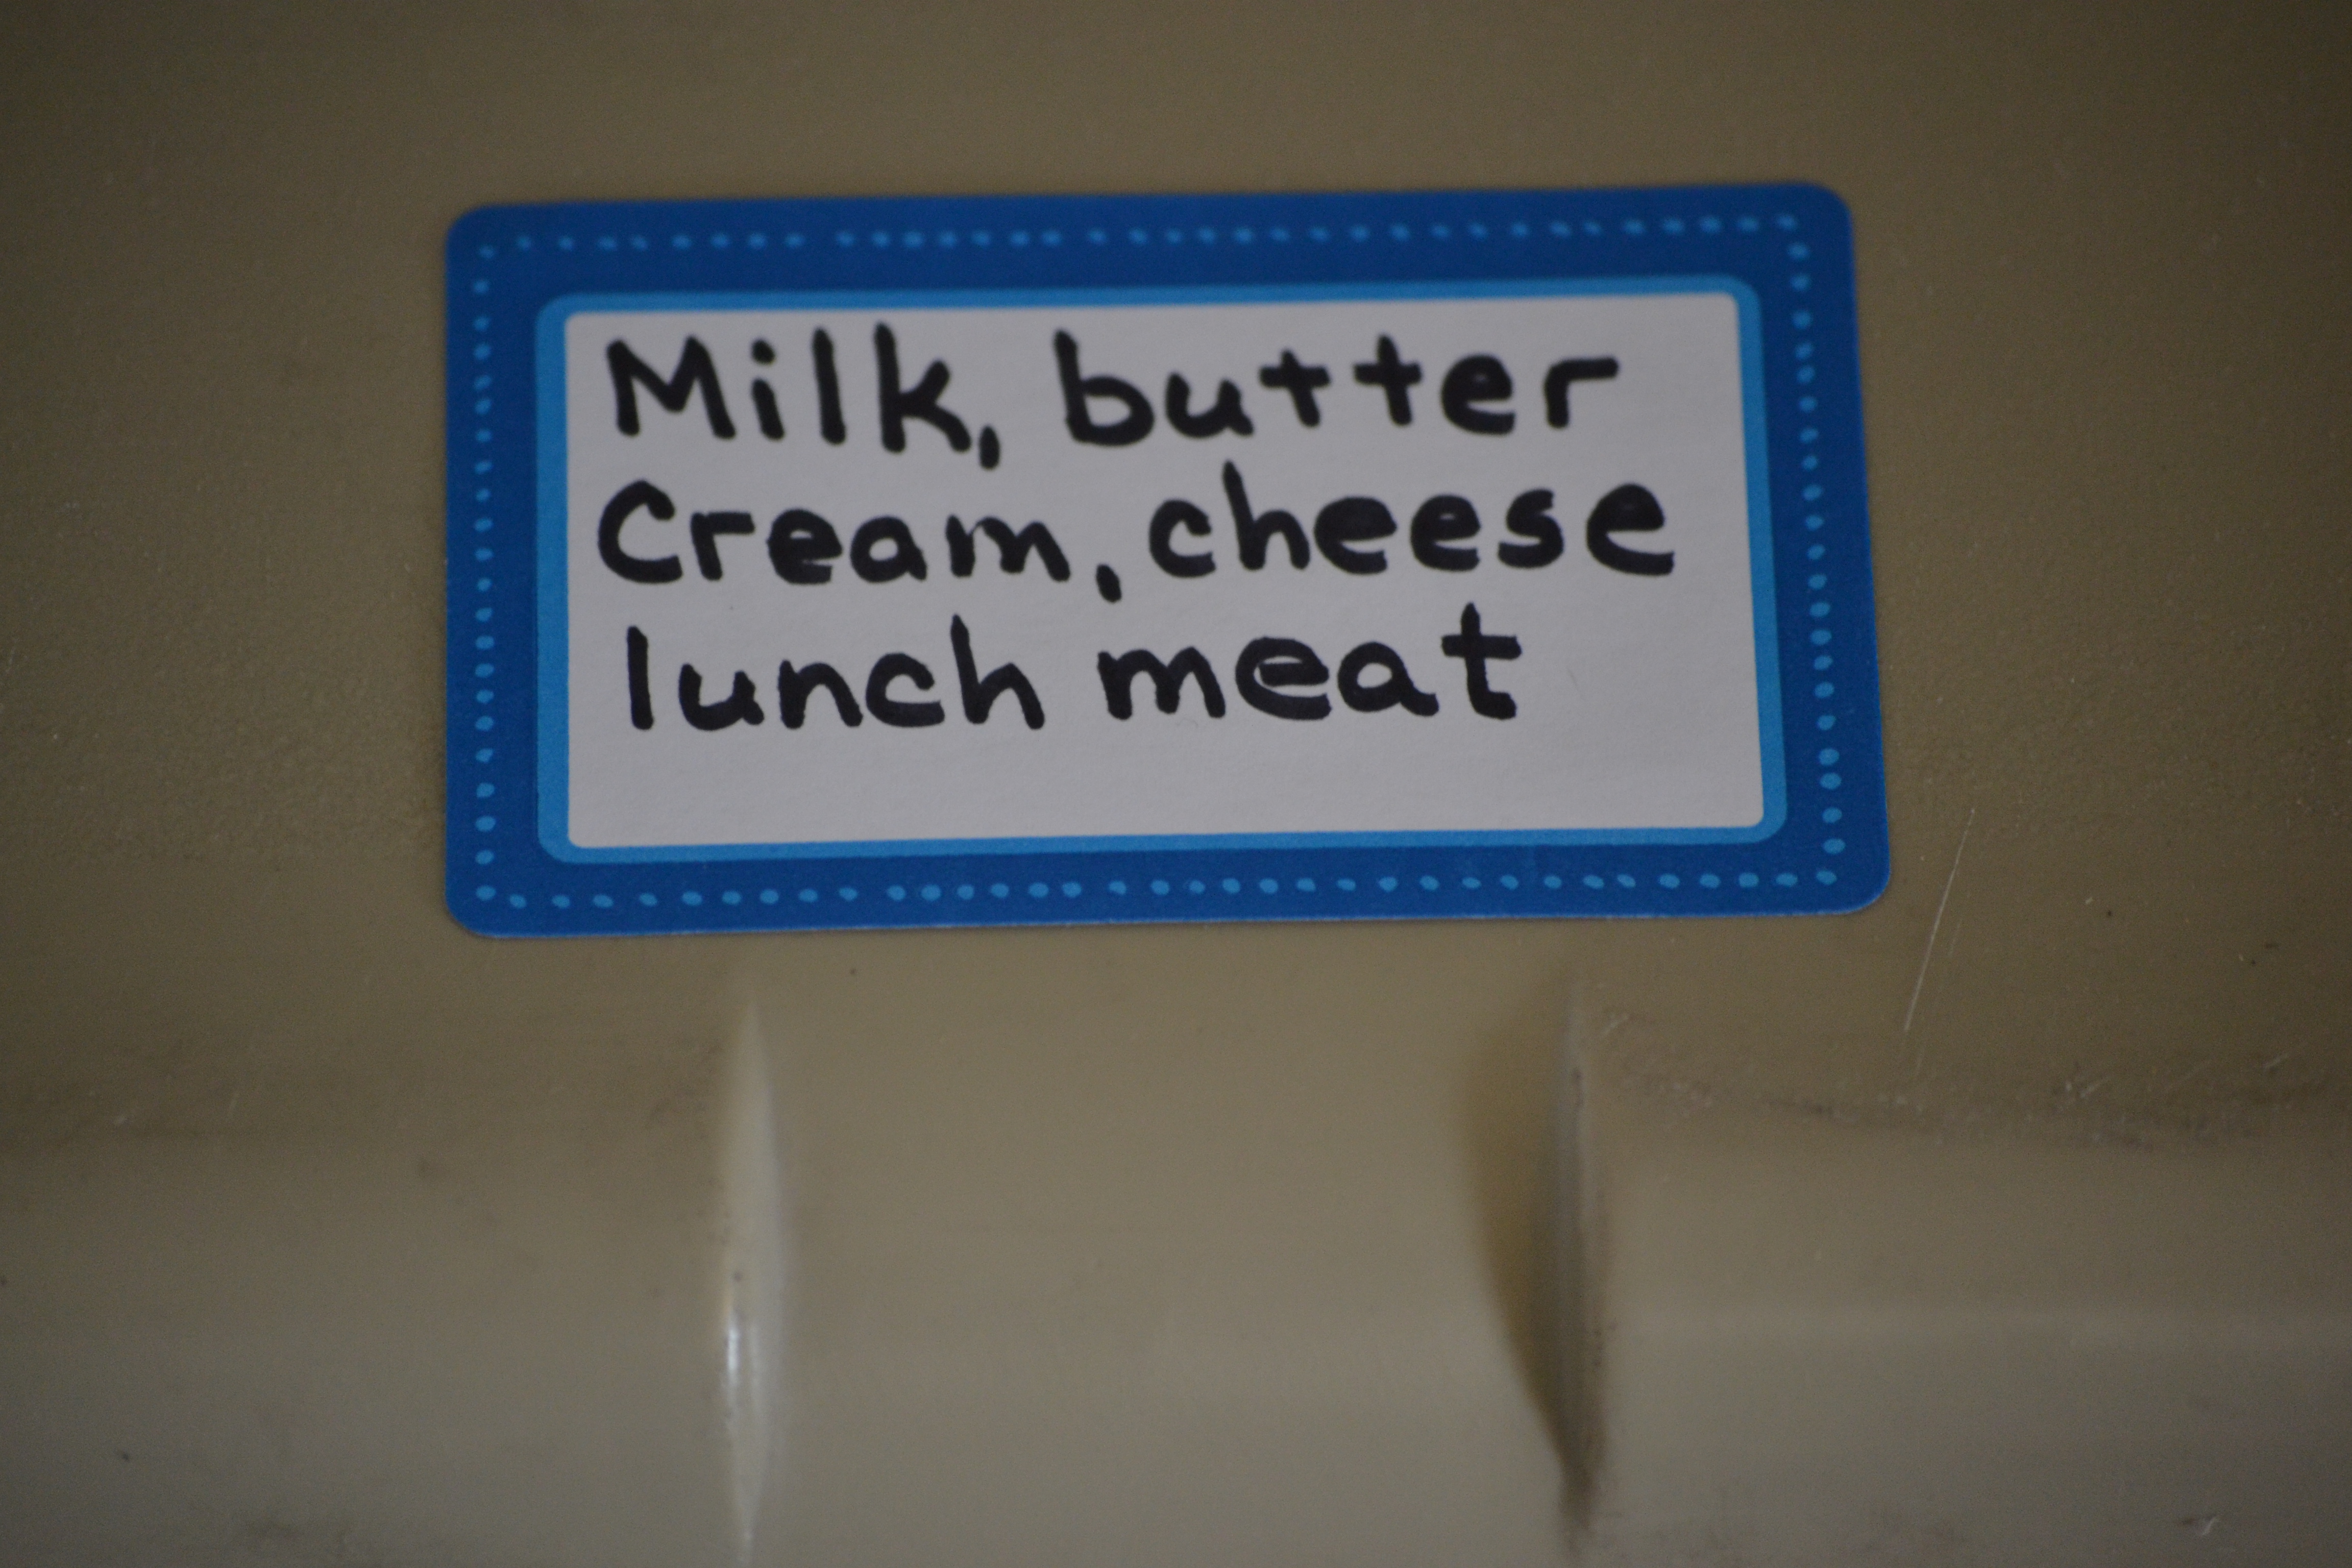
While most camping trips won’t need to accommodate this many people, over the years, the Deerslayer and I have honed the art of safe food transport. I have to admit that we used every one of the coolers in the picture. There are several tricks we’ve learned over the years that really make a difference when keeping packed food cold and/or frozen. Before a camping trip, we fill gallon jugs with water and freeze them. The frozen jugs are then used to “pre-chill” the coolers prior to packing. Starting with a pre-chilled cooler is worth the extra time. The jug can also be placed with refrigerated foods so that they don’t end up sitting in water. It’s always important to plan which foods will be prepared first. Those items should be packed together so that coolers aren’t opened unnecessarily. This year, we tried something new; we labeled the coolers so that we knew what was where, which prevented unnecessary loss of cold while rummaging through coolers. This worked really well.

.

Two of the middle coolers, called “105’s” held all the frozen food we needed for 4 meals for 40 people. In a previous post, I mentioned that I freeze foods like beans and carne guisada flattened in one-gallon zip bags so they stack easily. I added one block of dry ice, wrapped in a paper sack and kitchen towel to each cooler. The bottom cooler (a 125) held a week’s worth of iced beverages for four people. The others held all of our refrigerated foods. We used every single one and they performed amazingly.
Just an added note on how strongly the hunters feel about their Yeti coolers: The Deerslayer’s sister and her spouse were recently on a trip to Italy. Spouse received a text message (in Italy) that he shared. “Mike got a Yeti!”
Deerslayer’s sister asked, “Who’s Mike Gottayetti?”
It’s just a Deerslayer thang!
Too Much Bacon on a Camping Trip?
 Don’t make me laugh! A vital part of the preparation for the much-anticipated Deerslayer Clan camping trip is deciding how much bacon to take. I have a previous post that explains how I prepare the bacon ahead of time and toss it on the griddle to crisp up once we get to the campsite. The dilemma comes in the decision of “how much is enough?”.
This is a tricky question when it comes to bacon. Sure, everybody loves bacon and eggs for breakfast. But let’s not forget BLT sandwiches, topping for burgers and baked potatoes, breakfast tacos! Then there are the countless varieties available on the market. Thick or thin cut, center cut, peppered, jalapeno, applewood smoked, cider-infused.
As for me, It’s gotta be thick-cut, maple bacon. Granted, I’ve become somewhat of a “bacon snob” over the years. There are PLENTY of wine snobs out there, those who turn up their noses at lower priced choices. A box!?!? OMG. The way I look at it, If it suits your palate, and you’re with friends and family, drink it, damn it. I love the research where boxed wine is poured into bottles from expensive vintners and is slurped up with gusto by the “experts”. Bless their little, misguided hearts. I truly believe that the quality of a wine is directly proportional to the quality of the company with whom it is shared. Bacon is different. There’s good bacon and exceptional bacon!
My deerslayer came up with a bacon-cooking idea the other day that I was eager to try. I’ve been cooking bacon in the oven for several years now. It allows me to prepare 10-12 slices at a time. His idea produces perfect bacon.
Preheat the oven to 400°.
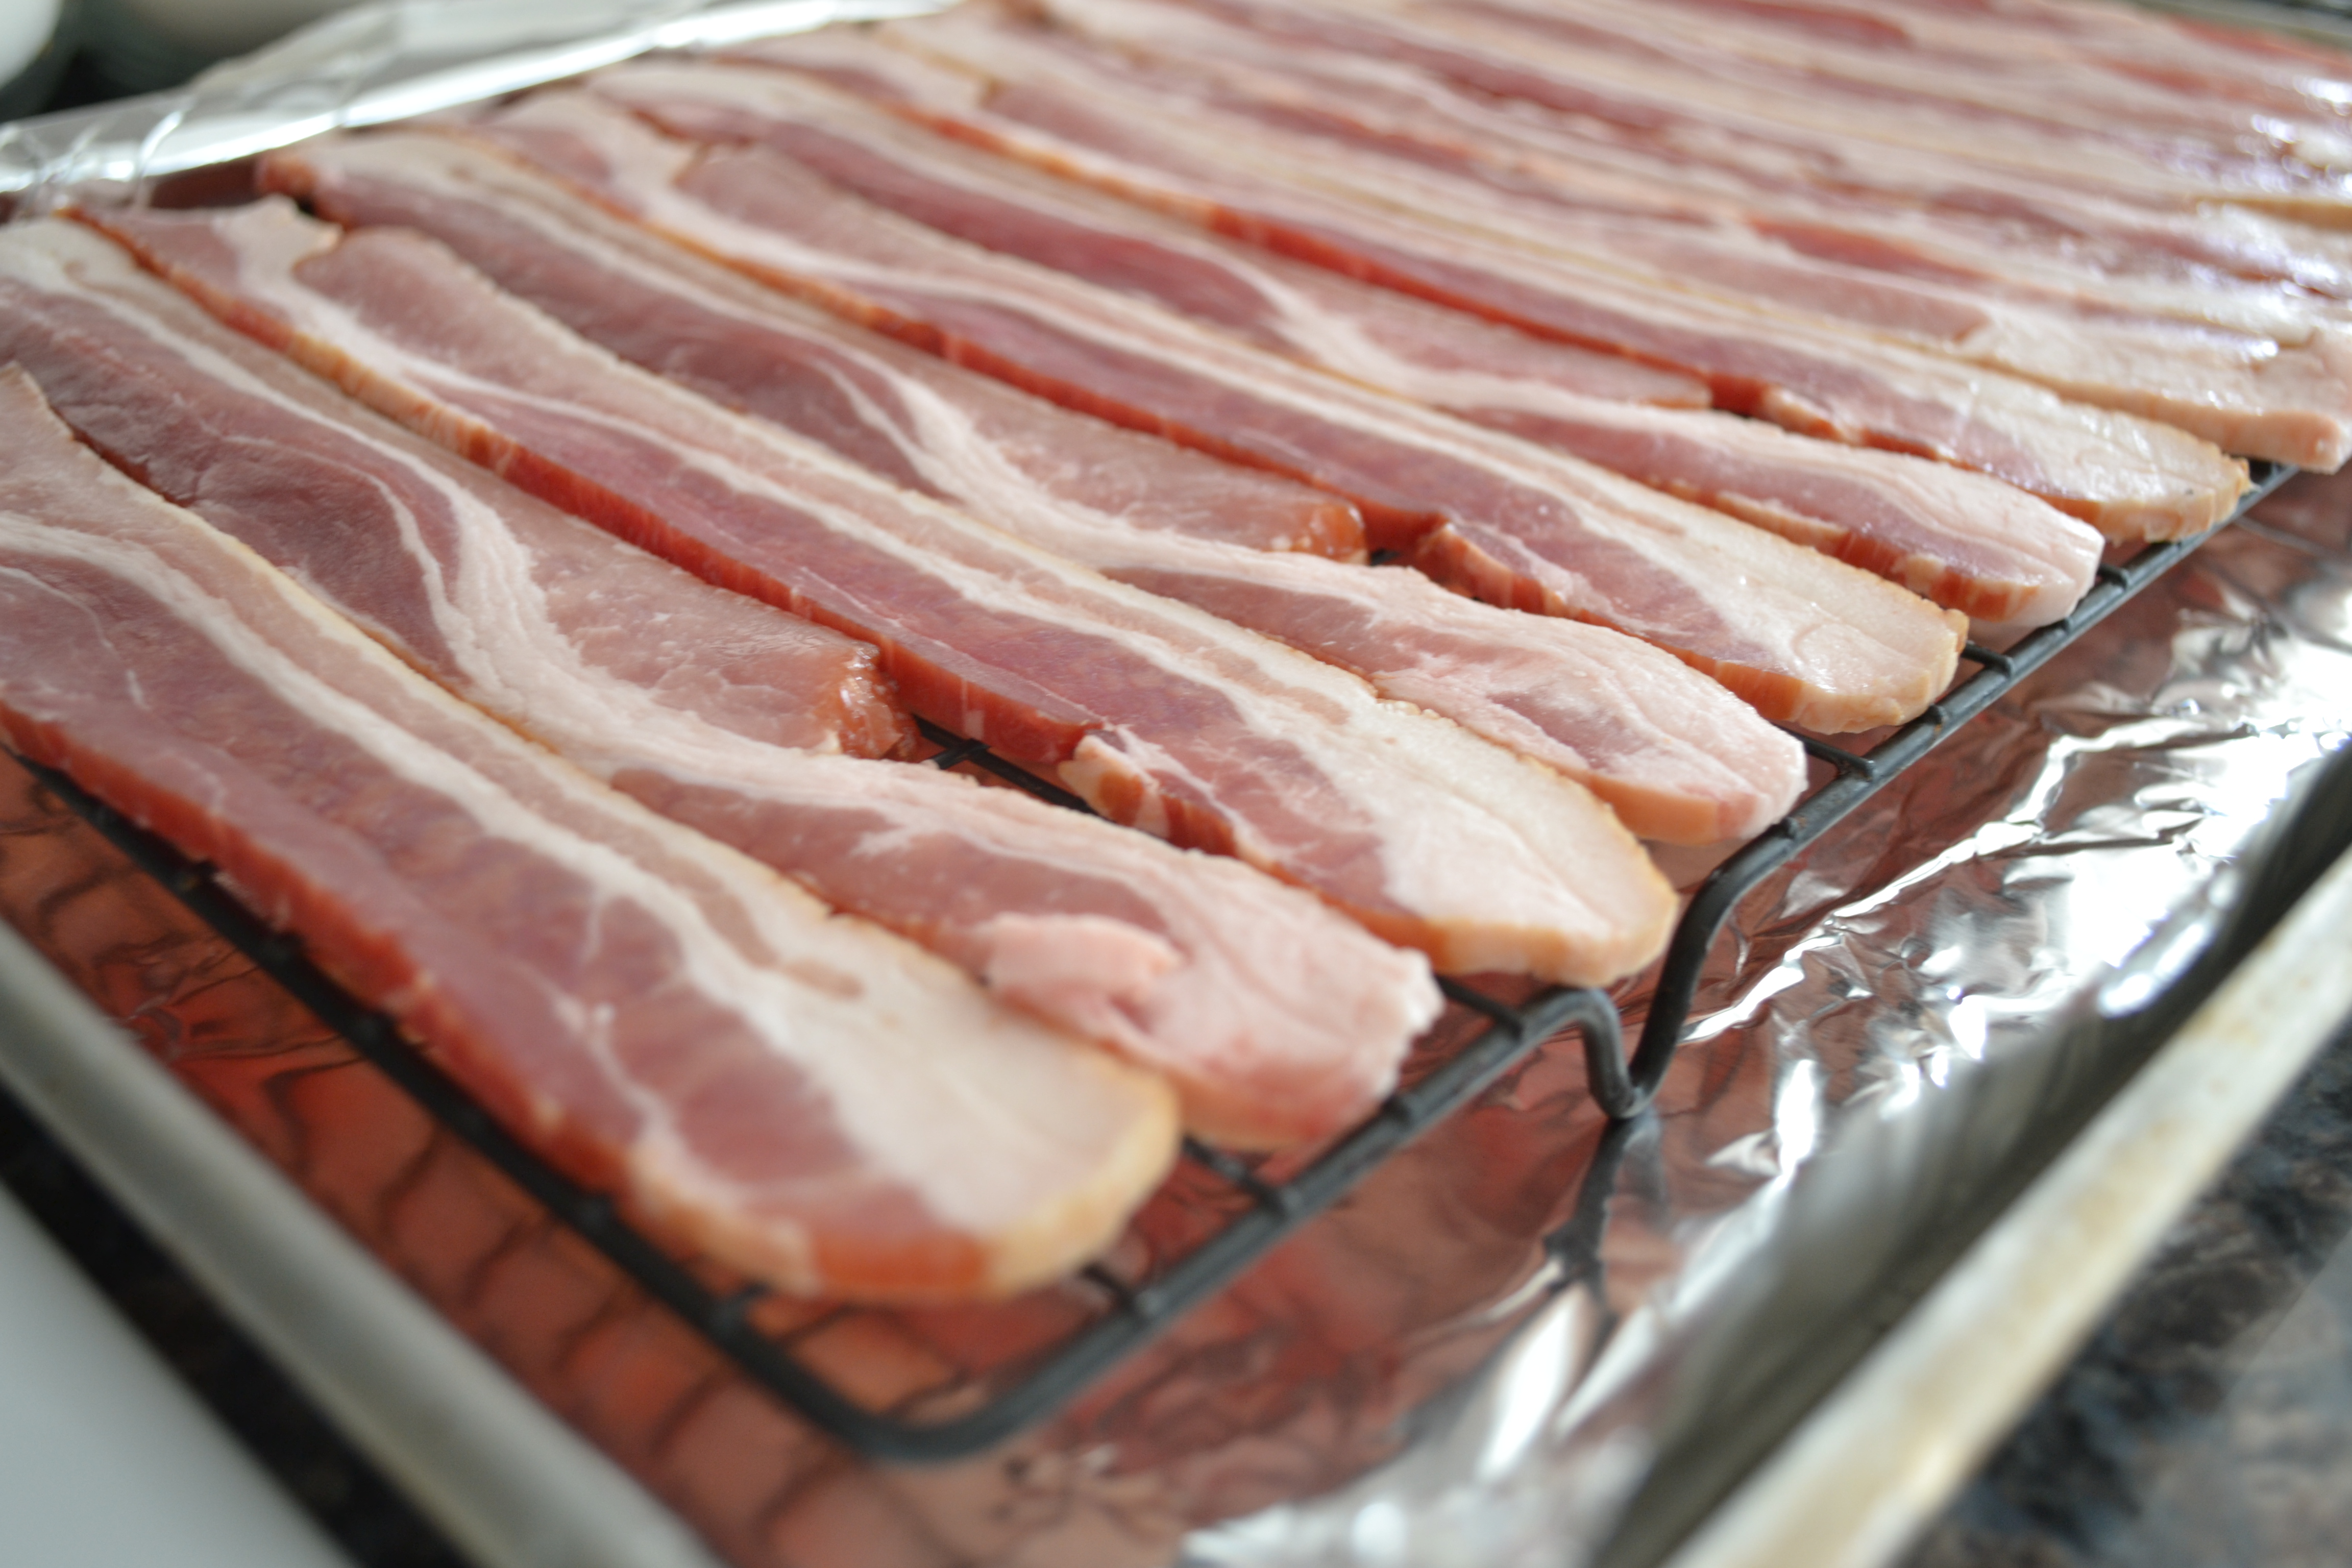
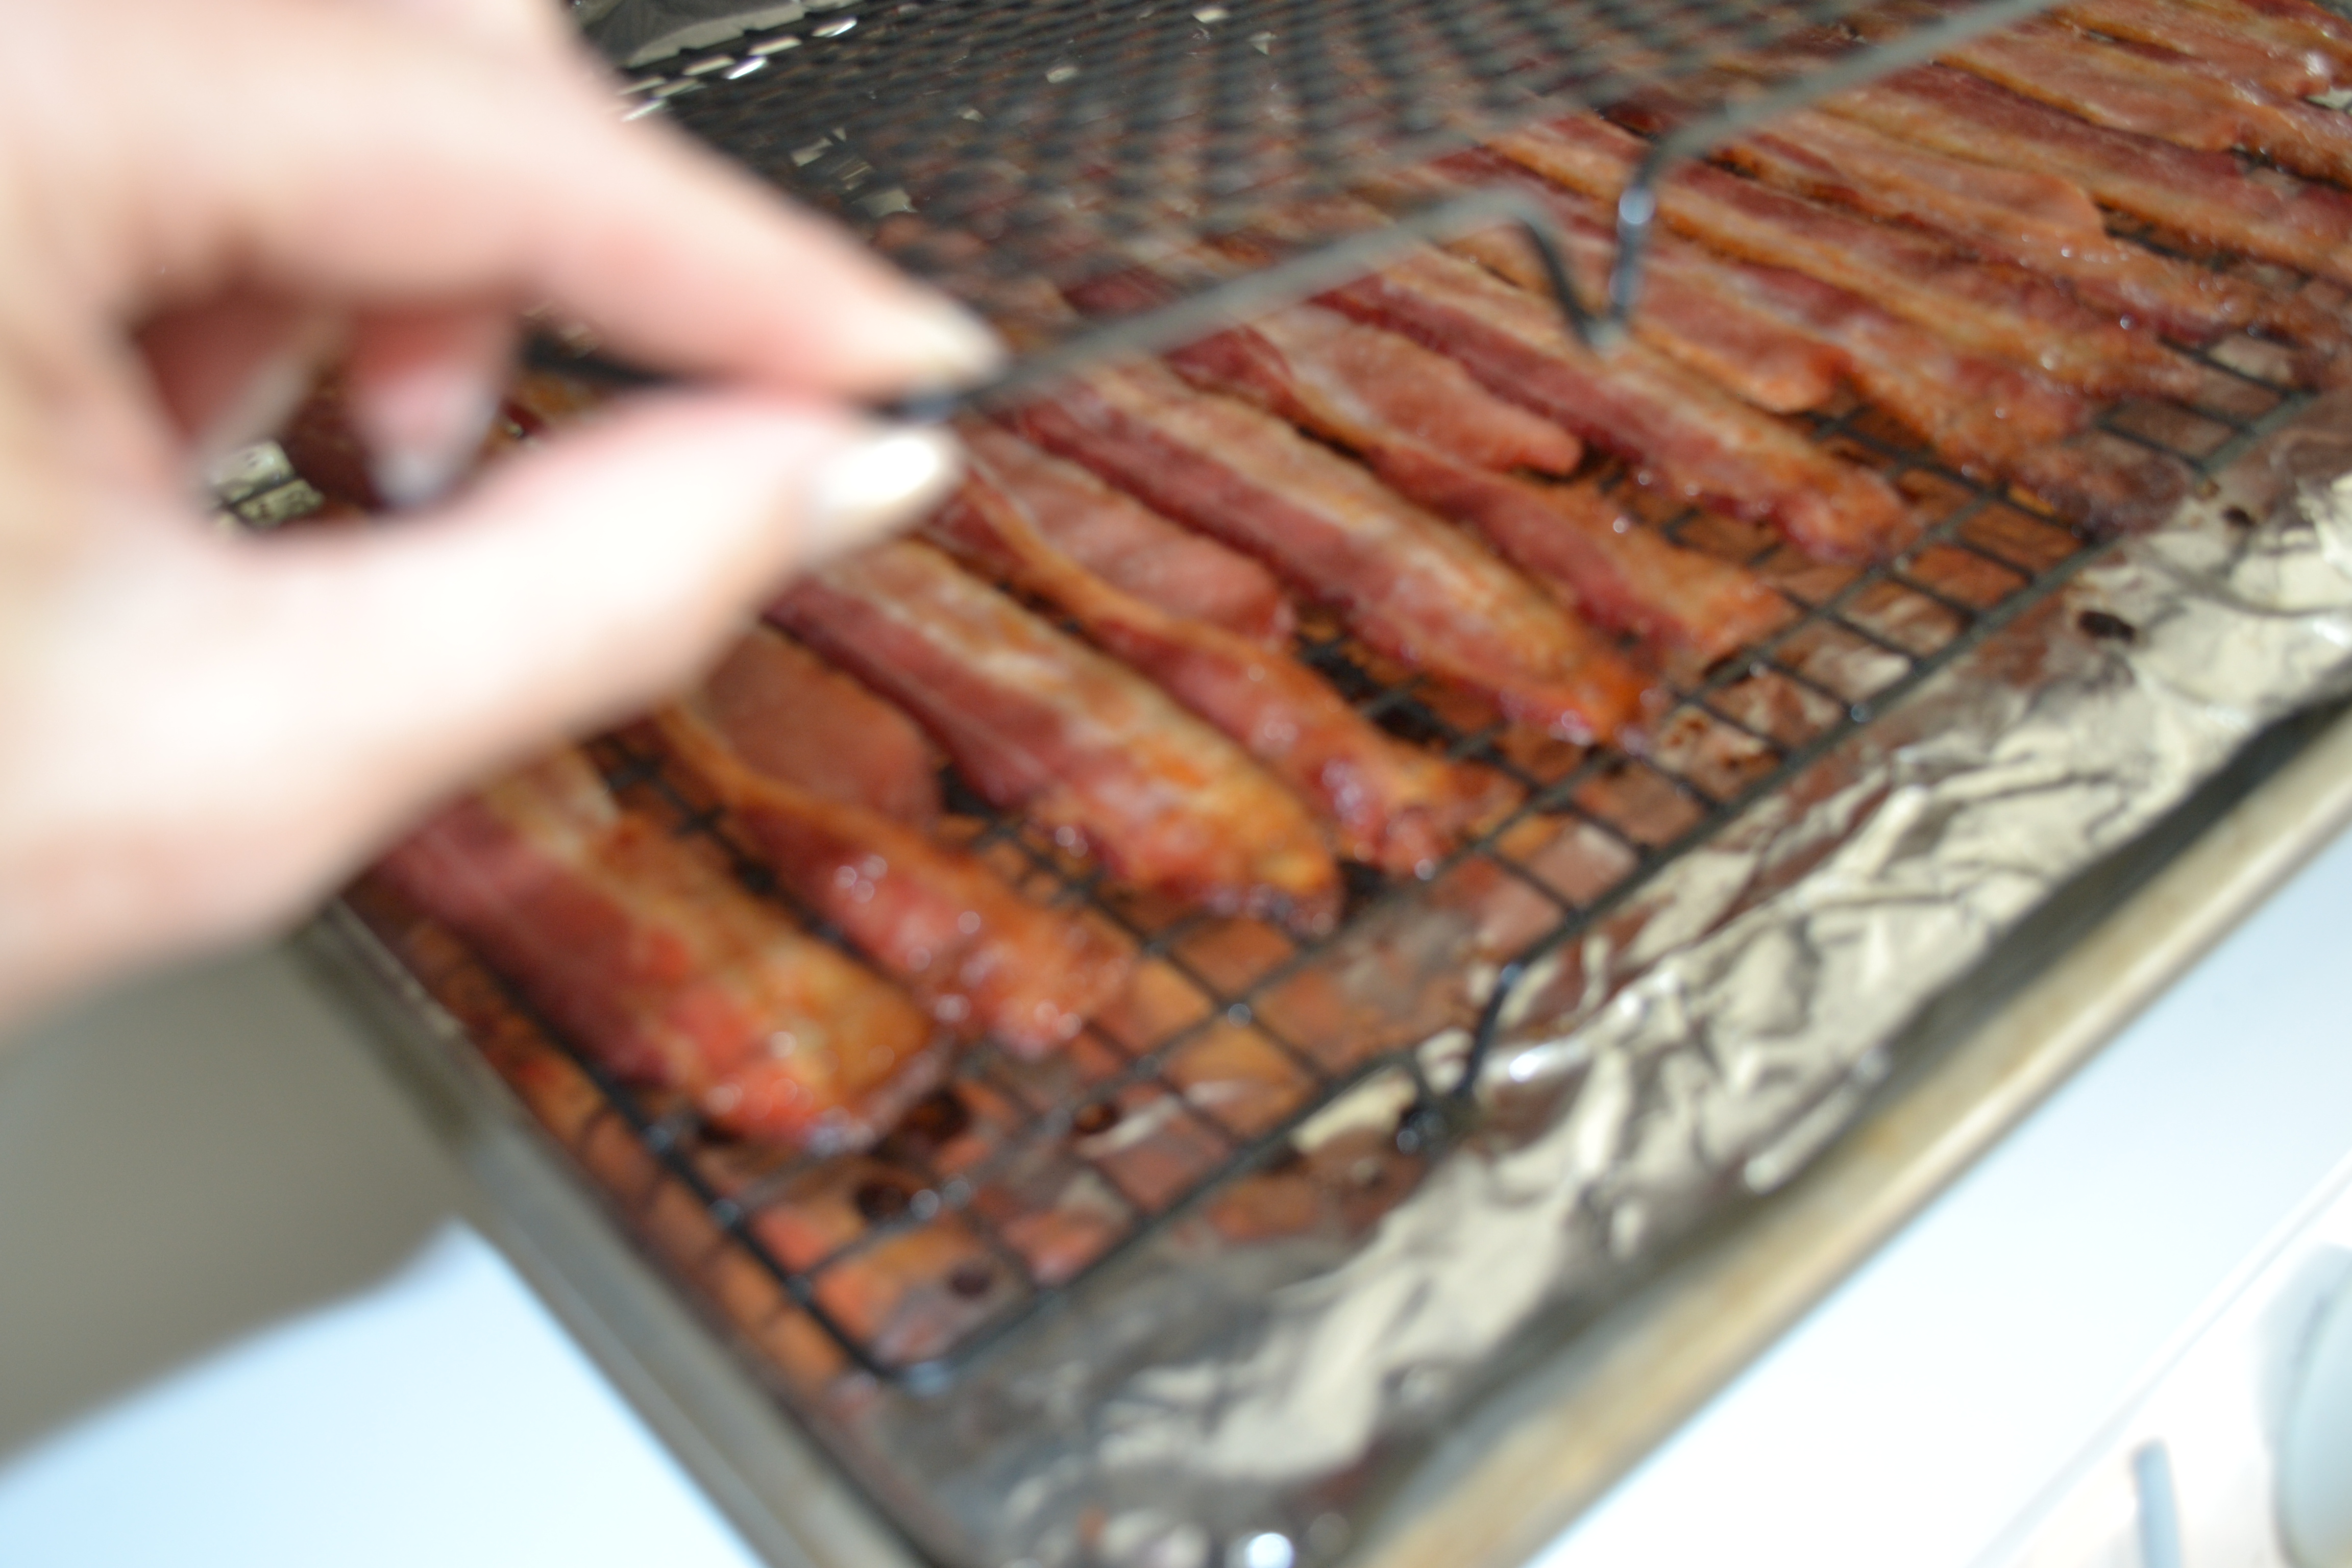
Place a sheet of heavy-duty aluminum foil on a cookie sheet with a 1 inch edge. I turn up the edges of the foil to catch the bacon drippings. Place a cooling rack over the foil and lay 10 to 12 slices of bacon on top. My deerslayer’s idea was to place an additional cooling rack atop the bacon to prevent it from curling.
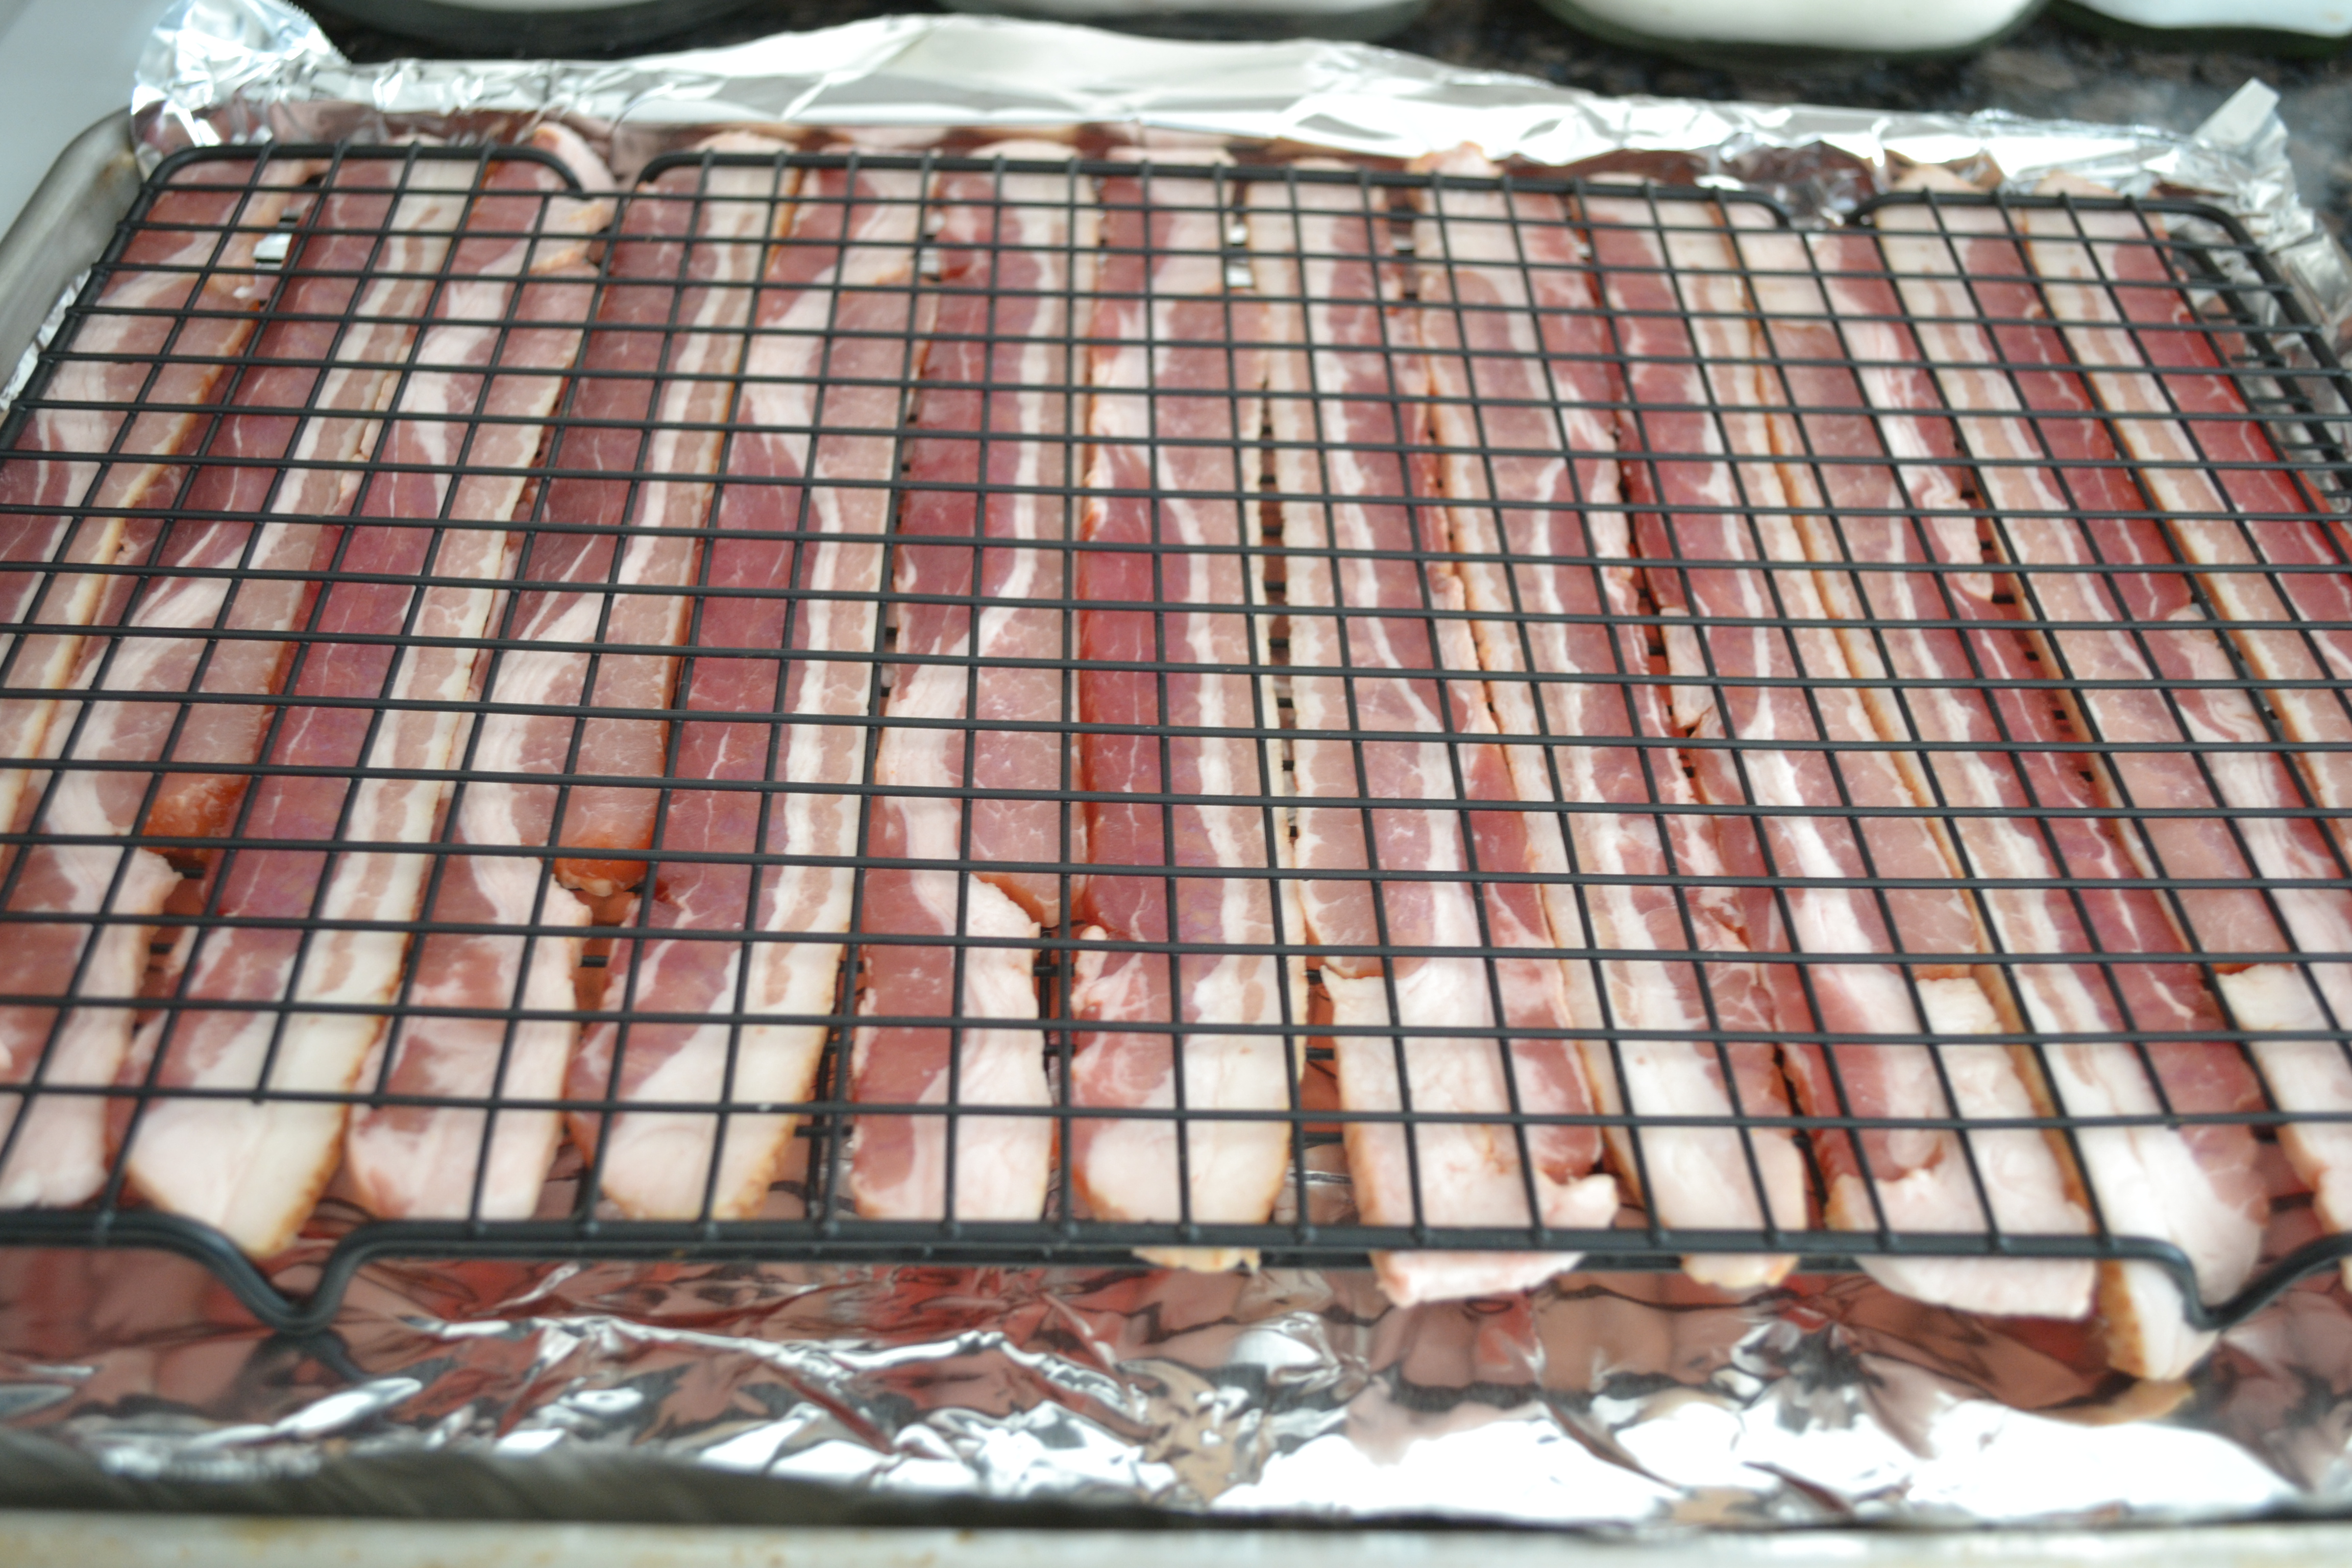
The process was flawless as was the bacon. Perfect slices after 20-25 minutes (depending on the oven)!

Camping Preparation Continues and Plain Ol’ Easy Venison/Wild Pork Hamburgers
 As we gear up for the big trip to Wyoming and the date draws near, the mess in the kitchen piles higher and higher. Every time I think of something that I won’t be able to get along without, it goes on the pile.
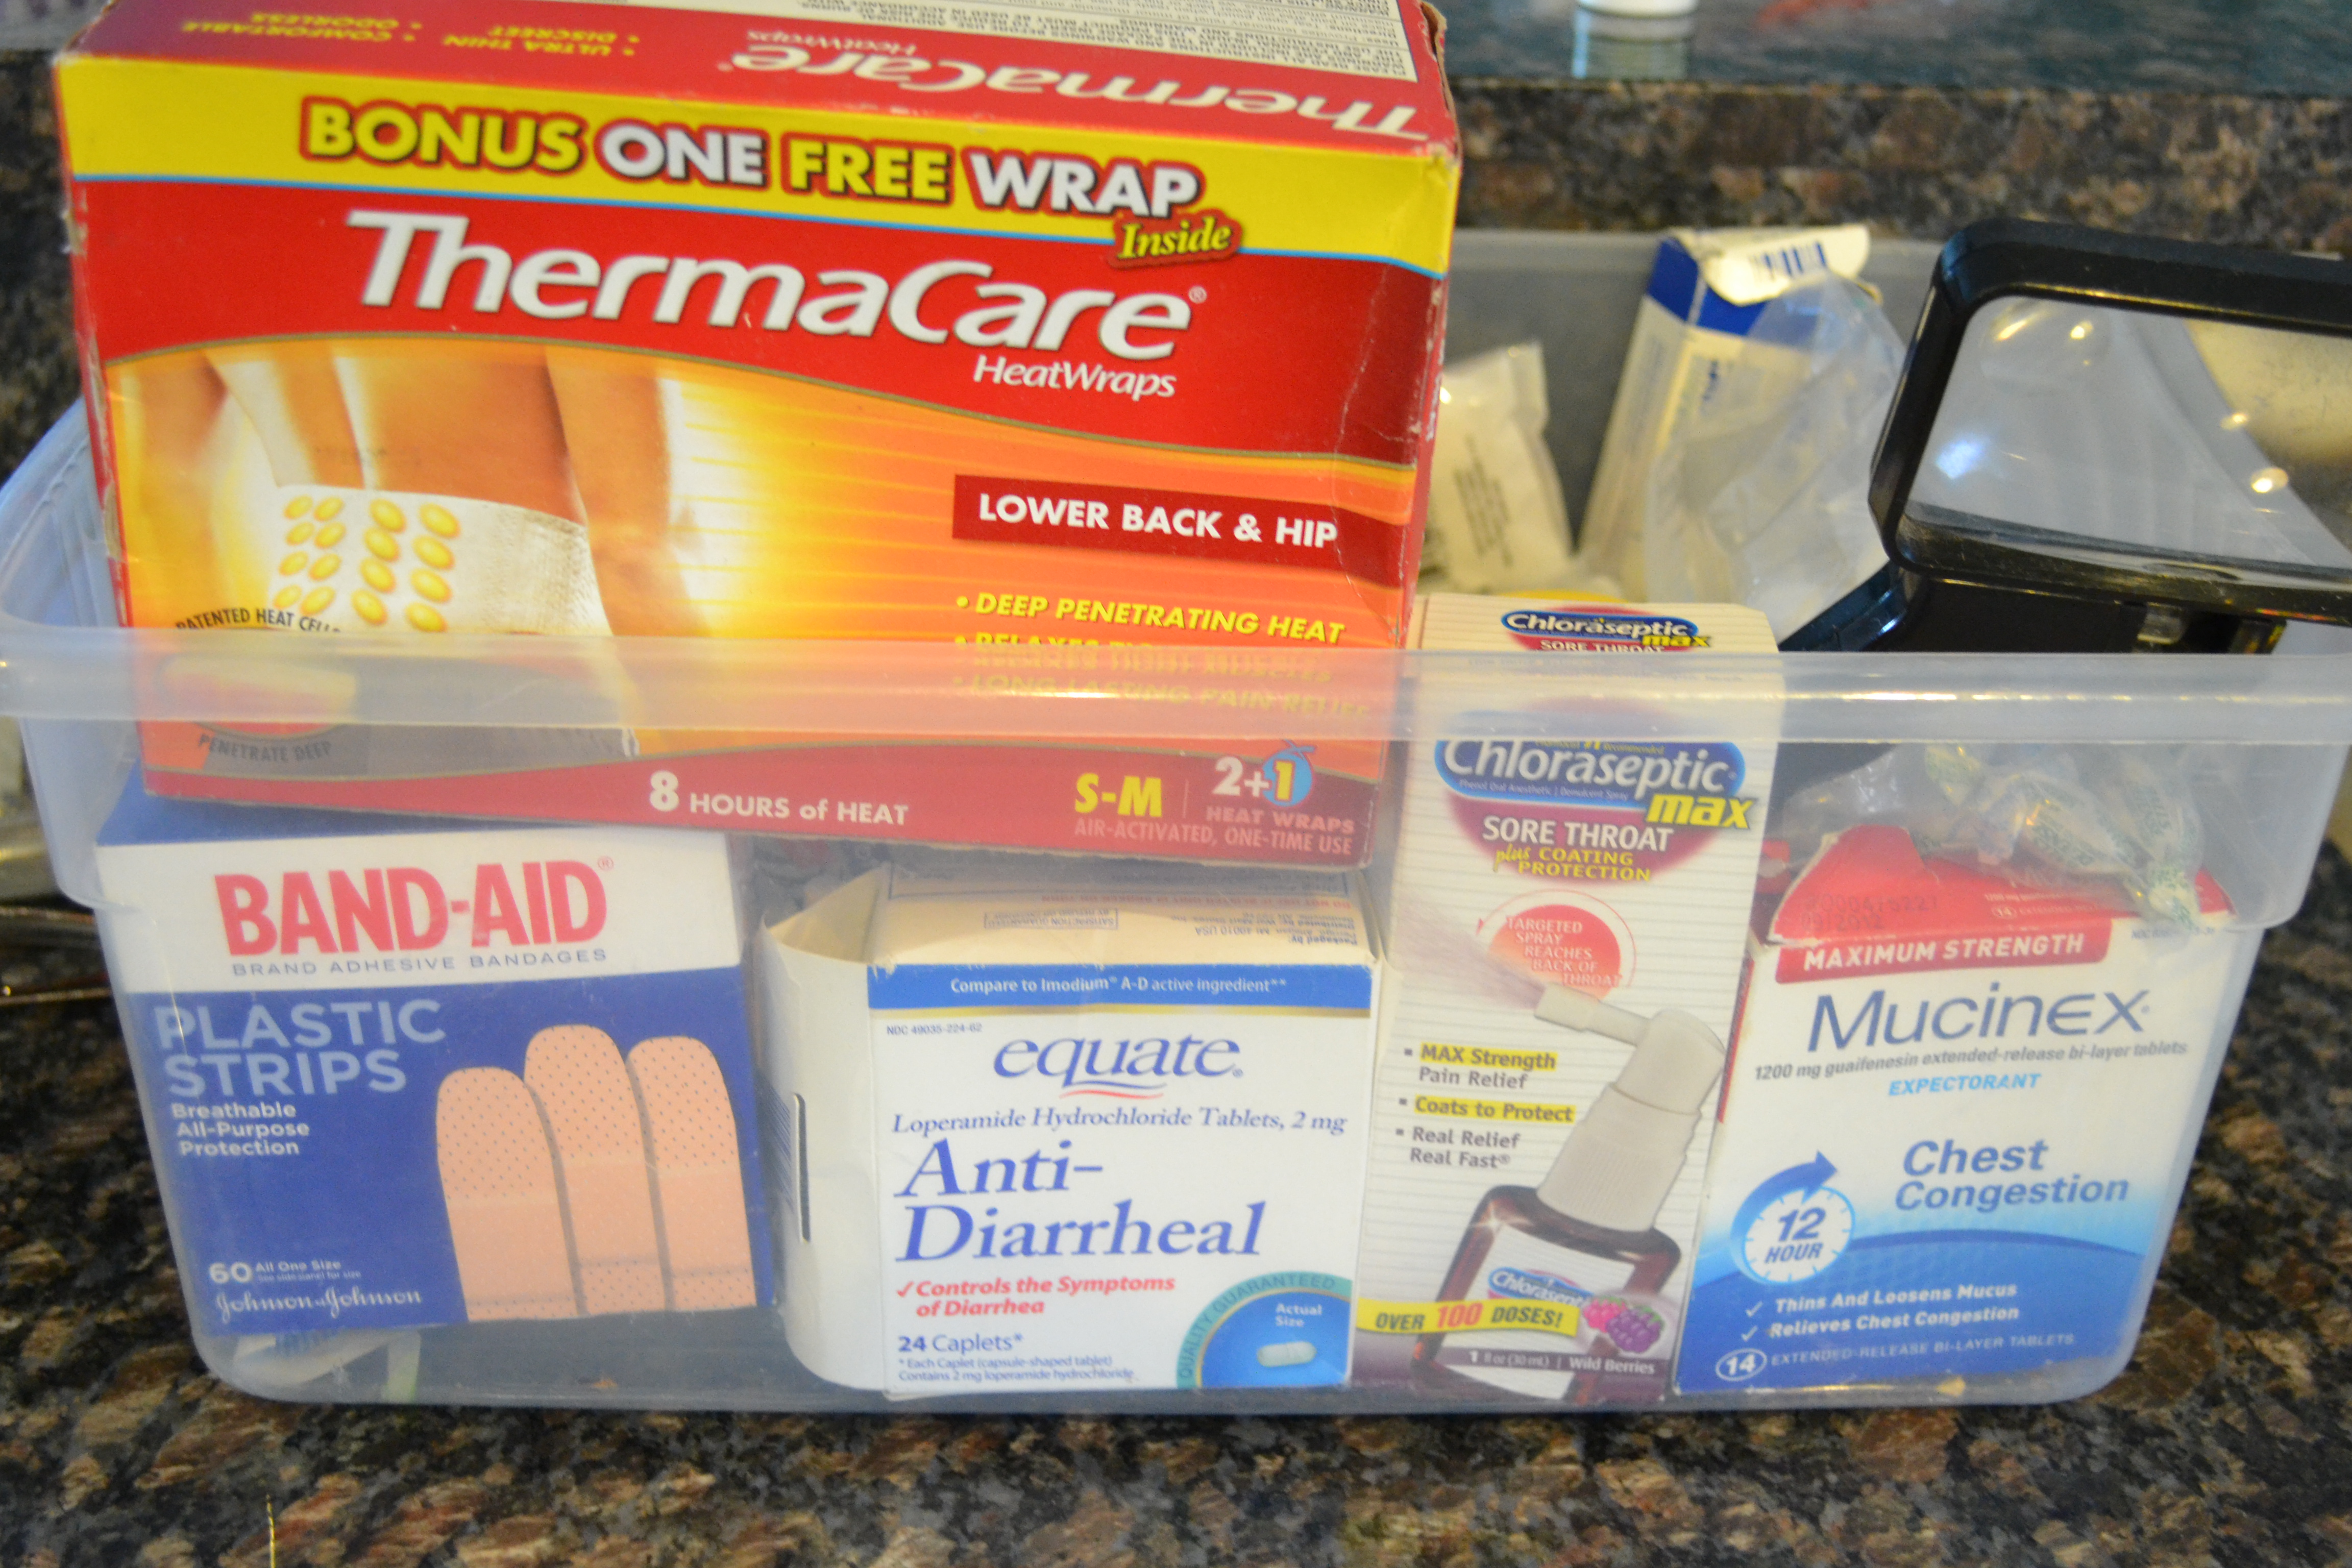
Yesterday, I worked on the medicine box. After many years of camping/hunting trips, we have, at different times, needed a variety of medications and/or first aid items. Our box is clear plastic so that we can easily and quickly identify and put our hands on necessary first aid or meds and includes (for all camping trips):
Band-aids, all sizes (including waterproof and stretchy for knuckles), butterfly sutures, triple antibiotic ointment, tweezers, magnifying glass, a needle for spinters and thorns, alcohol, hydrogen peroxide, and sterile pads & surgical tape
Acetaminophen, Ibuprofen, Naproxen, aspirin
Anti-diarrheal meds, Benadryl, Sudafed, Various sore throat and cough lozenges, sore throat spray
Sun screen, aloe gel
Thermacare heat wraps for backs and necks
Any prescription meds required by various campers in your group
Candied ginger (works wonders for upset stomach and motion sickness)
Benadryl capsules – I have discovered that, not only is this med. effective for allergy symptoms, but it has worked for us as a topical relief for itchy insect bites. My junior deerslayer and I are particularly susceptible to mosquito bites. We opened a Benadryl capsule, made a paste with water, and applied it topically to the affected bites. The paste relieved the itching and reduced the swelling. While I can’t vouch for others, know that we don’t camp without Benadryl capsules close at hand.
Remember, I’ve traveled with or camped with kids for many years. “Always be prepared” is the mantra of all parents. Also, I suffer from allergies so I keep a well-stocked medicine box that I update periodically to ensure that nothing is past its expiration date .While many may say that my first aid list seems a little excessive, keep in mind that everyone’s situation and needs are different. Also keep in mind, though, that nothing can ruin a good camping/hunting trip more than a pesky intestinal or allergy-related problem or a cactus encounter that might have been remedied with just a little fore-thought.
In addition to preparing the first aid box, I’ve continued to plan for our meals for the two weeks we’ll be on our trip. I’ve prepared and frozen food for four dinners for 50 people. I’ve decided to bake and freeze Cranberry-Rubbish Muffins for several breakfasts. I made arrangements with my local source for farm fresh eggs and homegrown tomatoes to pick up plenty of both for the trip. That will take care of several more breakfasts (huevos con chorizo) and BLT sandwiches for lunch. The homegrown tomatoes will also make for some superb pico de gallo. (My last entry.)
An old stand-by for a fast and fabulous camping meal is Plain Ol’ Easy Venison/Wild Pork Hamburgers. These burgers are so flavorful due to just a couple of key ingredients. Garlic and Knorr’s Caldo de Tomate con Sabor de Pollo (Tomato Bouillon with Chicken Flavor). This stuff is worth its weight in gold. It also adds beautiful flavor and color to Mexican Rice. Of course, you doctor them up as you desire with things that you can transport easily.
Plain Ol’ Easy Venison/Wild Pork Hamburgers
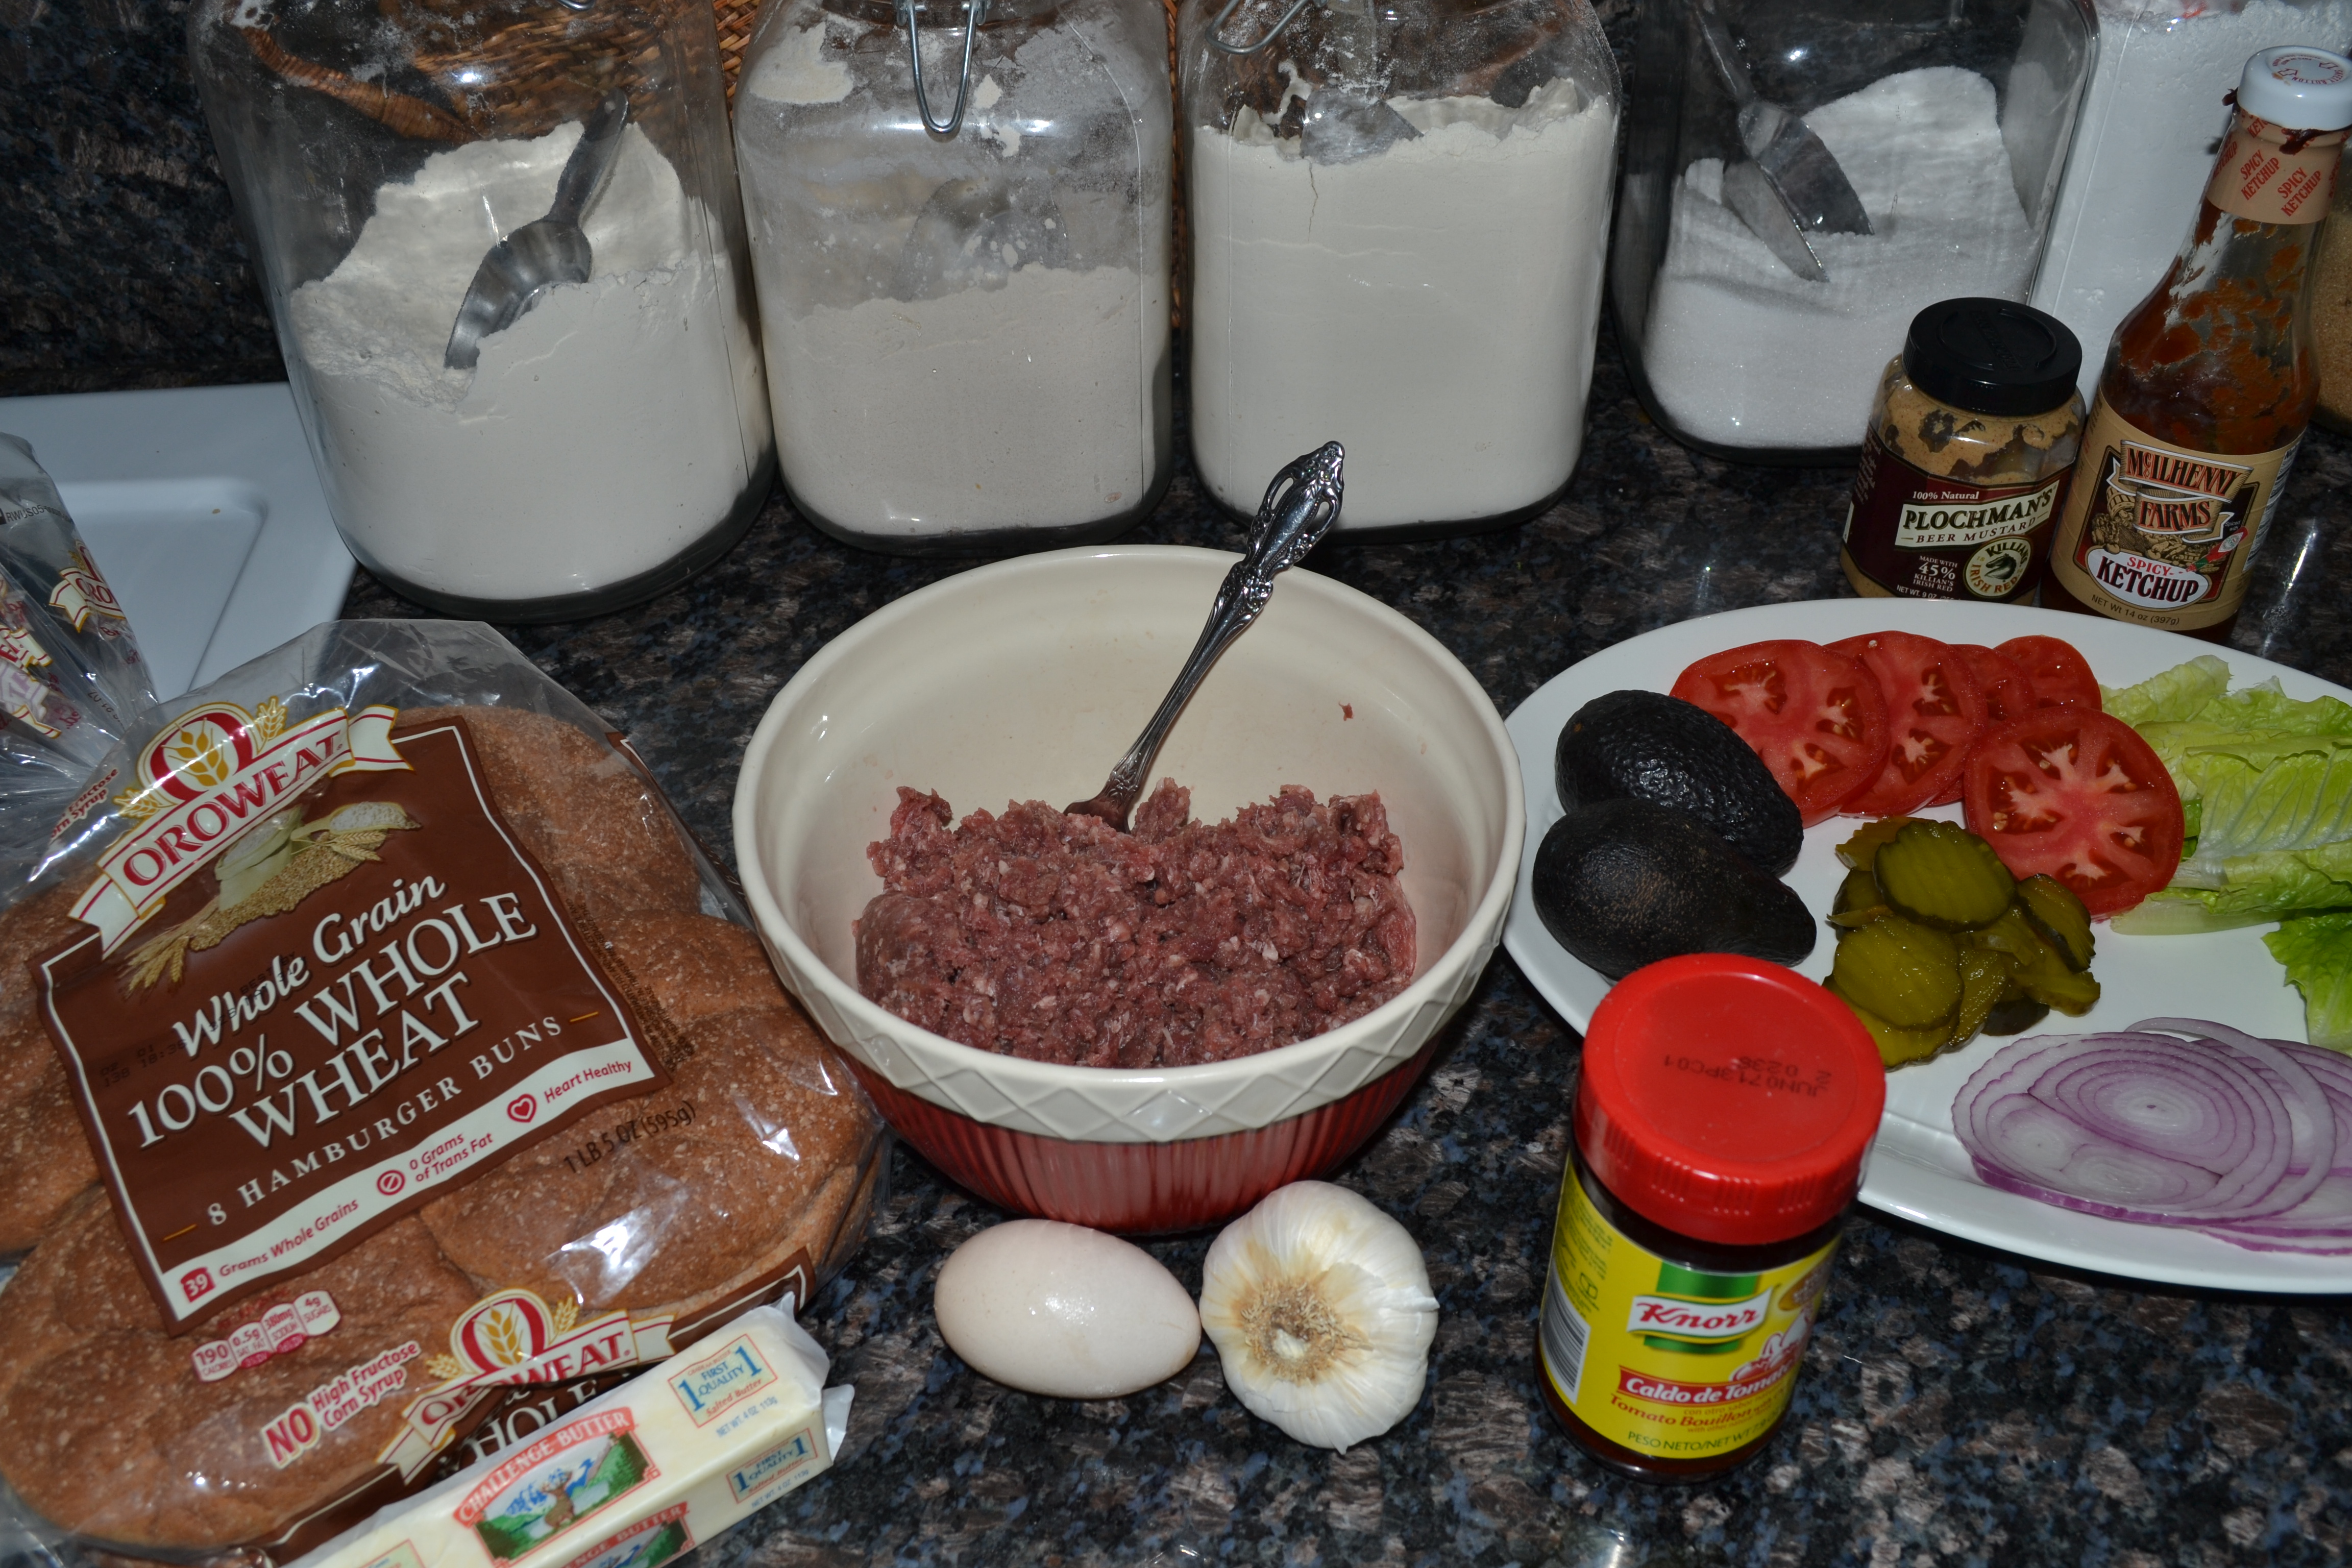
1 lb. ground venison and wild pork
1 egg
3 cloves garlic, chopped (or a tbsp. minced garlic to save time)
1½ tbsp. Knorr’s Pollo y Tomate bouillon (Chicken and tomato)
1 tsp, pepper

4 Hamburger buns
All the trimmings
1. In a mixing bowl, combine ground meat, egg, garlic, and bouillon. Shape into four patties and throw on the grill. Cook to medium. Add good cheese (Awesome cheddar or blue cheese) and melt.
2. Toast buns on a cast iron griddle in some butter or on the grill.

3. Doctor up as desired. Easy Peasy! Perfect for camping!

For a camping trip, it’s easy to prepare the meat with the seasonings before leaving home. Hamburger patties could also be prepared ahead.
Camping and Pico de Gallo (and skinning fajitas!)
 This is the time of year that I enjoy the most. My younger junior deerslayer and I have finished up her homeschool year. My older junior deerslayer turned 24 today. With these milestones under our belts, the entire family has switched into camping mode. We are pulling out camping lists, preparing menus, and beginning to cook and freeze the meals that we will prepare for the annual Deerslayer Clan camping trip to Wyoming. This year we will be staying for two weeks.
With plenty of planning, the trip should be twice as much fun as in previous years. The first thing that we did was to have our camper thoroughly checked out by a local RV place. They did yearly maintenance that included checking seals all around to insure that everything is water-tight in case of heavy rain. (It’s been an issue in the past.) They also checked the batteries and electrical system. (It’s been an issue in the past) They checked the bearings and tire pressure. (Also been an issue!)
We’ll be filling propane tanks and cleaning out coolers this weekend.
I’ve prepared and frozen 9 dozen wild pork enchiladas. They were frozen in 9 x 13 casserole pans and transferred to gallon freezer bags. I’ll prepare the gallon of creamy poblano sauce a couple of days before we leave. I’ve also prepared 1 ½ gallons of bean soup and transferred it to gallon bags which I lay flat on a cookie sheet. I’ll be making Mexican Rice for 50 people this weekend. I discovered that parboiled rice doesn’t get sticky and can be reheated in batches with a little broth in a large cast iron skillet and transferred to aluminum trays for serving.
Every year, my Deerslayer prepares fajitas for the entire crew. This is no small feat! Fajita meat, also called skirt steaks, requires removing skin (usually even the skinless ones). For this reason, until the last 20 years or so, fajita meat was some of the cheapest you could buy in the South, because of the work involved in preparation. With the increased popularity of fajitas nationwide, the cost has continued to rise. Same amount of work, just quadruple the price. Go figure!

Fajitas, like I mentioned before, require skinning. This process is very similar to removing the silver skin or fascia from venison or elk. The skin can rather easily be lifted and removed using a sharp filleting knife. I have my favorite that I bought in the fishing area at Academy Sporting Goods.
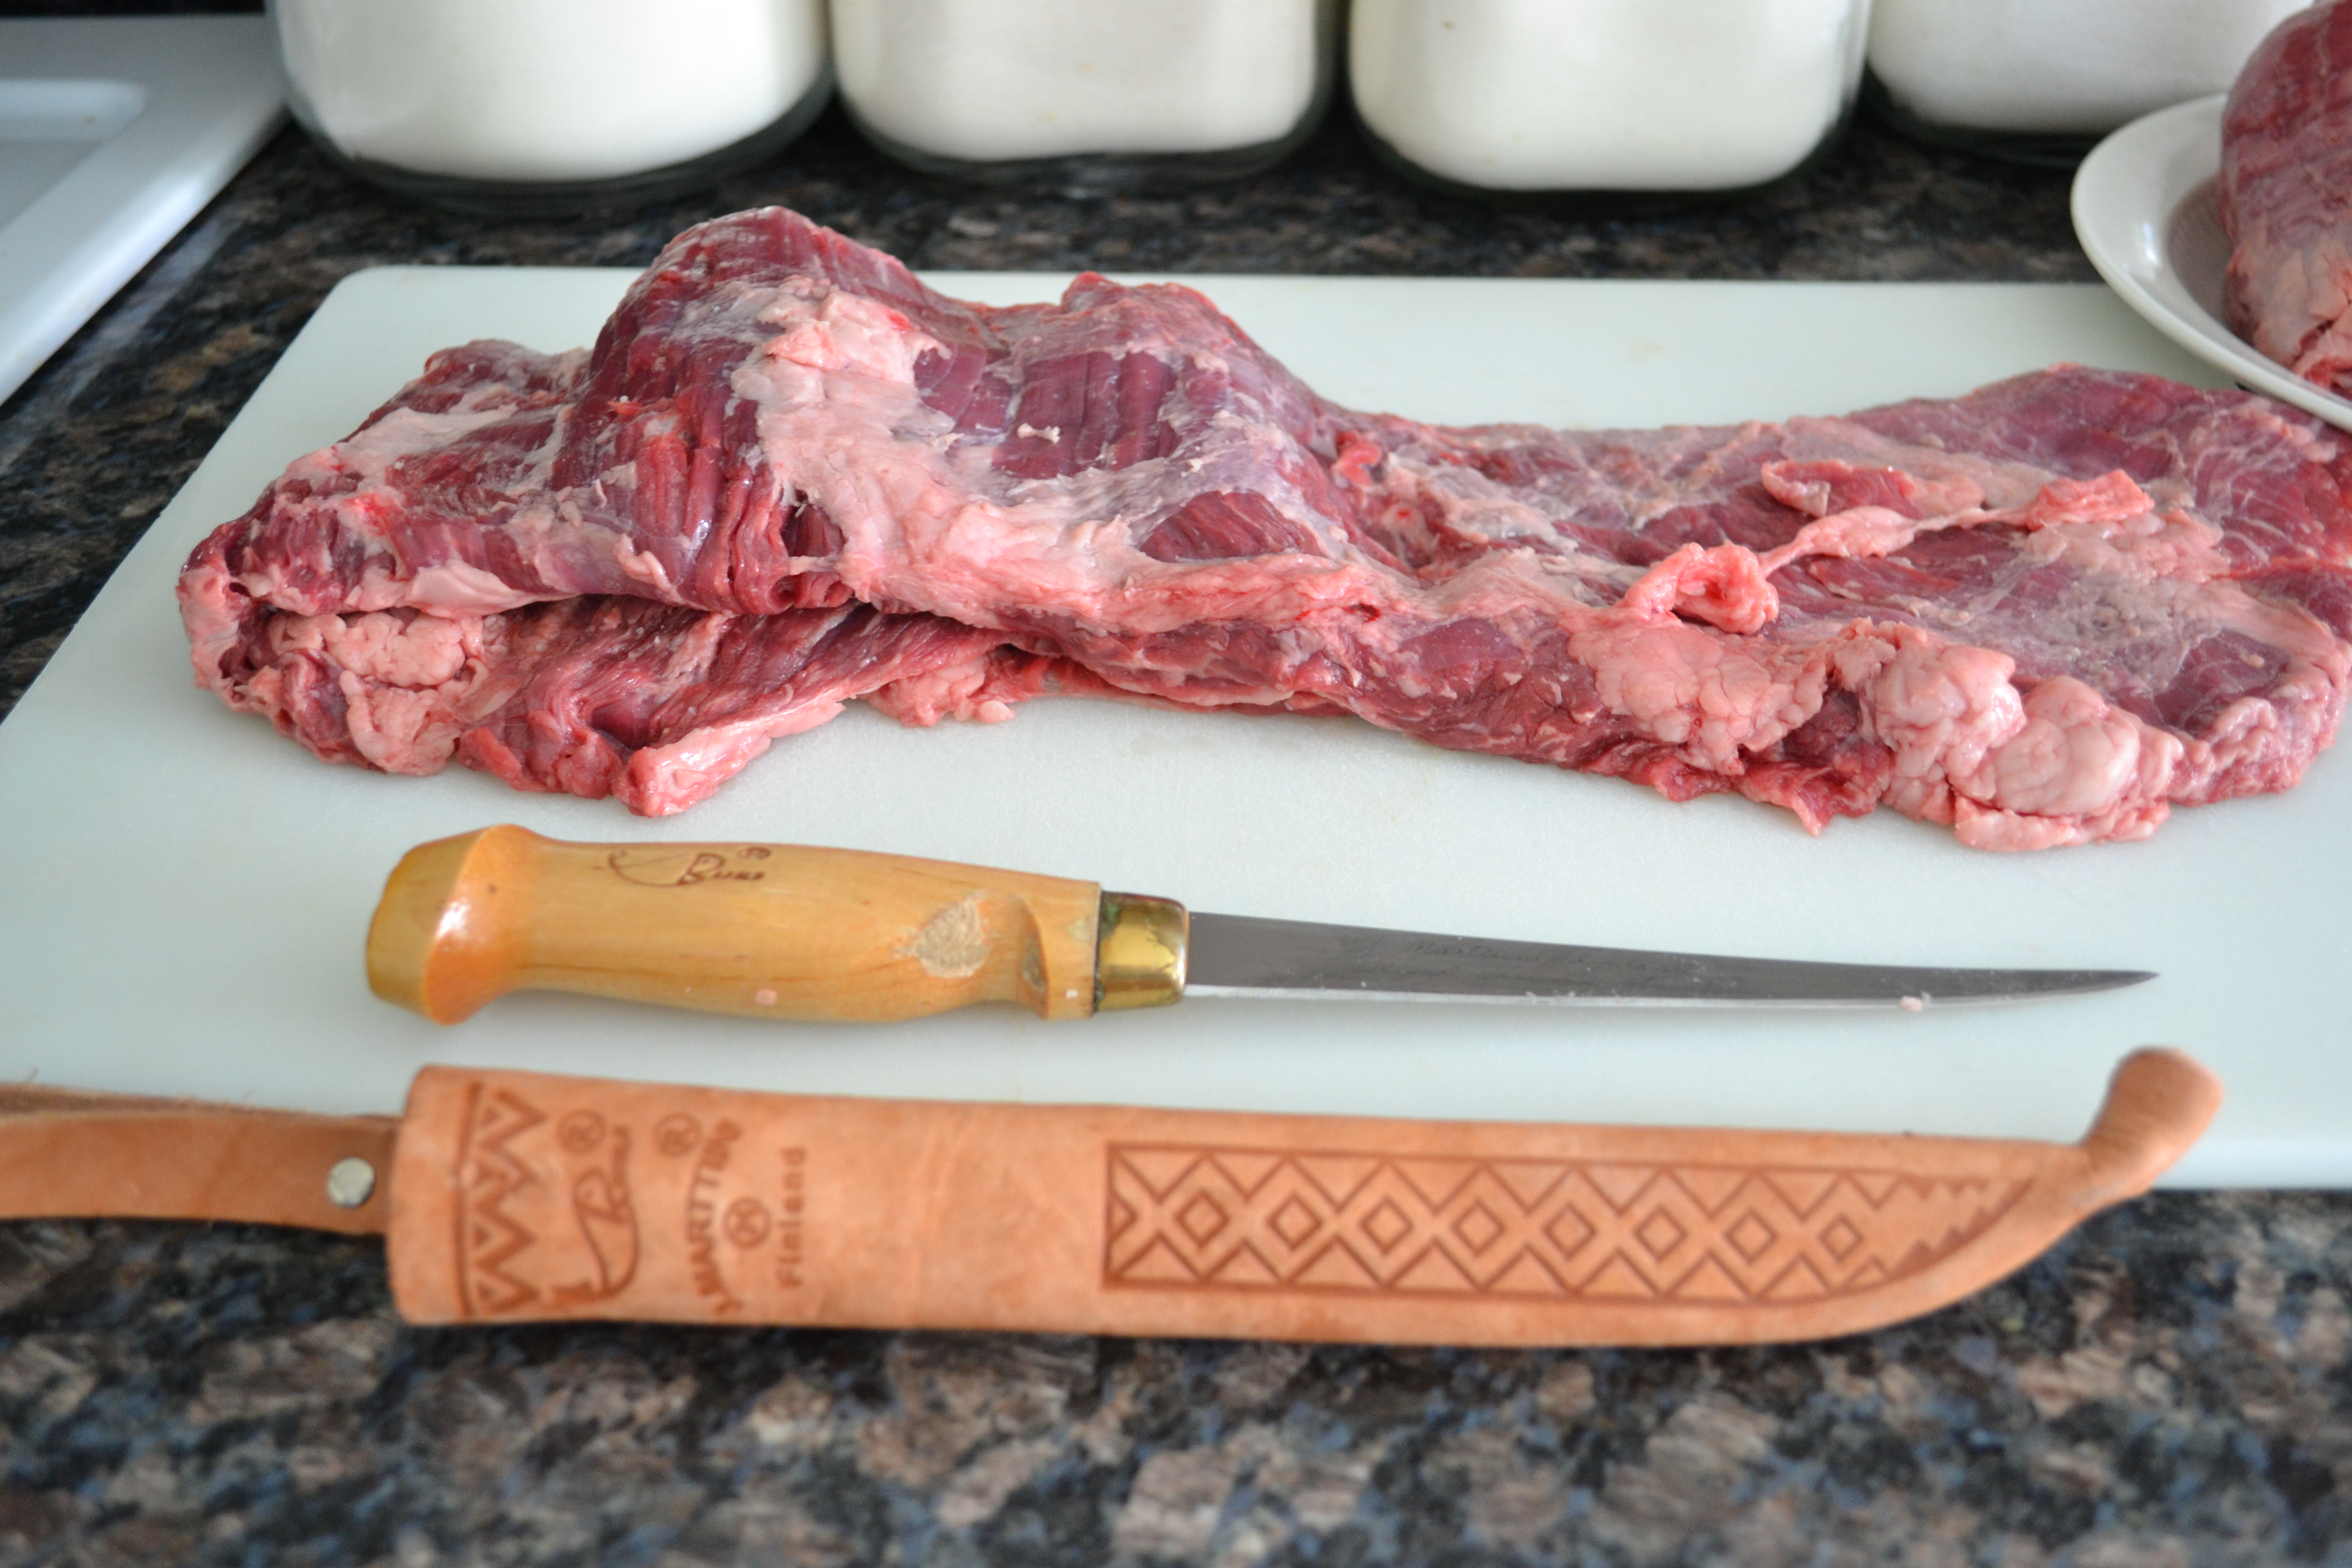
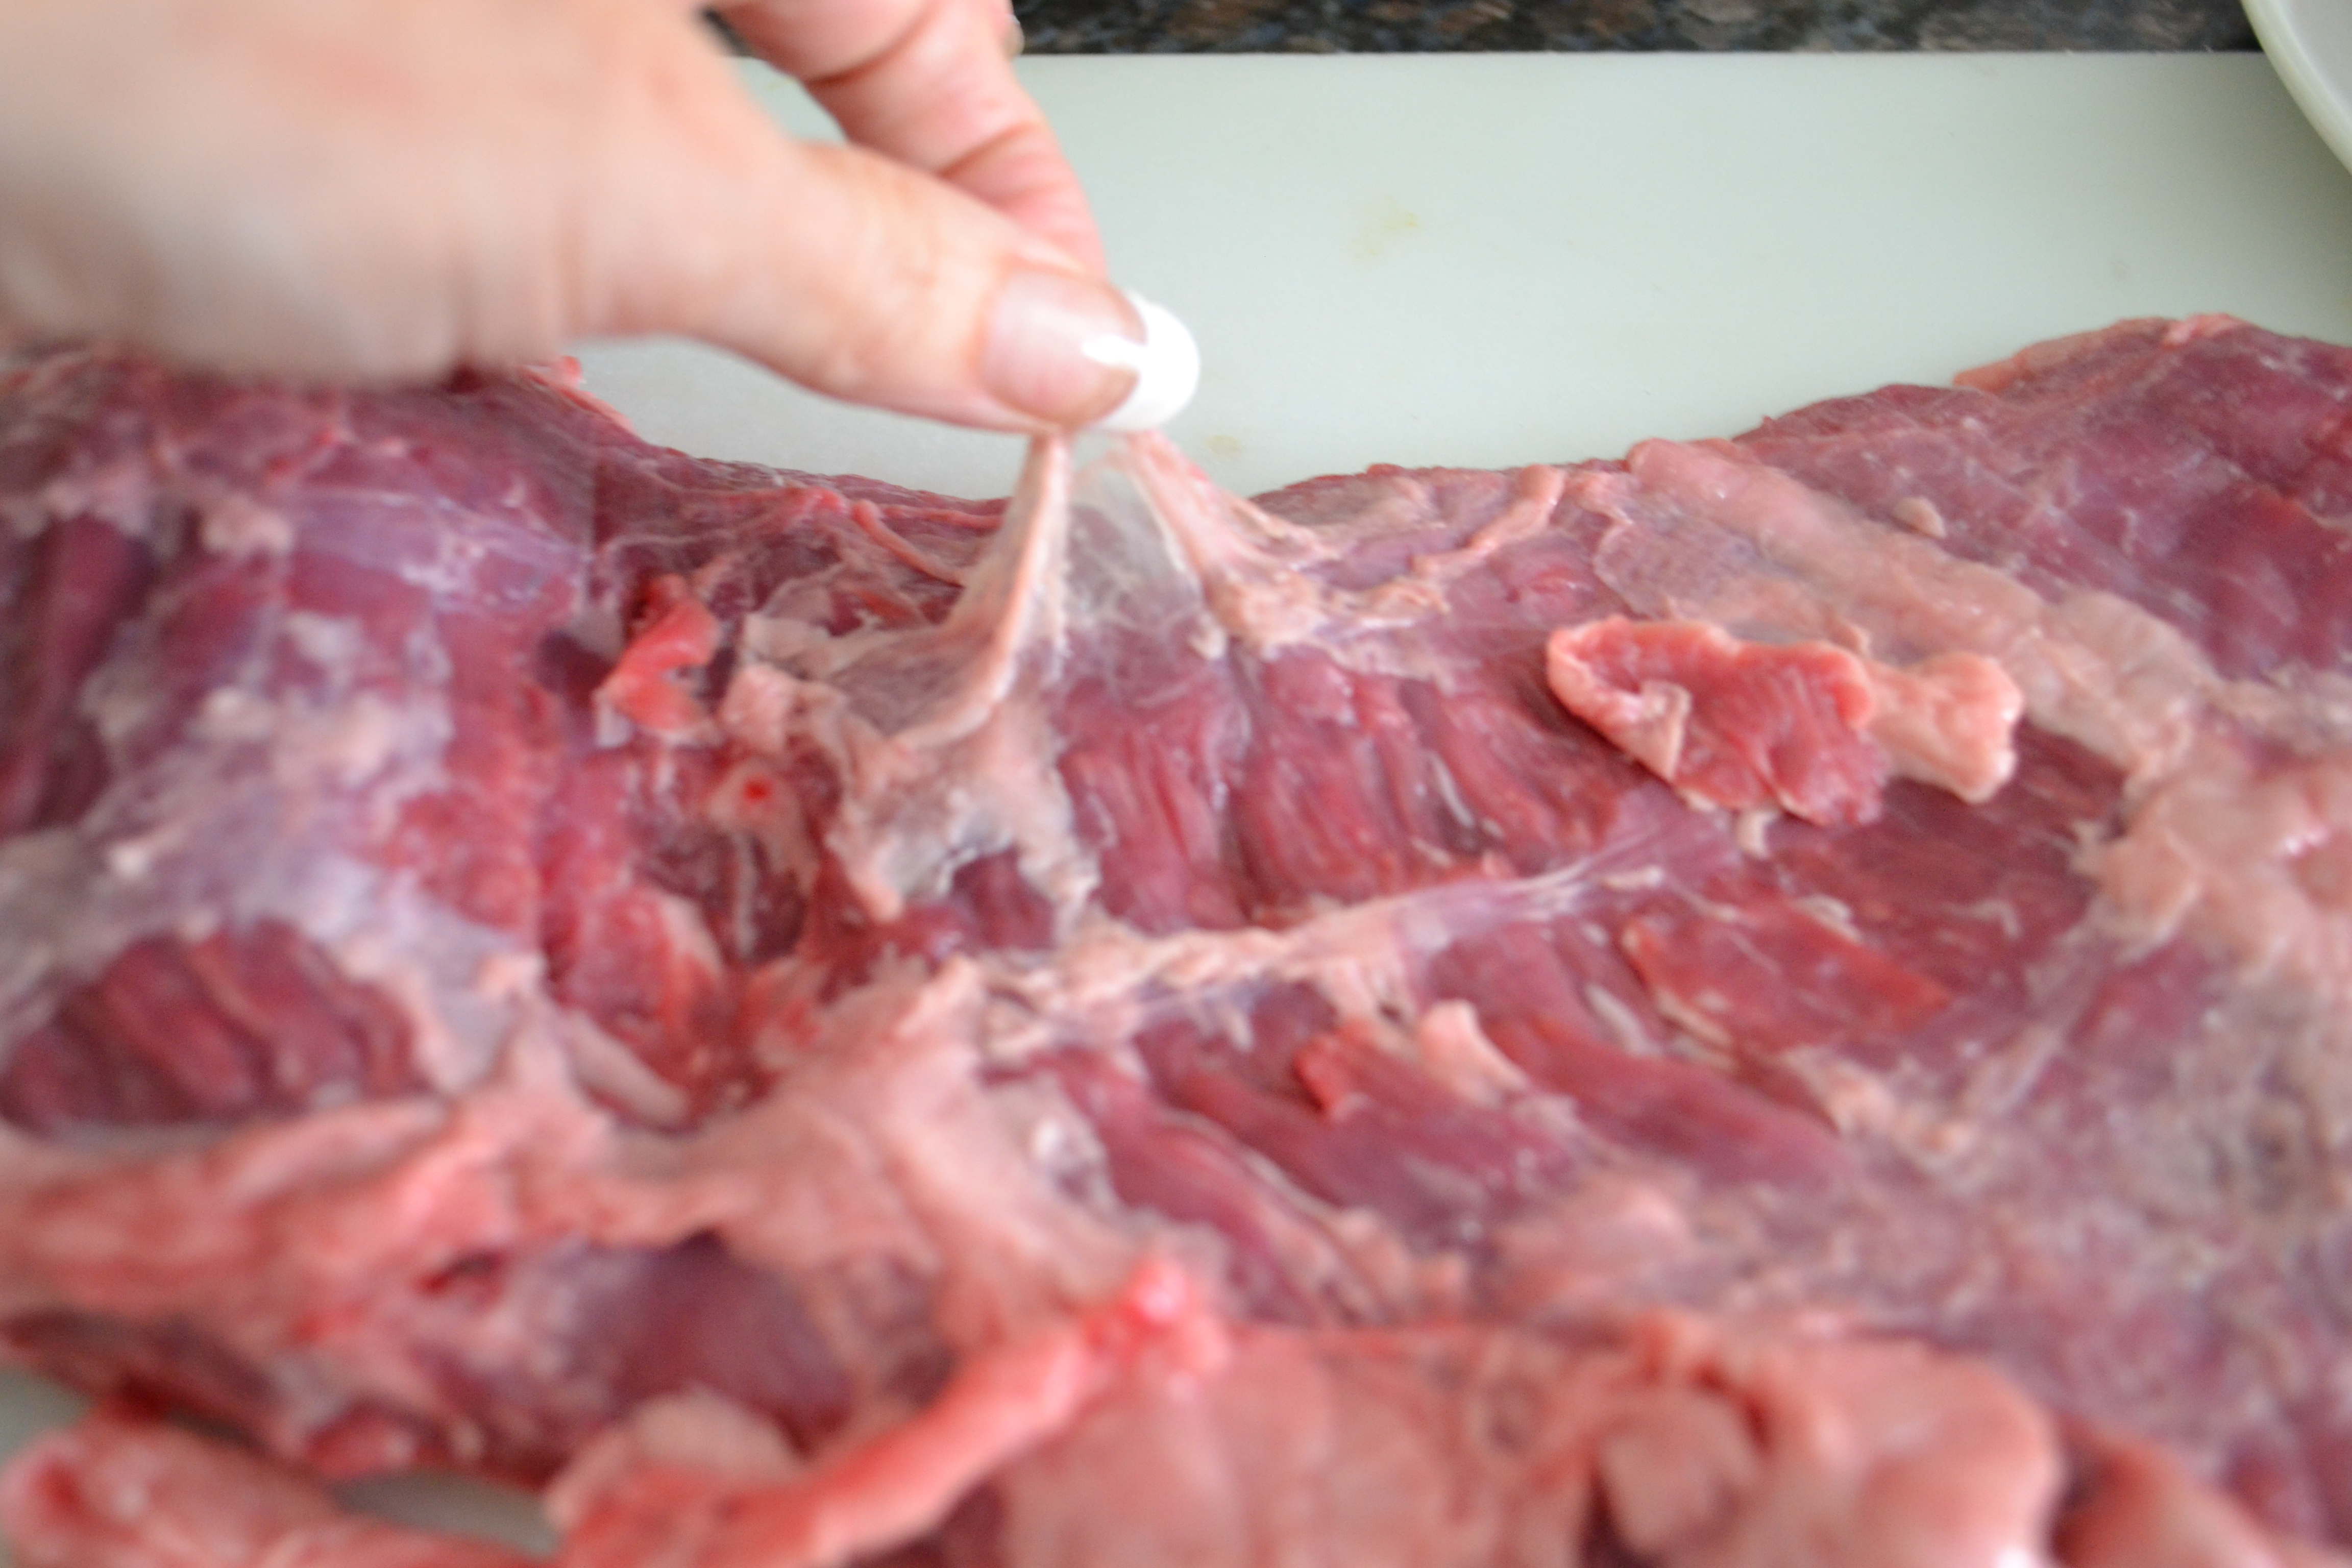
I keep 2 sizes in the camper and also at home. I really, really like this knife. Its thin blade makes short work of what could become very tedious with a substandard, dull knife. My deerslayer has instilled in me a real appreciation for good cutlery.
Last year, I skinned all the fajitas (25 lbs.) at home, packaged them up pretty flat in gallon sized bags so they would thaw easily, and froze them, in the bags on cookie sheets in the freezer. That way they stacked easily with the other food I prepared.
Before the frozen foods are packed into the coolers on the day we leave, I place several flat gallon bags into a 2 gallon zip bag. One year, the carne guisada began to thaw once we got up there. The zip bag had split and we had a big mess in the cooler and no carne guisada!
It’s at this time of the summer in South Texas that fajitas begin to go on sale, usually around Memorial Day and again near the 4th of July. Some are more flavorful than others. Some require less skinning than others. The Deerslayer family becomes guinea pigs right about now. We purchase fajitas from various grocers and grill them up to see which are the best. Once we’ve come to a consensus on the best flavor for the money, we buy up lots, skin them, package them, and freeze them. The process isn’t really that painful! There are several weeks of great grilled fajitas in preparation for the trip.
I give my Deerslayer credit for being “grill-gifted”. He prepares some amazing feasts. Usually, he uses McCormick’s meat marinade, but just for a very short time, since it has papaine, a meat tenderizer in it that will turn good meat to paste if you’re not careful.
Even the best fajitas need good tortillas. The packages that are available in the bread section at the local grocer SHOULD NOT be an option. I DO realize that not everyone has access to fresh, hot corn tortillas. There’s nothing to compare to the soft, melt-in-your-mouth fresh corn flavor that can only be attained from fresh hand-made corn tortillas. In Texas, we are lucky enough to have cook-yourself flour tortillas available in local grocers in the refrigerated section, near biscuits and pie crusts. They’re worth their weight in gold. Once you’ve had them, you’ll never go back. They even freeze!!! My dear Deerslayer surprised me with a professional-sized griddle to take on our Wyoming trip. It’ll fit on the Camp Chef propane cooktops. I can cook about 10 tortillas at a time, or toast as many buns, or heat up thick-cut bacon that I cooked at home, or make about 15 pancakes at once. That man knows what I like! He also gave me a beautiful string of pearls for those times that I feel like Julia Child! Guys, learn! Girls, weep! He’s mine!
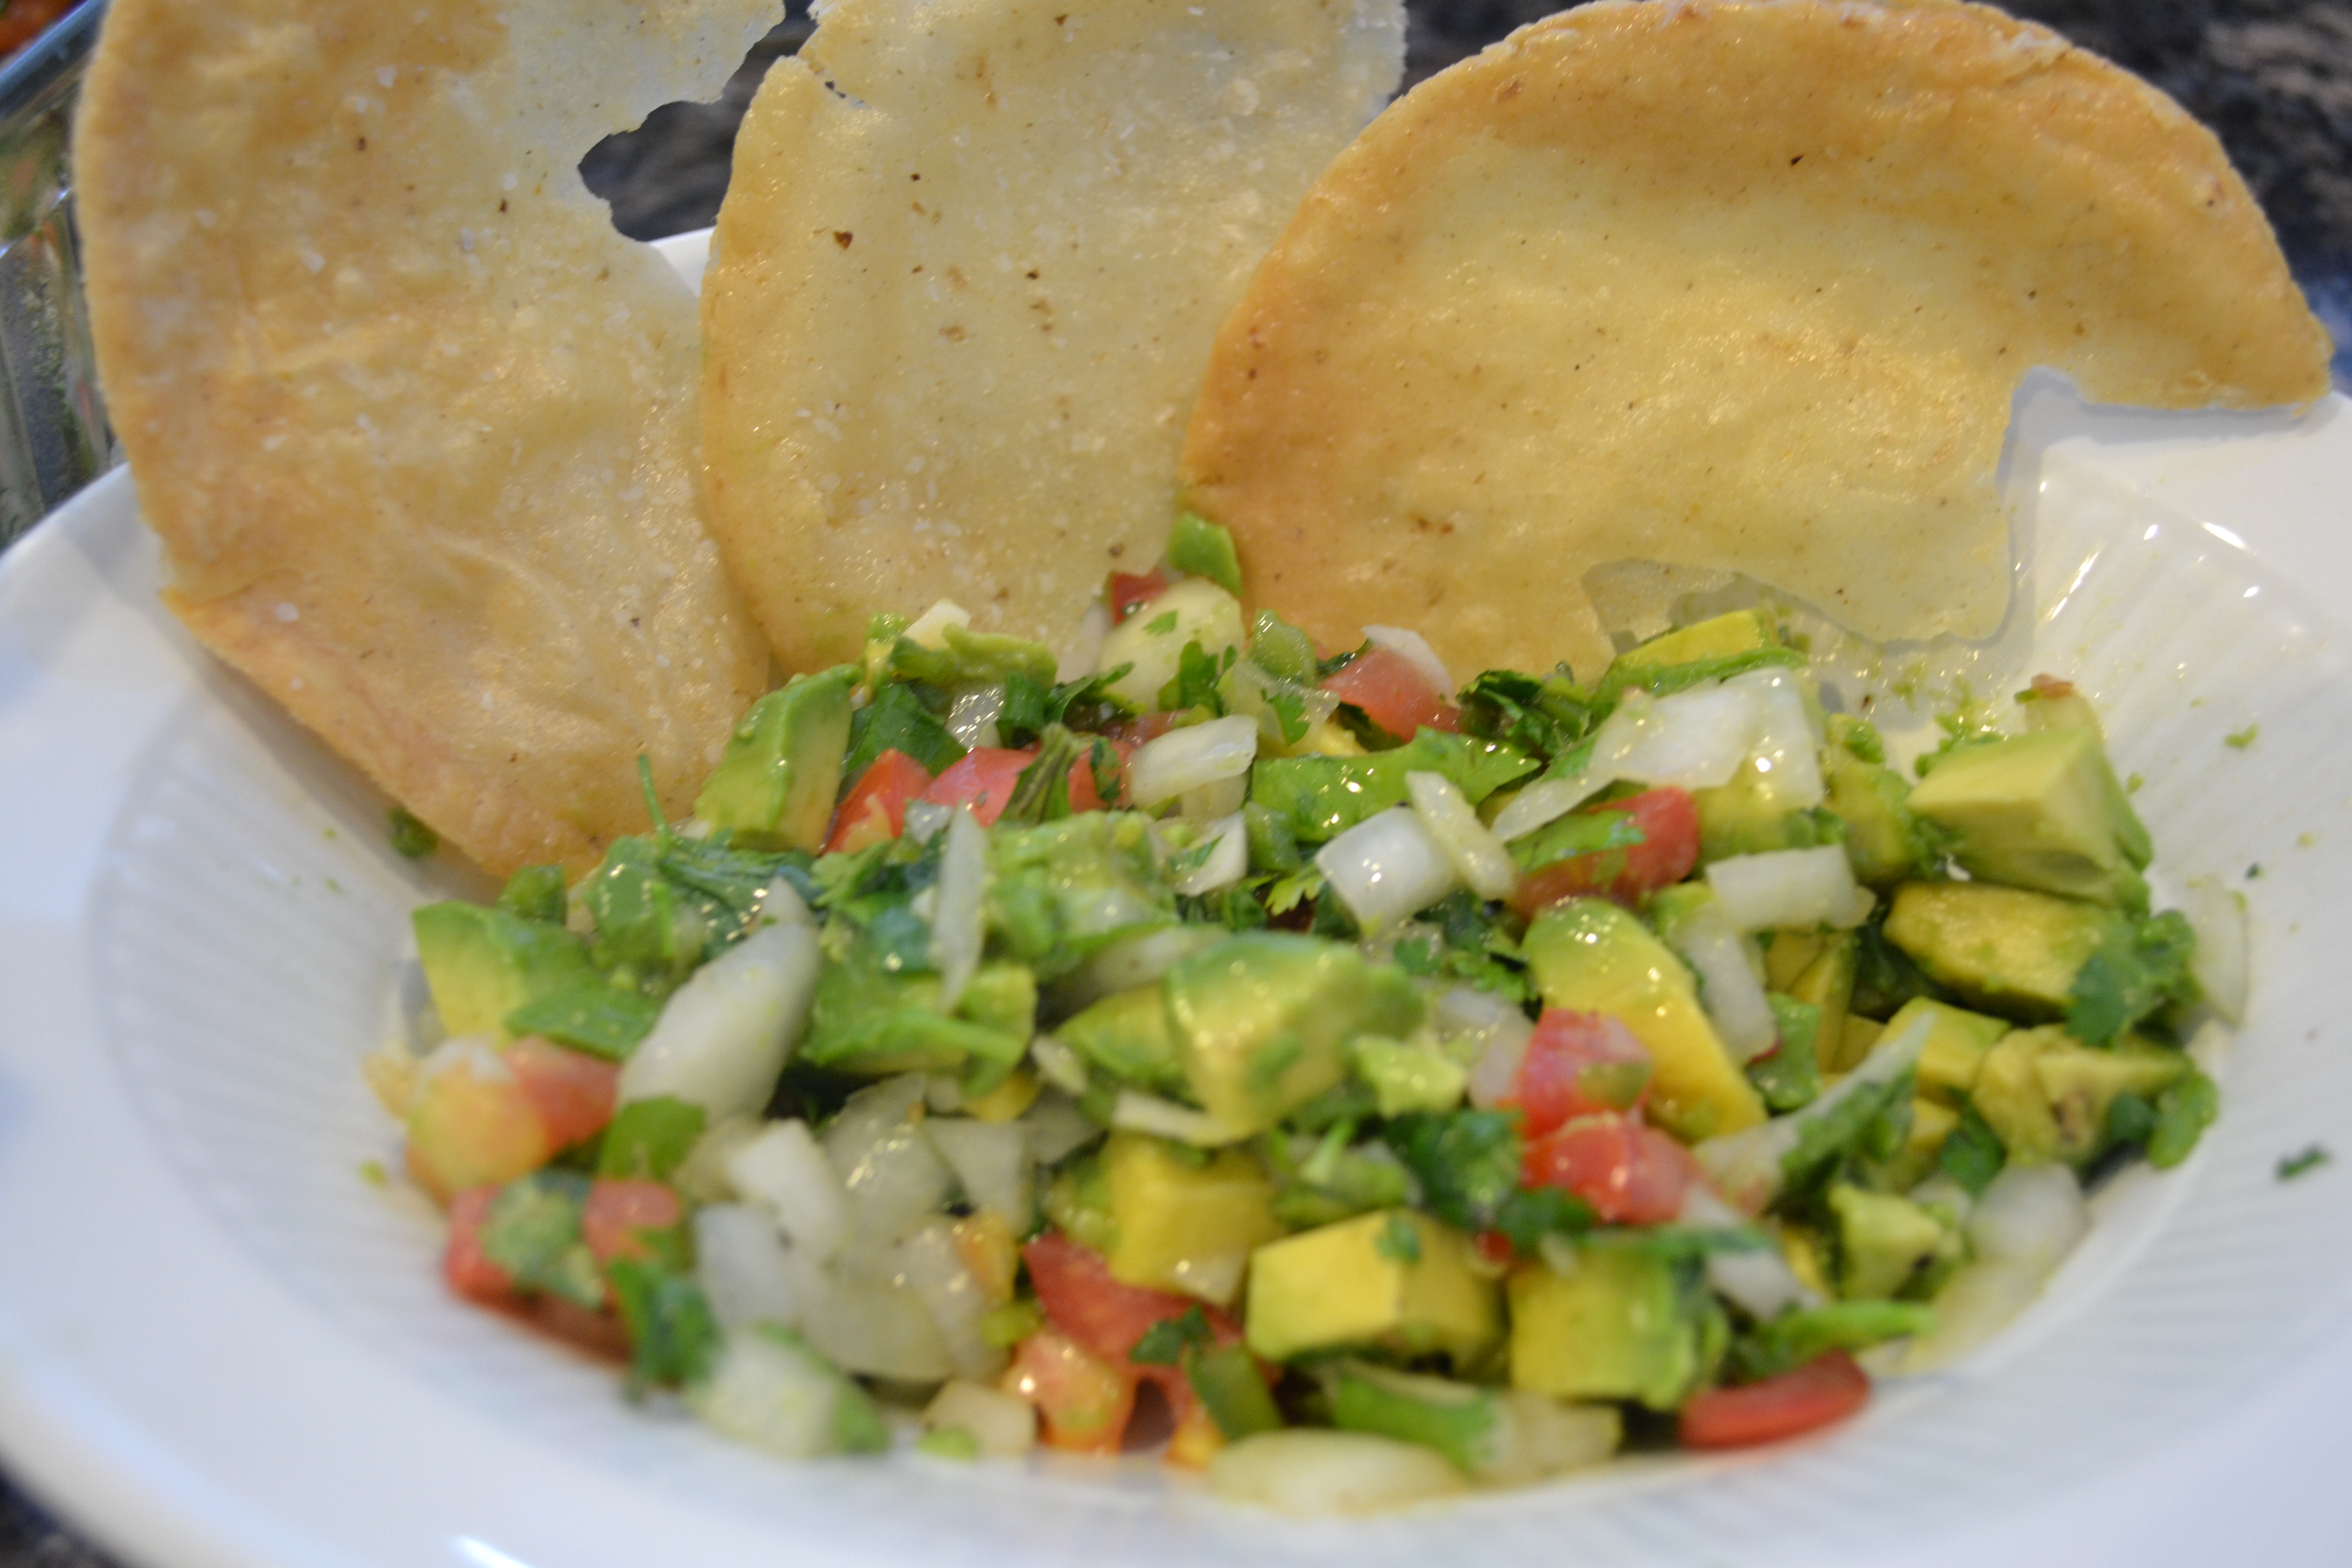
I’ve gotta say that, without sounding irreverent, fajitas are only as good as the tortillas and toppings that you put on them. When I say toppings, you need to know that there’s really only one acceptable topping for this meat of kings in the Deerslayer domain; and that topping is Pico de Gallo (the beak of the rooster). My deerslayer uses the recipe that he learned from his father. The bright, fresh veggies, accented with garlic, vinegar, and oil compliment the meat perfectly. Here it is, but only with permission! I’m not sure how “authentic” it is, but it is truly from the Deerslayer Clan.
Pico De Gallo
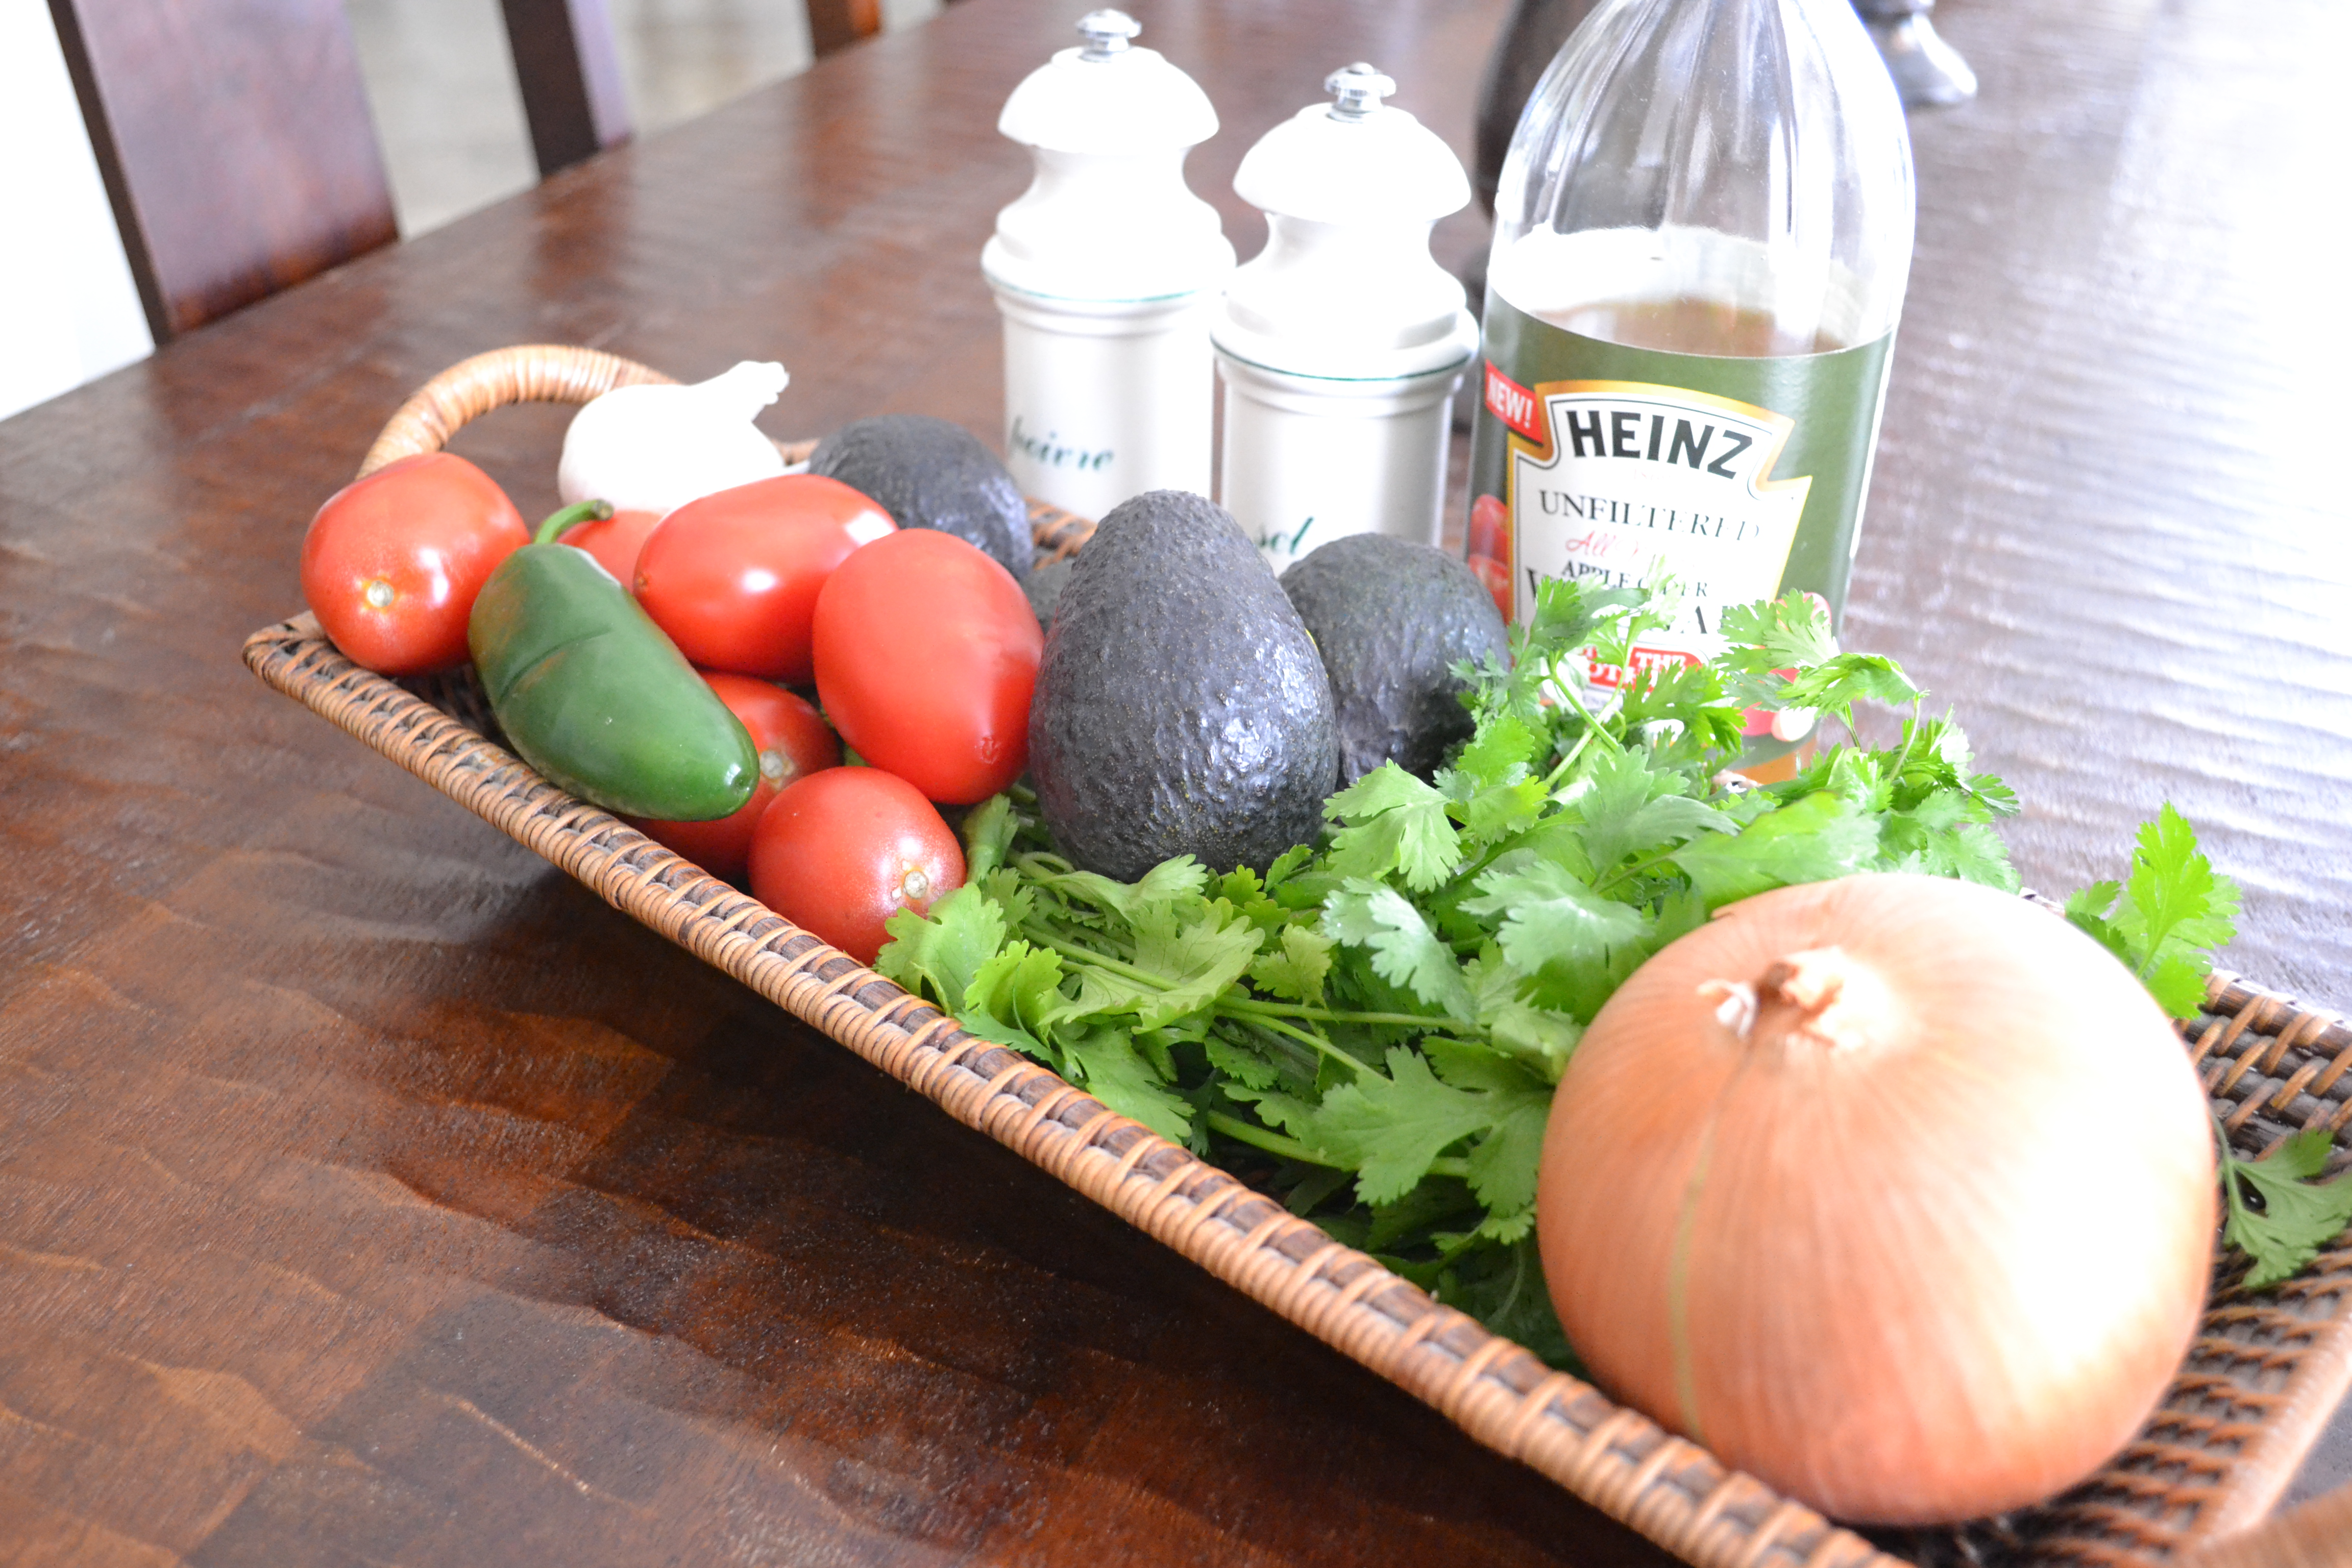
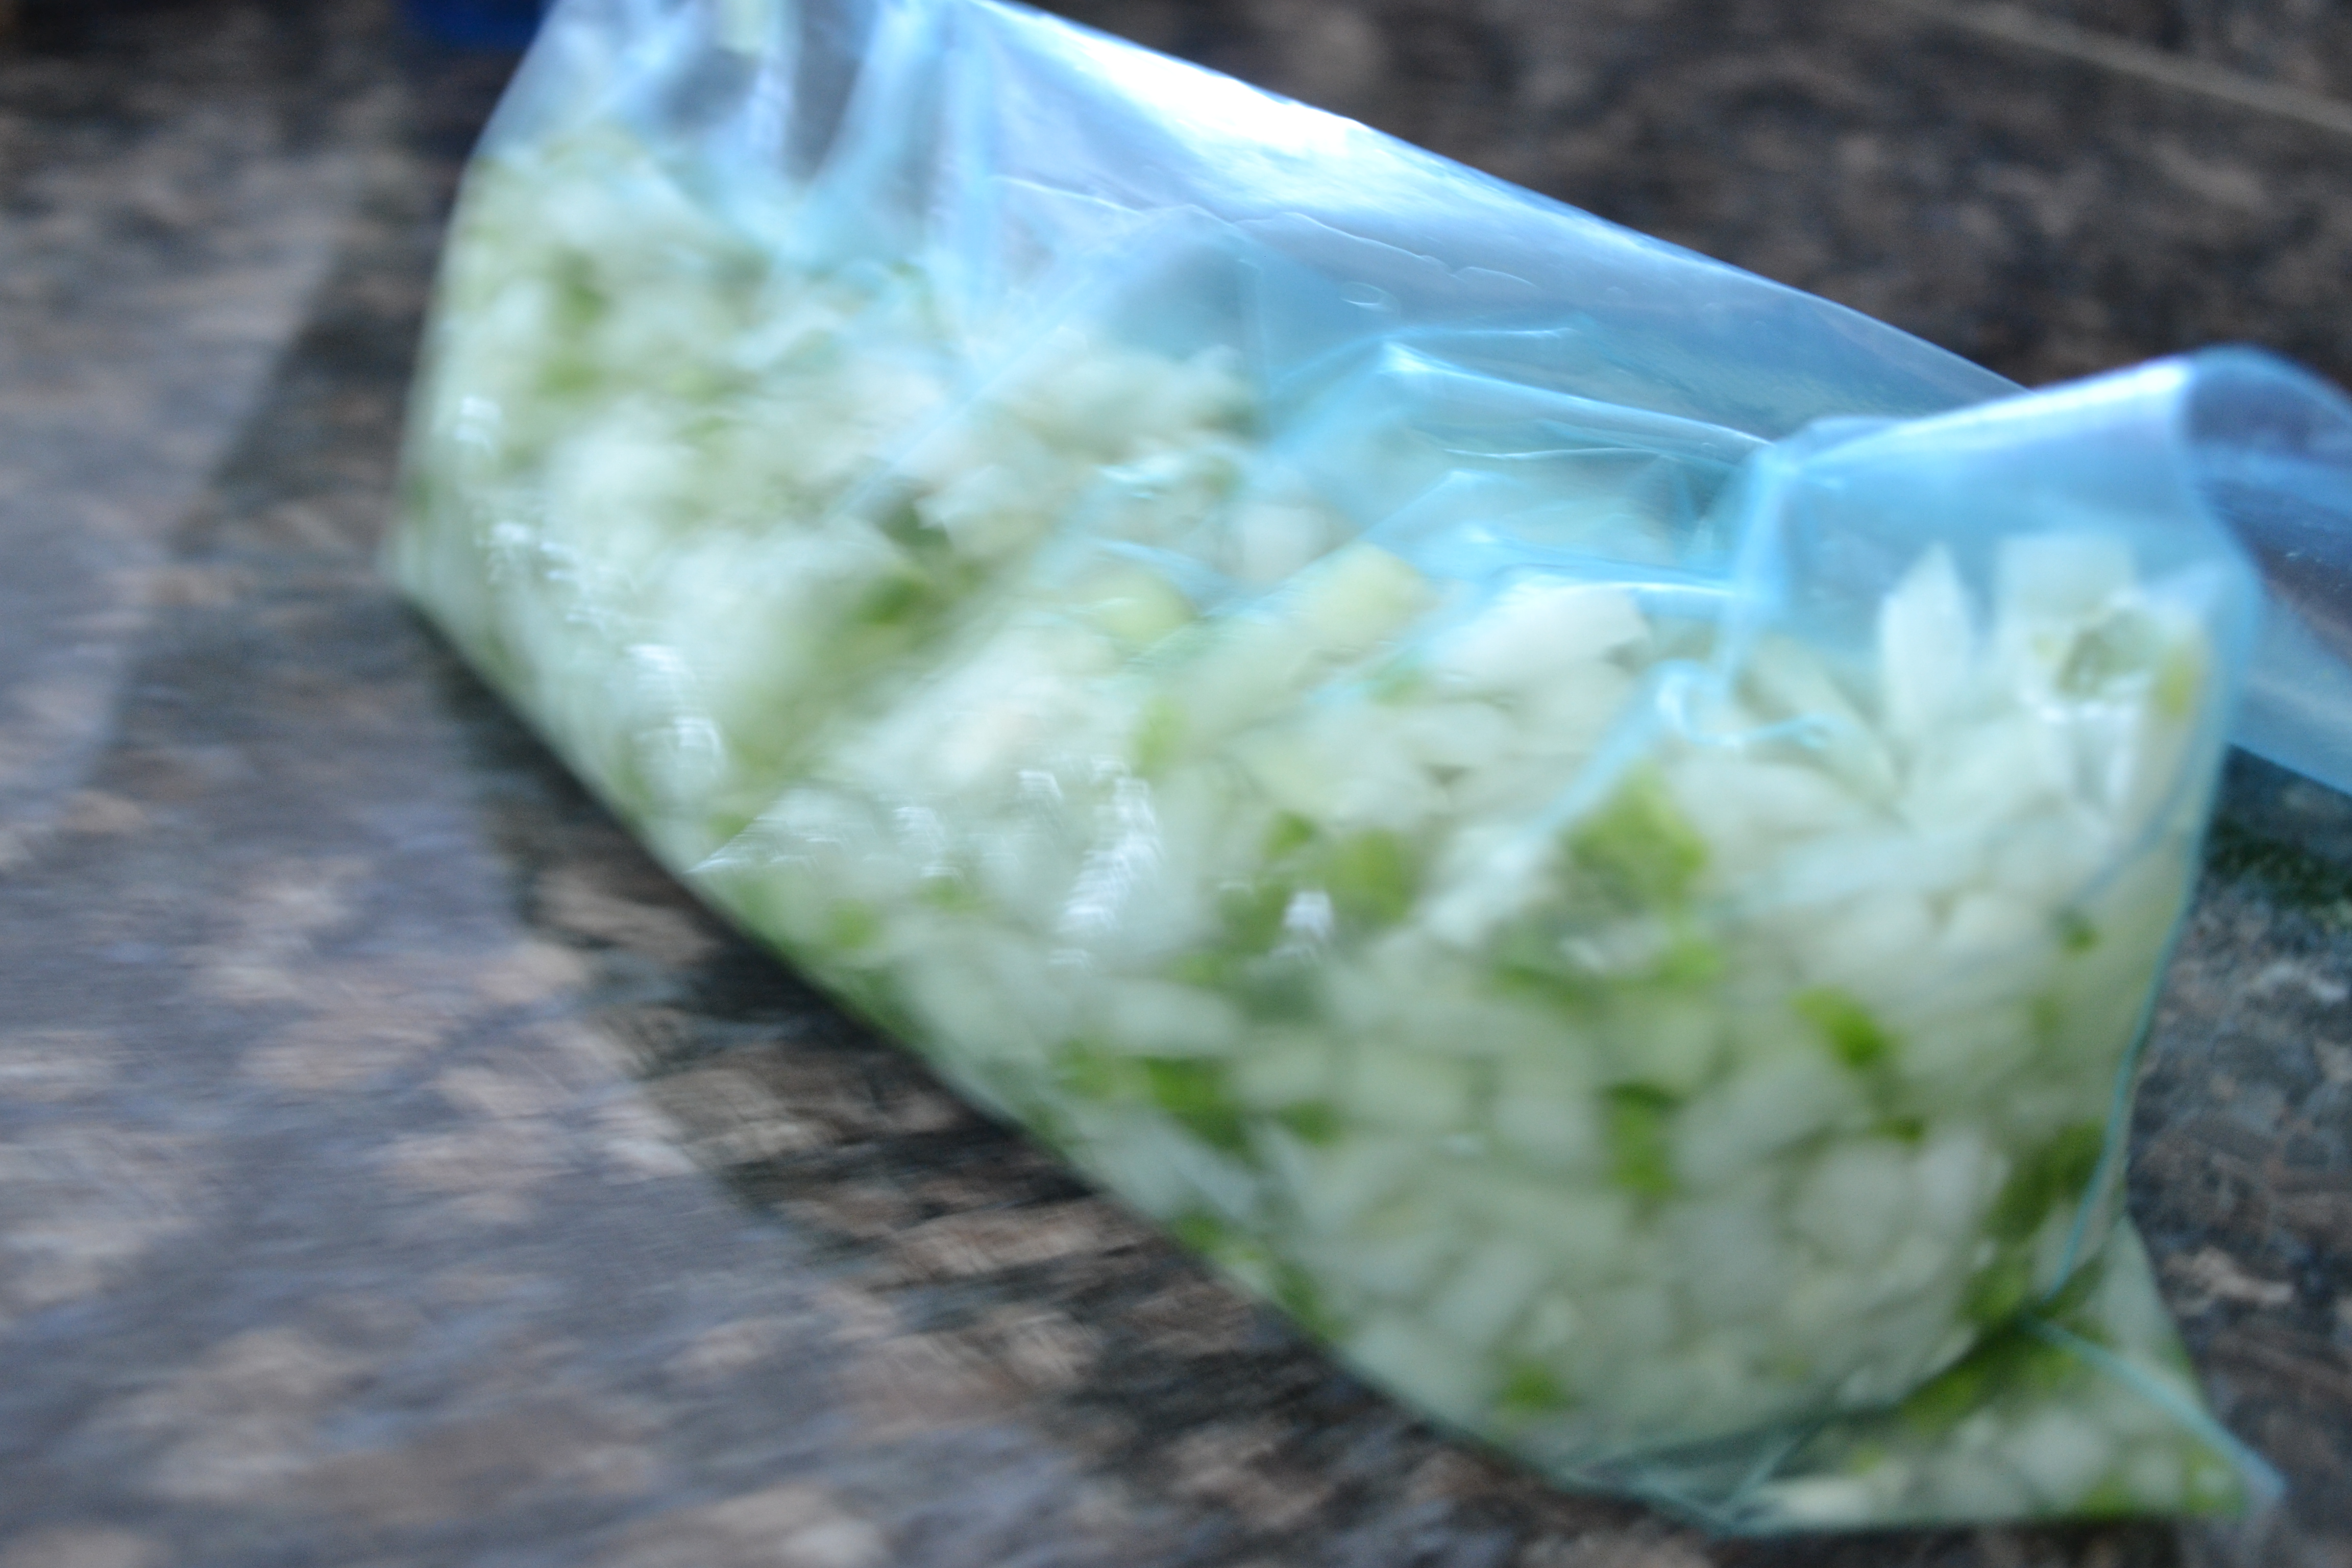
1 Large Onion, coursely chopped
2 Jalepenos, chopped, seeds and pithy membranes removed
Garlic, 6 cloves, chopped
Apple cider vinegar, enough to cover
6 Roma Tomatoes, chopped
Cilantro, 1 bunch, chopped, stems removed
Salad oil, a splash
Kosher salt and pepper taste
Avocado, scooped and chopped
1. Add chopped onion, jalapenos, garlic in a one-gallon zip bag. Add enough apple-cider vinegar to cover. Allow to macerate for at least a couple of hours.
2. Transfer to a glass serving dish.

Add tomatoes, salt & pepper, cilantro, and avocado.

Toss with a splash of oil and serve with tortilla chips, homemade if at all possible. There’s nothing like homemade corn tortilla chips! Soooo worth the effort!
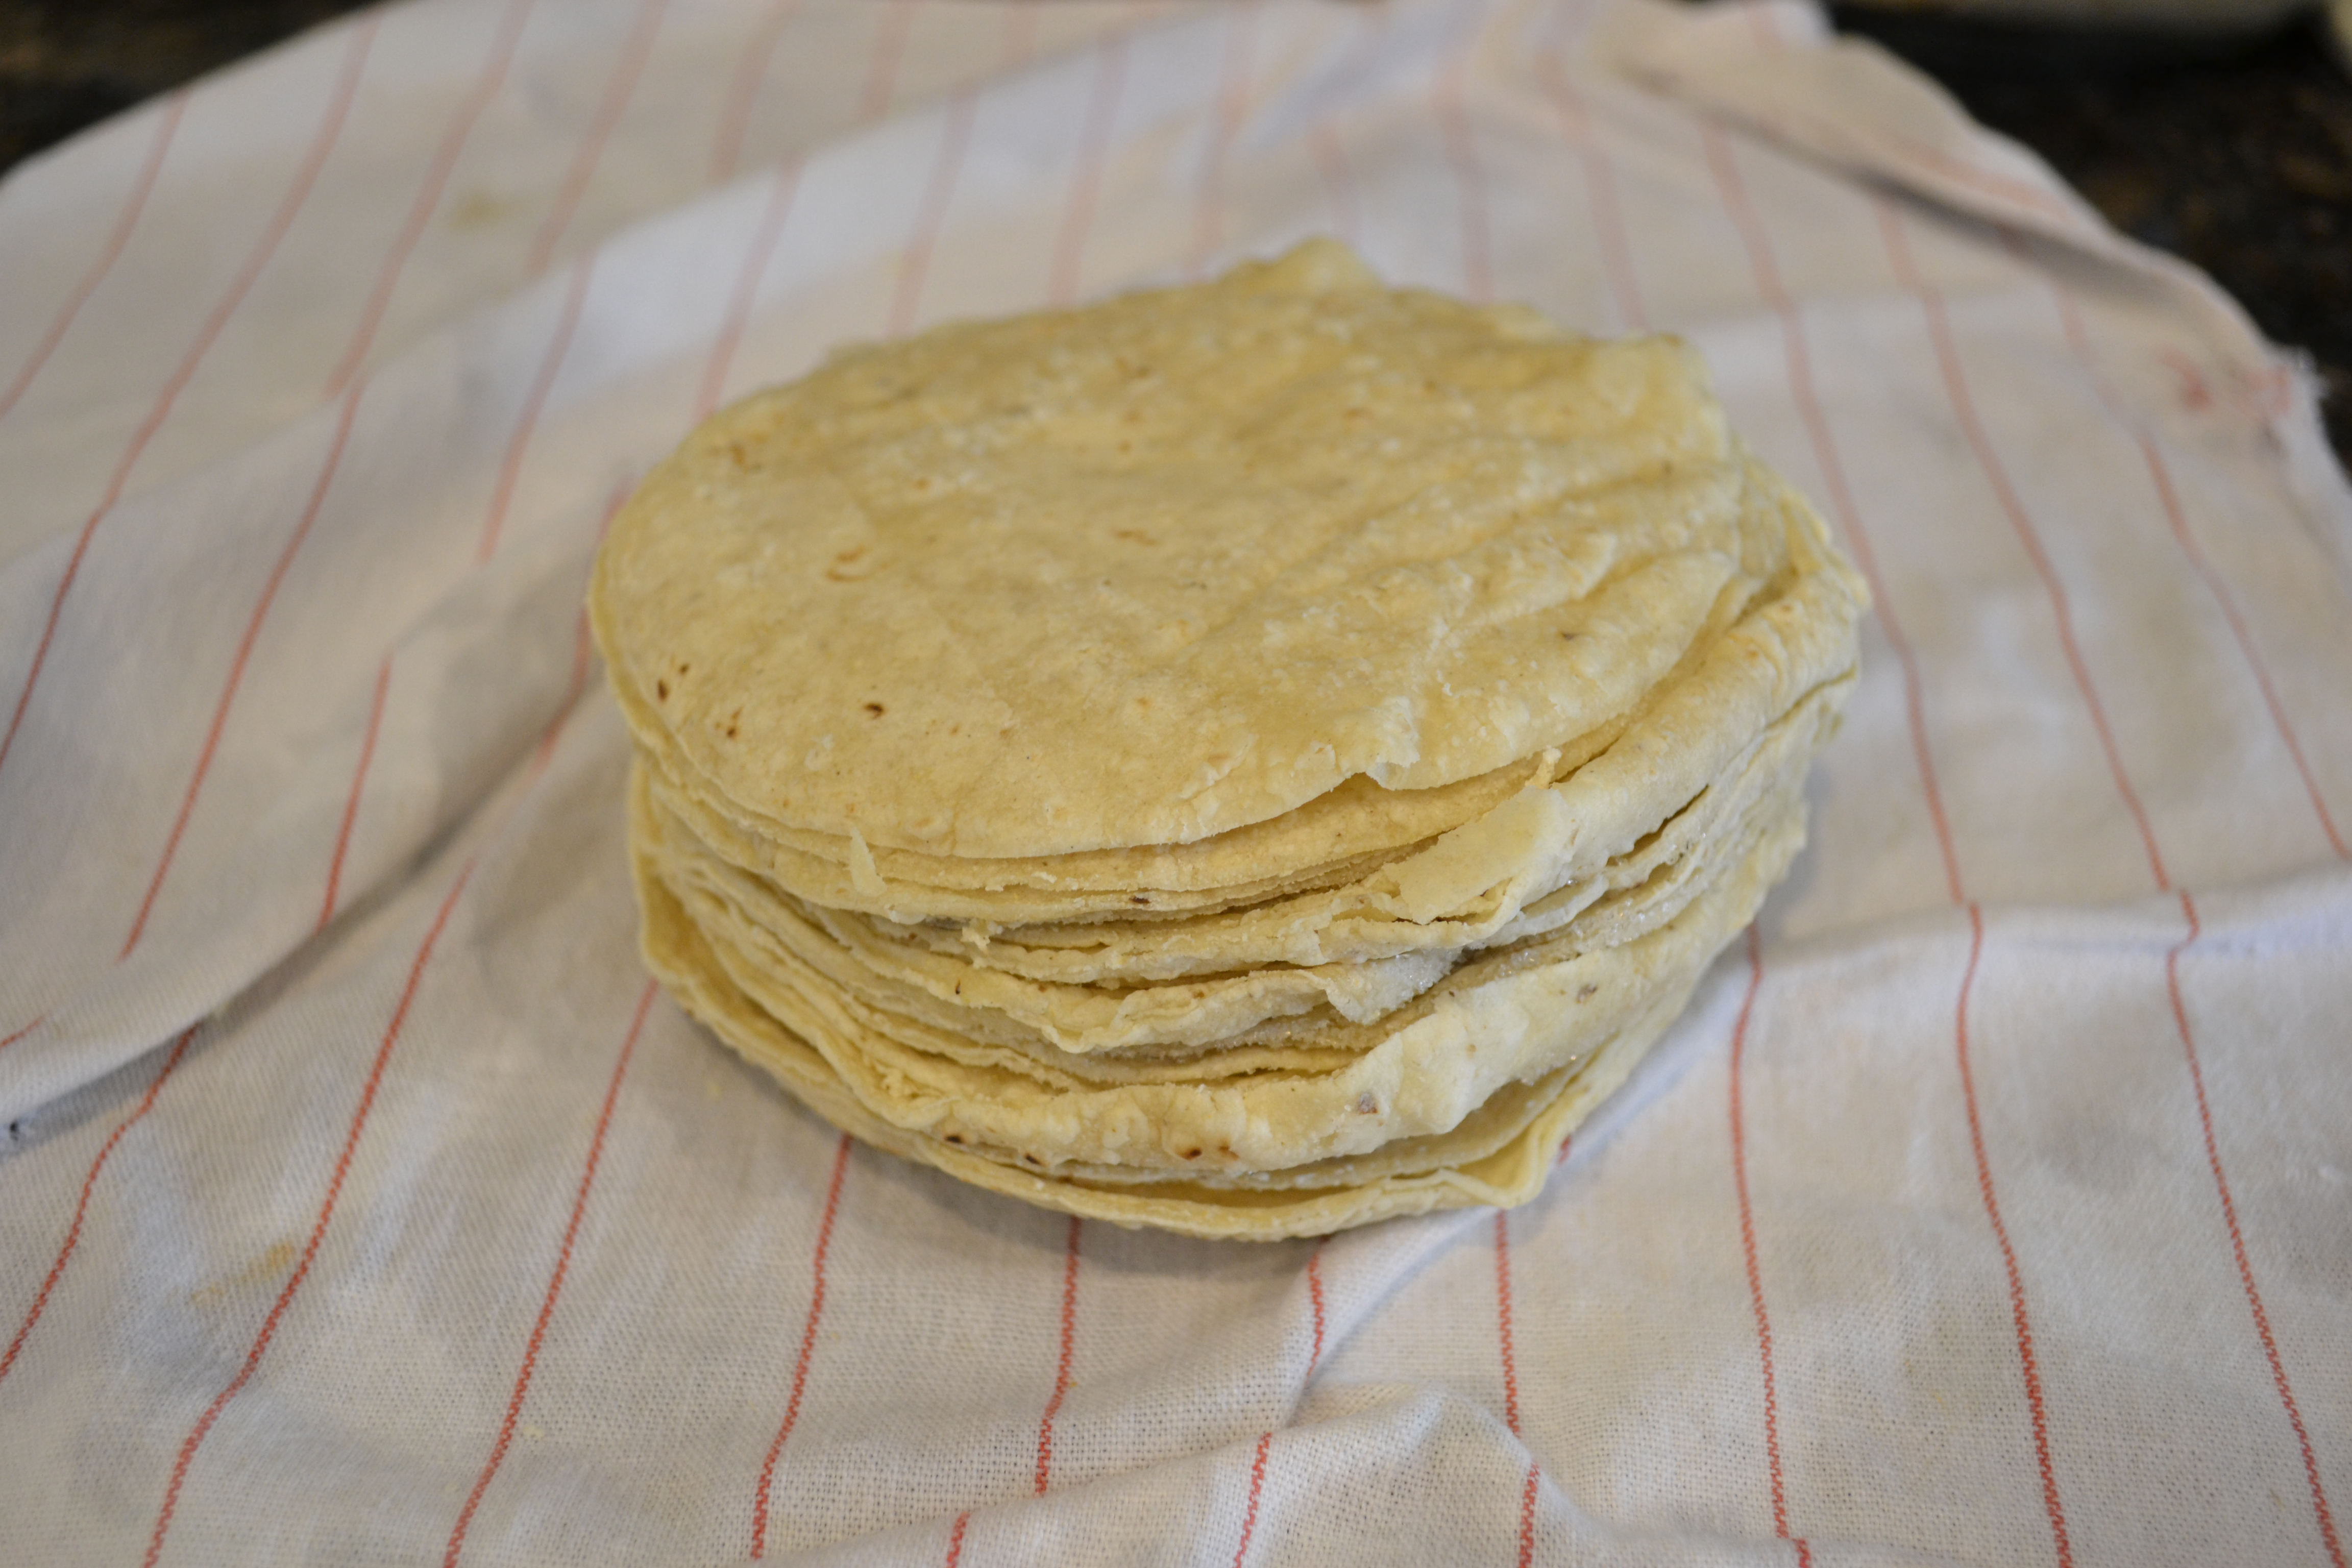
3. Start with corn tortillas from the store. They don’t need to be fresh. As a matter of fact, I always toss leftover tortillas into the freezer and save for a batch of tortilla chips.
4. Add about an inch of cooking oil to a deep-sided cast iron dutch oven. Heat to medium high heat.

5. Be sure that tortillas are dry. Prepare one tortilla at a time. Using tongs, add tortilla to hot oil. Allow to fry for a couple of minutes until crispy.

6. Set on a cooling rack atop a cookie sheet. Immediately sprinkle with kosher salt.
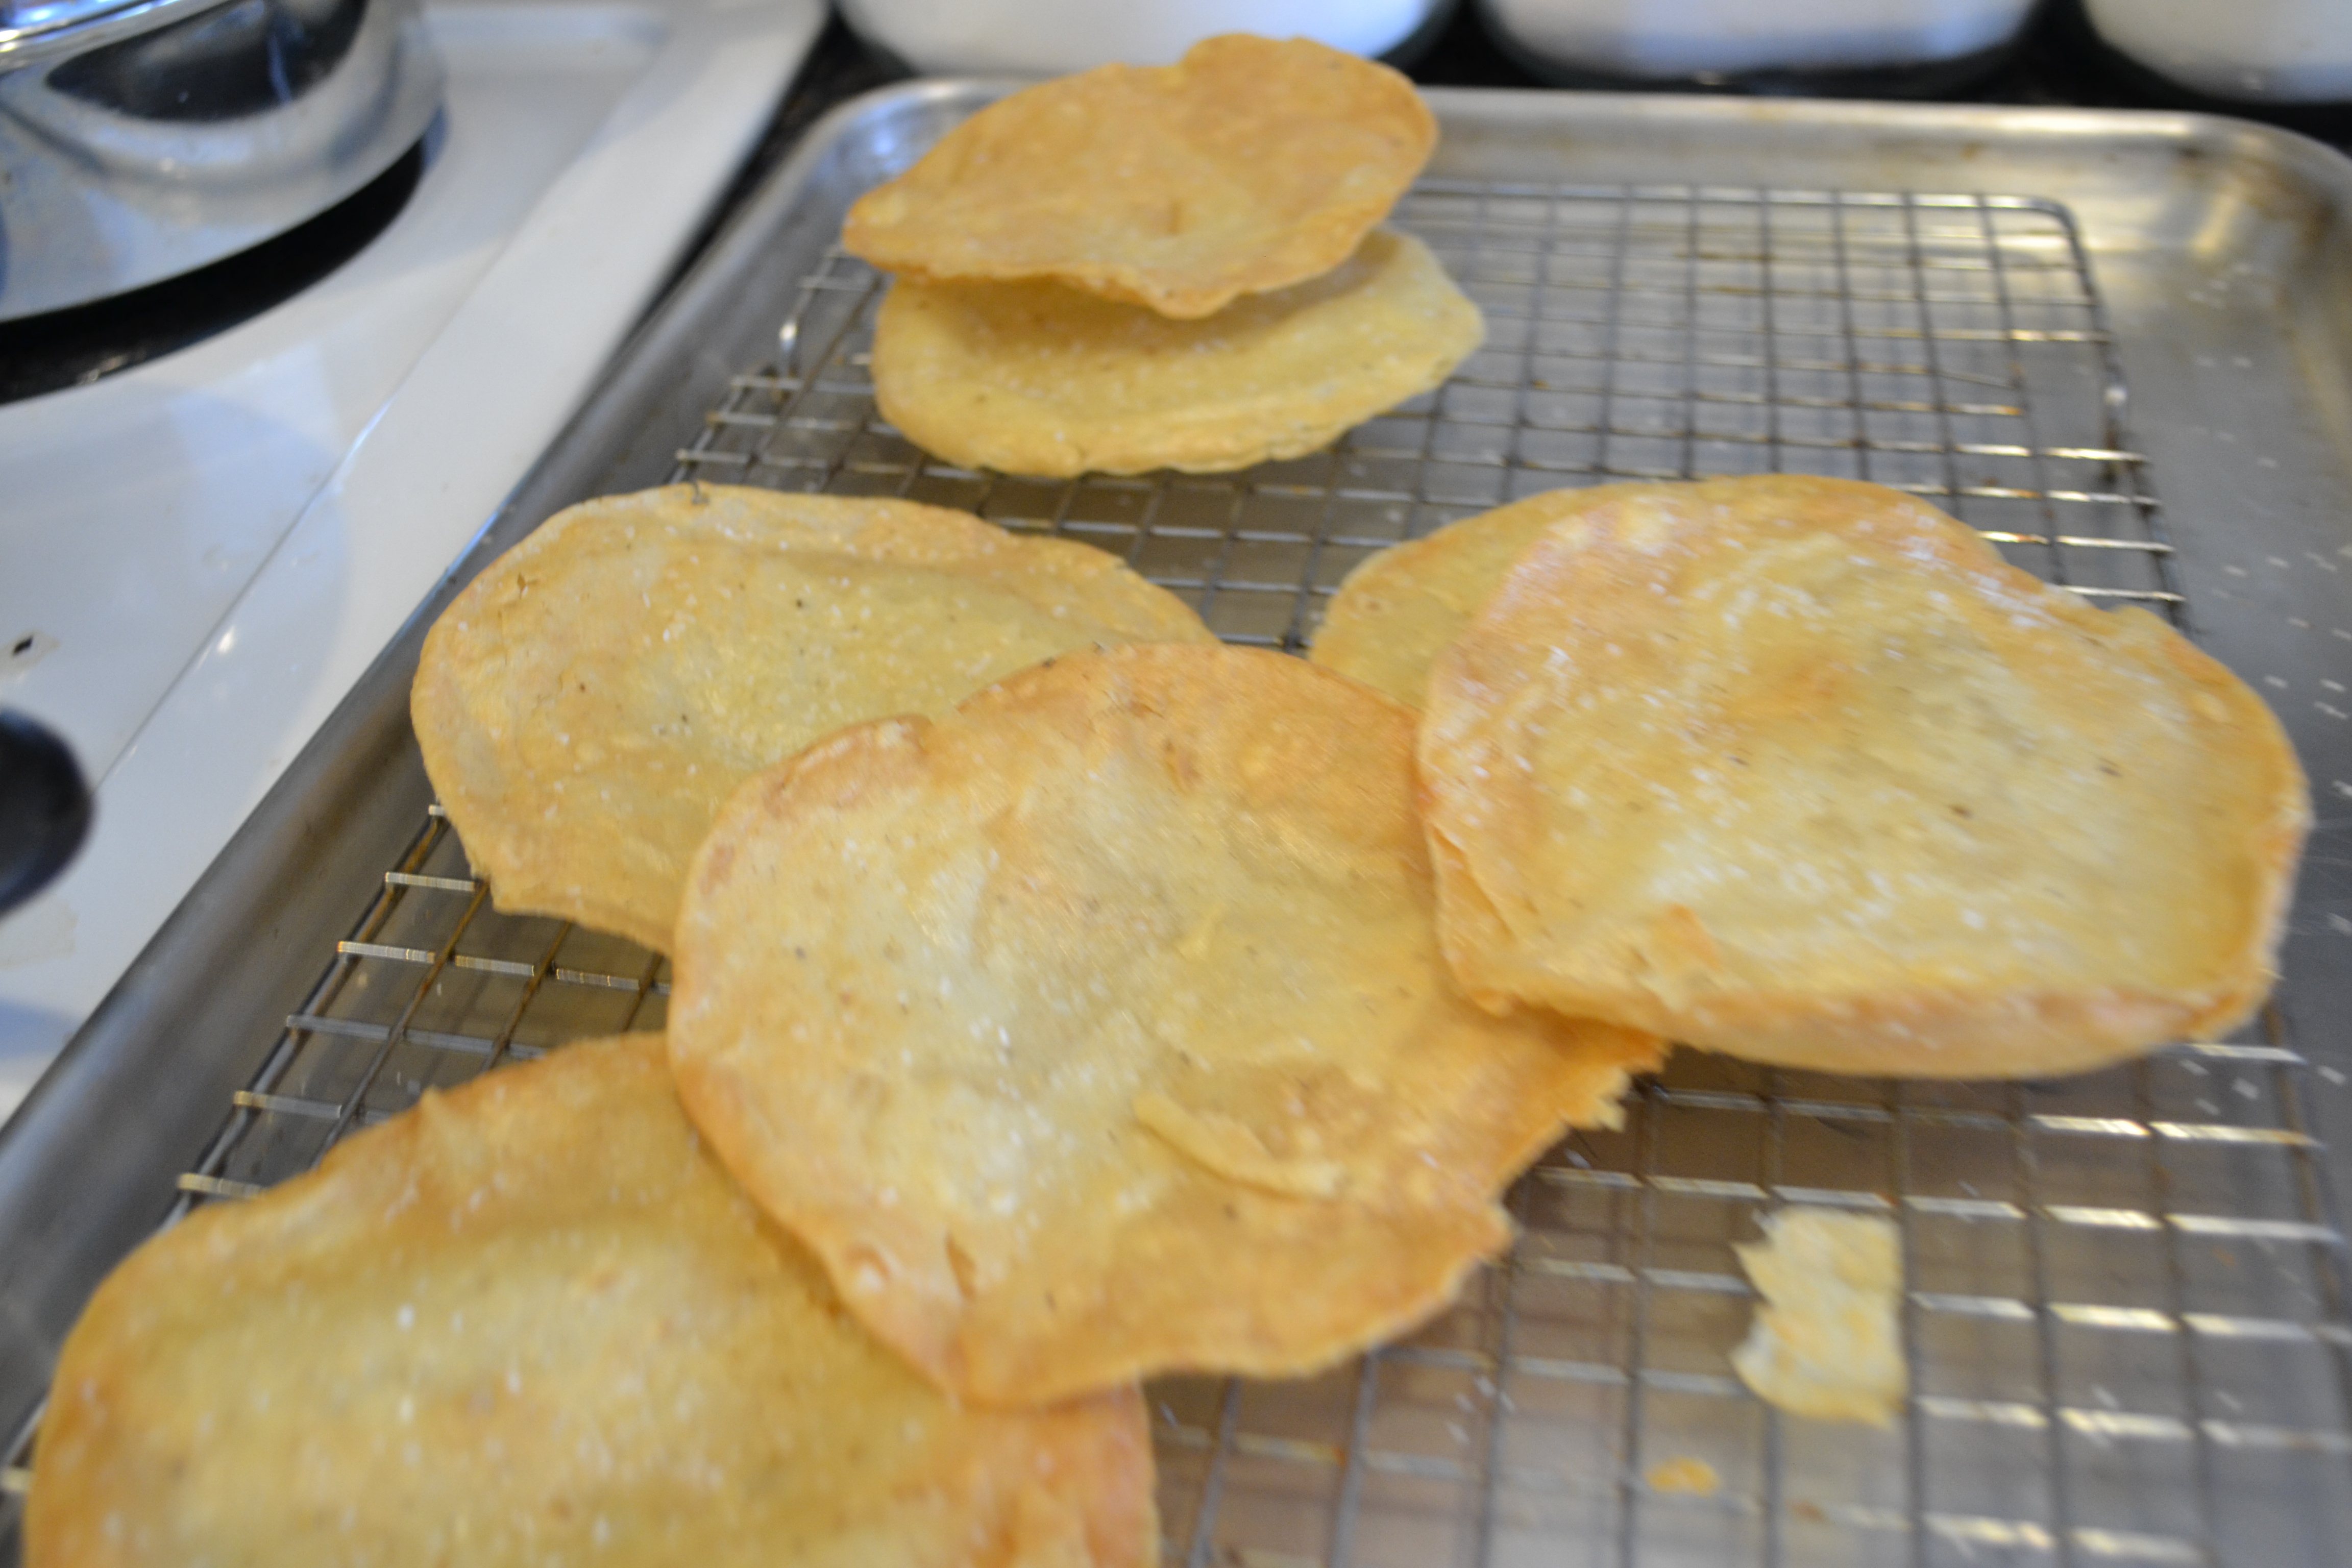
7. Enjoy!
Only 3 1/2 More Months
Roasted Corn and Poblano Chowder with Whitewing Dove Breast
 First of all, it just occurred to the Deerslayer family that, in South Texas, whitewing season will commence in three and a half short months. With that in mind, it was safe for me to baby my Deerslayer with his favorite meal of Cook- All Day Whitewing With Rich Gravy” and the obligatory white rice and LeSueur peas. Although the recipe is time-consuming, the result is totally worth it for the devotee. The meat is succulent and falls off the bone. The gravy is rich and flavorful.
It was greatly appreciated. As usual, however, we had about a half dozen birds left over. We usually just reheat the birds, make a new batch of rice and dig in. But I had a new idea for the leftovers that was inspired by a recipe that the female Deerslayers recently enjoyed at a local restaurant!
We knew our starting point; roasted poblanos and roasted corn. There were carrots and potatoes, chicken (which I knew I could substitute with whitewing instead!) and a creamy base. Now to put it all together.

2 roasted and peeled poblano peppers, chopped
2 roasted ears of corn, cut from the cob
1/2 cup onion, chopped
5 cloves garlic, chopped
one stalk celery, finely chopped
one large carrot, finely chopped
corn oil, to cover bottom of skillet*
3 cups of chicken stock
1 small red potato, cubed
1 cup cooked whitewing breast (or more!)
1/2 cup cream or half and half
1/2 tsp. chili powder
¼ tsp. comino (cumin)
1 1/2 tsp. salt or to taste
freshly ground pepper to taste
1. On a cookie sheet, arrange poblano peppers and two ears of shucked corn, silks removed. Set oven to “high” broiler setting. Place cookie sheet on highest rack in oven, about 10 inches from the heating element. Watch closely. As poblanos begin to blister and corn browns, use tongs to turn each until all sides of poblanos are blistered and corn is browned on all sides. Remove from broiler.

Place poblanos in a bowl, cover with plastic, and allow to steam for 20 minutes.

Remove stems, seeds, and charred skin . Chop poblanos and set aside.

Once roasted corn is cooled, cut from the cob and set aside.

2. Saute’ onion and garlic in corn oil in a high-sided cast iron skillet.

*Now some may disagree with this next step, but don’t knock it ’til you’ve tried it. I like to use corn oil that has previously been used to soften corn tortillas for enchiladas or for frying corn tortillas for homemade tortilla chips. The oil takes on a fabulous flavor that works beautifully when frying rice, or sauteing onions and garlic for this recipe. Waste not, want not, I always say!
3. Add all veggies (except for roasted corn and poblanos) to onion and garlic, saute for a couple of minutes, then add 2 cups of the stock, chili powder, comino, salt, and pepper. Simmer until veggies are soft.


5. Pour blended contents back into skillet. Add diced whitewing (or chicken) and half of the corn. Heat through.

6. Serve with reserved corn, sliced avocado, sour cream, cilantro, or extra whitewing breast..
Sauteed Mushroom, Basil, and Sundried Tomato Filled Ravioli with Creamy Tomato-Basil Sauce
 Playdoh was one of my favorite things as a kid. It had such an interesting texture, smell, and what vibrant color! It squished wonderfully between my fingers. It transformed into animals and flowers, pretend foods and characters. It was perfect fun and kept an only child occupied for hours on end.
Now that I’m an adult, I need look no further than homemade pasta to fulfill my need for malleable creativity. I even have a pasta-making apparatus that I received from my deerslayer for Mother’s Day a few years back. It’s like a souped-up Playdoh-squirty thing that allows me to knead, roll, and create to my heart’s content. My junior deerslayers usually like to get in on the fun. During a recent trip to a gourmet cooking store, we came across a really cool little gadget that presses perfect little ravioli, a spring-loaded ravioli press! Once again, this was as much fun as a day with Playdoh. Kneading, squeezing, rolling, extruding, and now pressing! What’s not to love?!?
Now that we had this fun stuff to play with, the junior deerslayers and I decided to spend a day playing with pasta. We just had to decide on what delicious filling to use for the ravioli. We decided on the following:
Filling
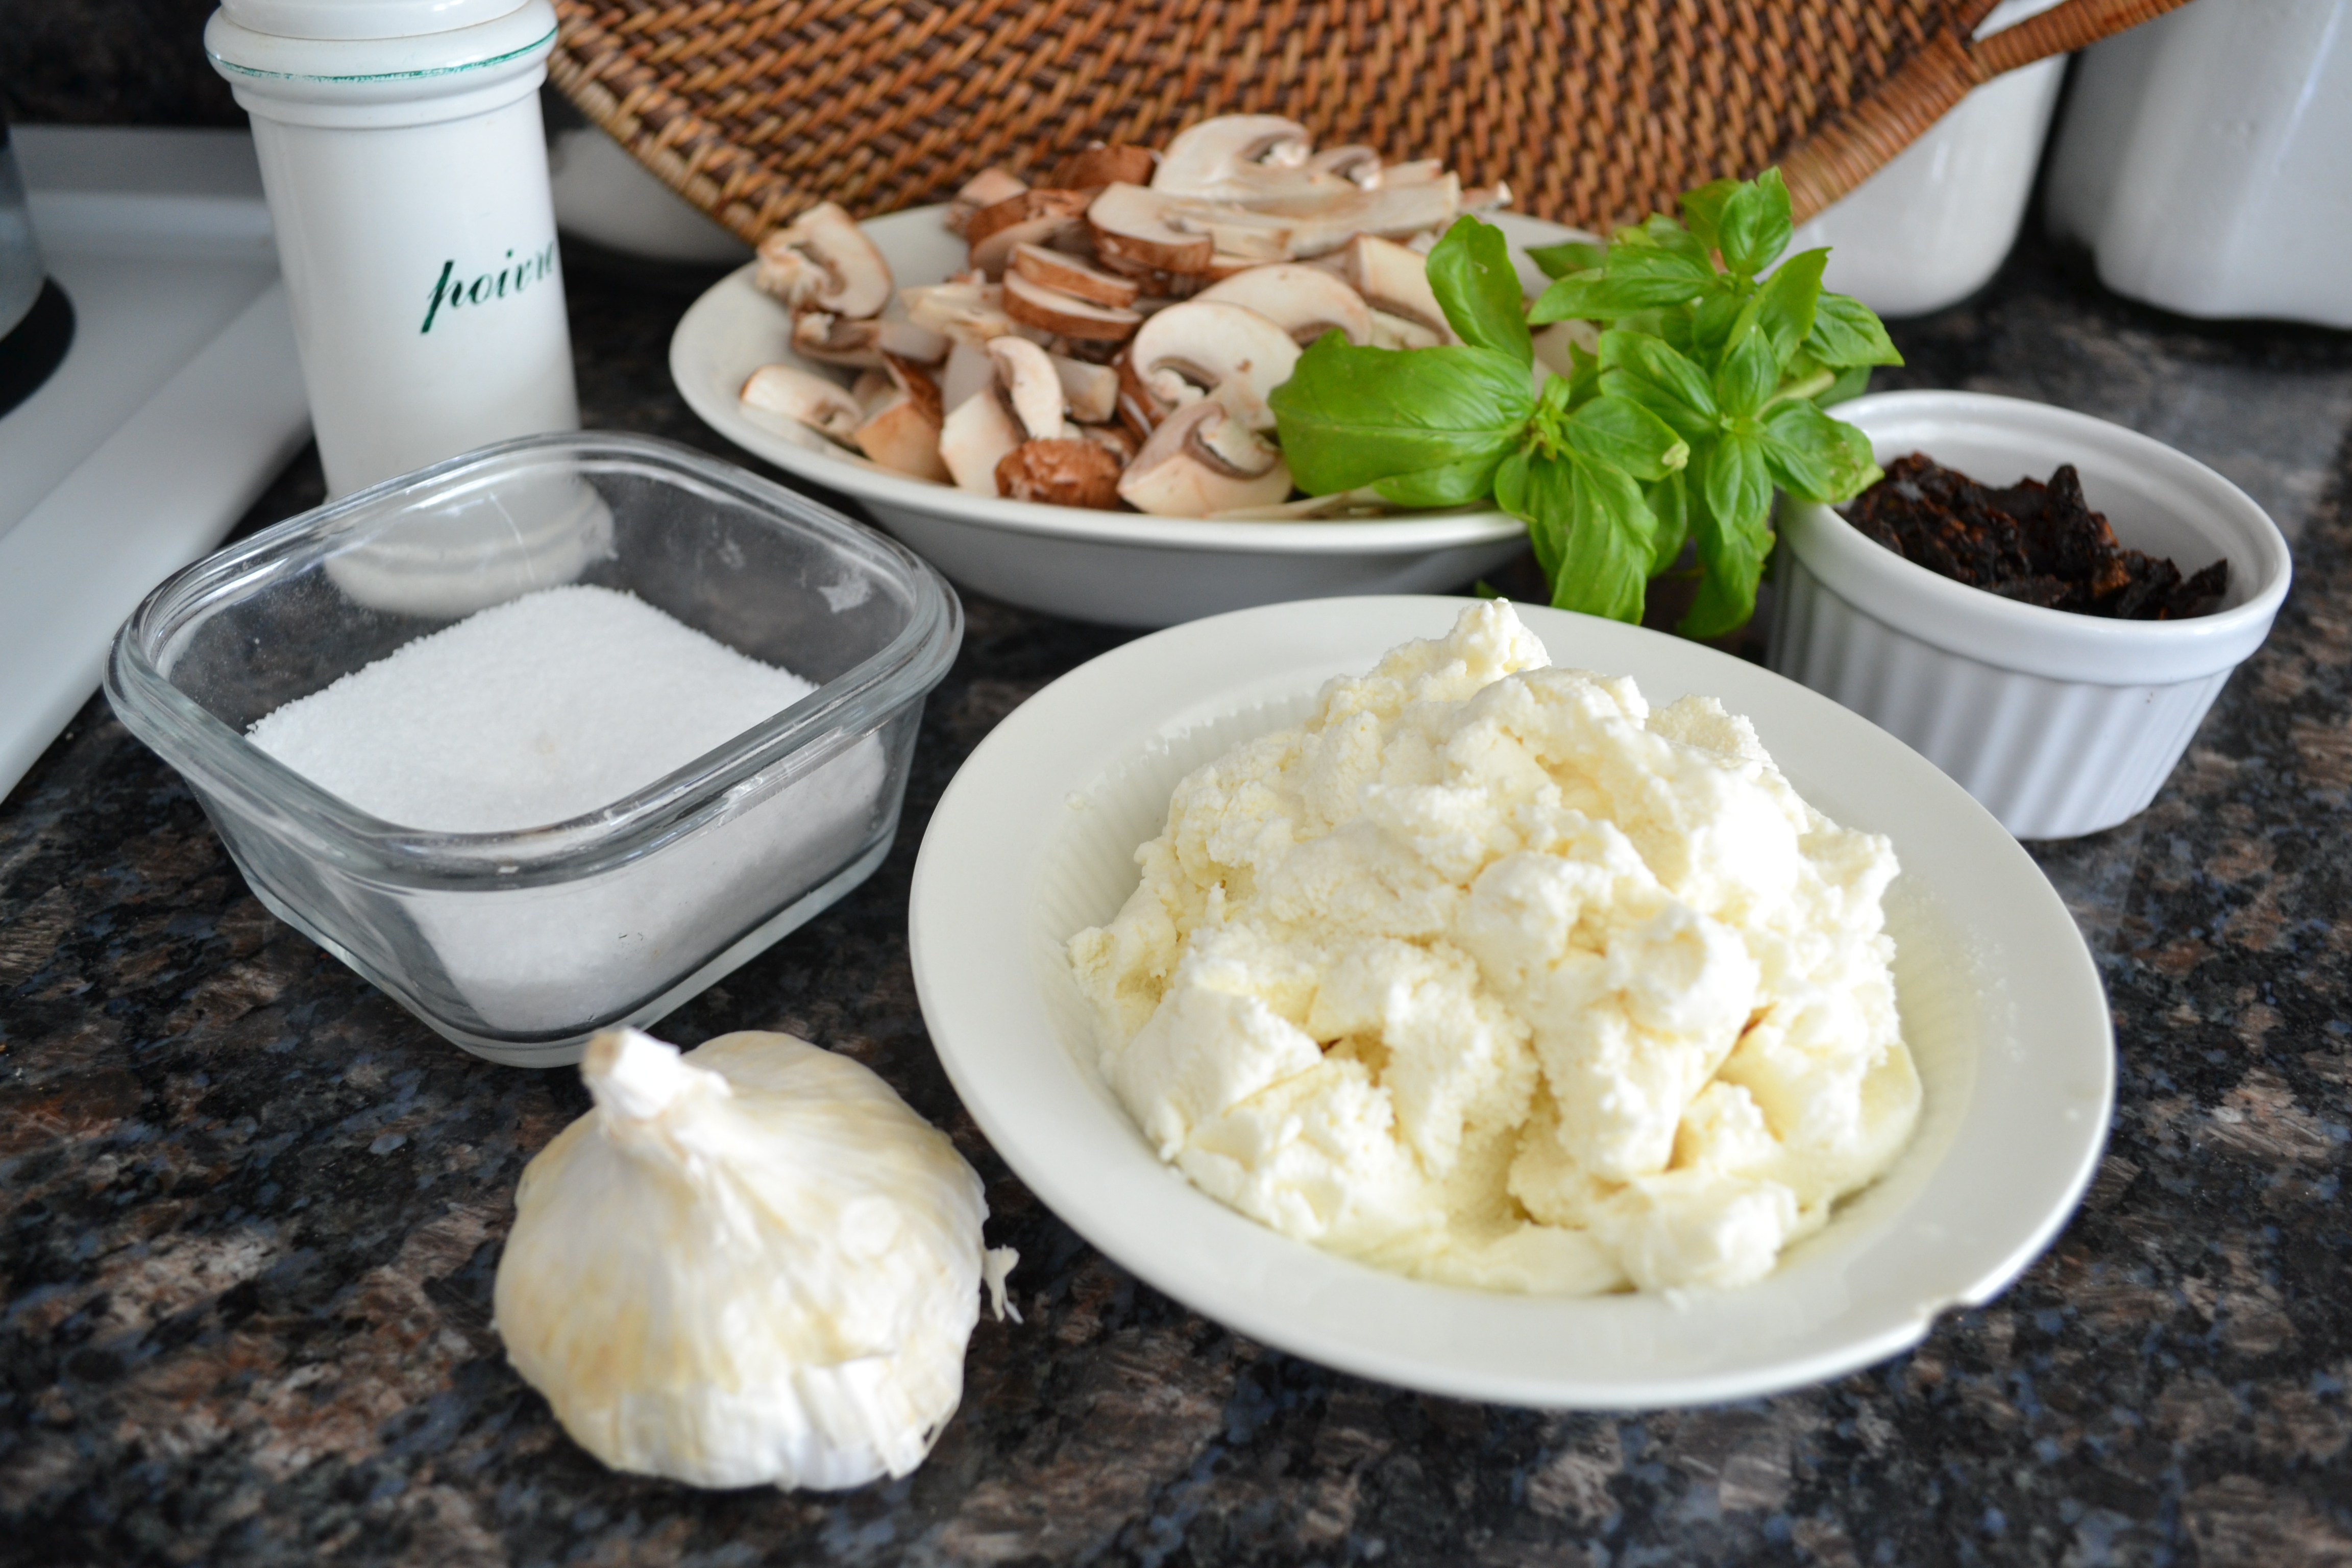
1/4 cup of olive oil, (sadly, omitted from the photo)
2 tbsp. butter (also, sadly, omitted)
16 oz. baby bella mushrooms, sliced and washed
5 cloves of garlic, chopped
1/4 cup sun-dried tomatoes, chopped
a couple sprigs of fresh basil (stems removed)
1/2 cup of ricotta cheese (not nearly as much as appears in the photo)
kosher salt and freshly ground pepper, to taste
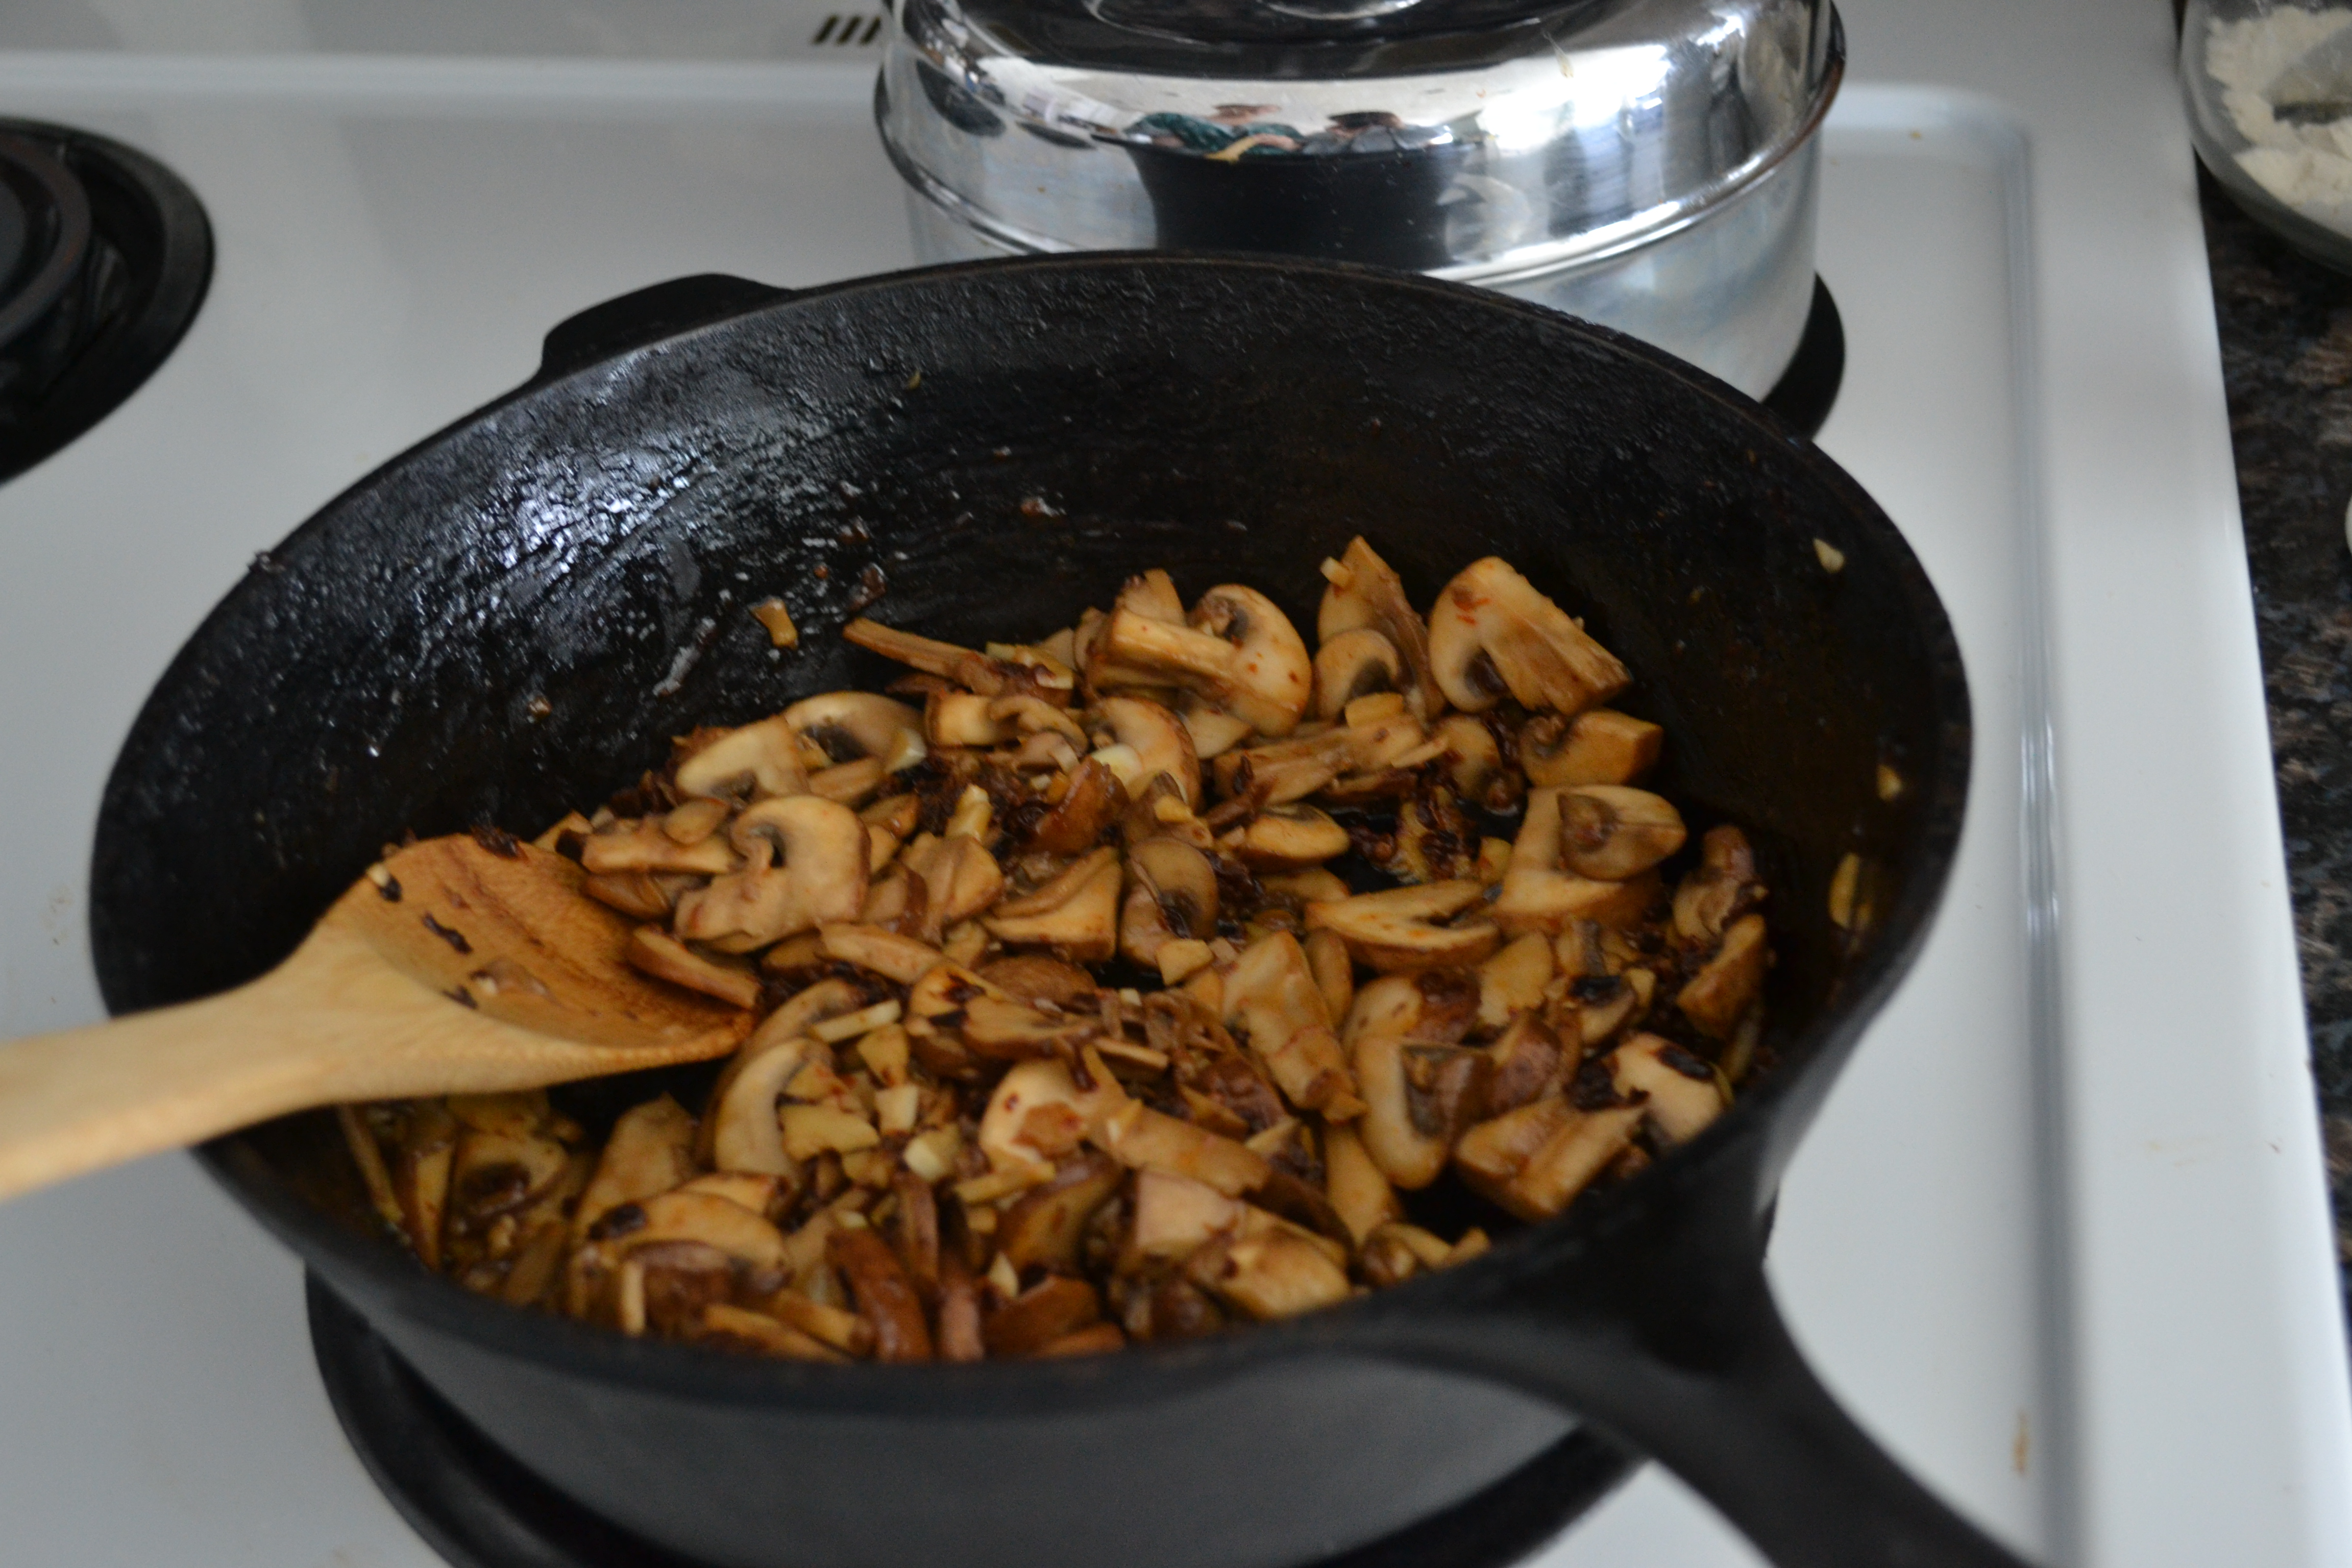
1. In a cast iron skillet, saute mushrooms in olive oil and butter. Add garlic, chopped sun-dried tomatoes, salt and pepper. Continue to stir until heated through and flavors are well-mixed.
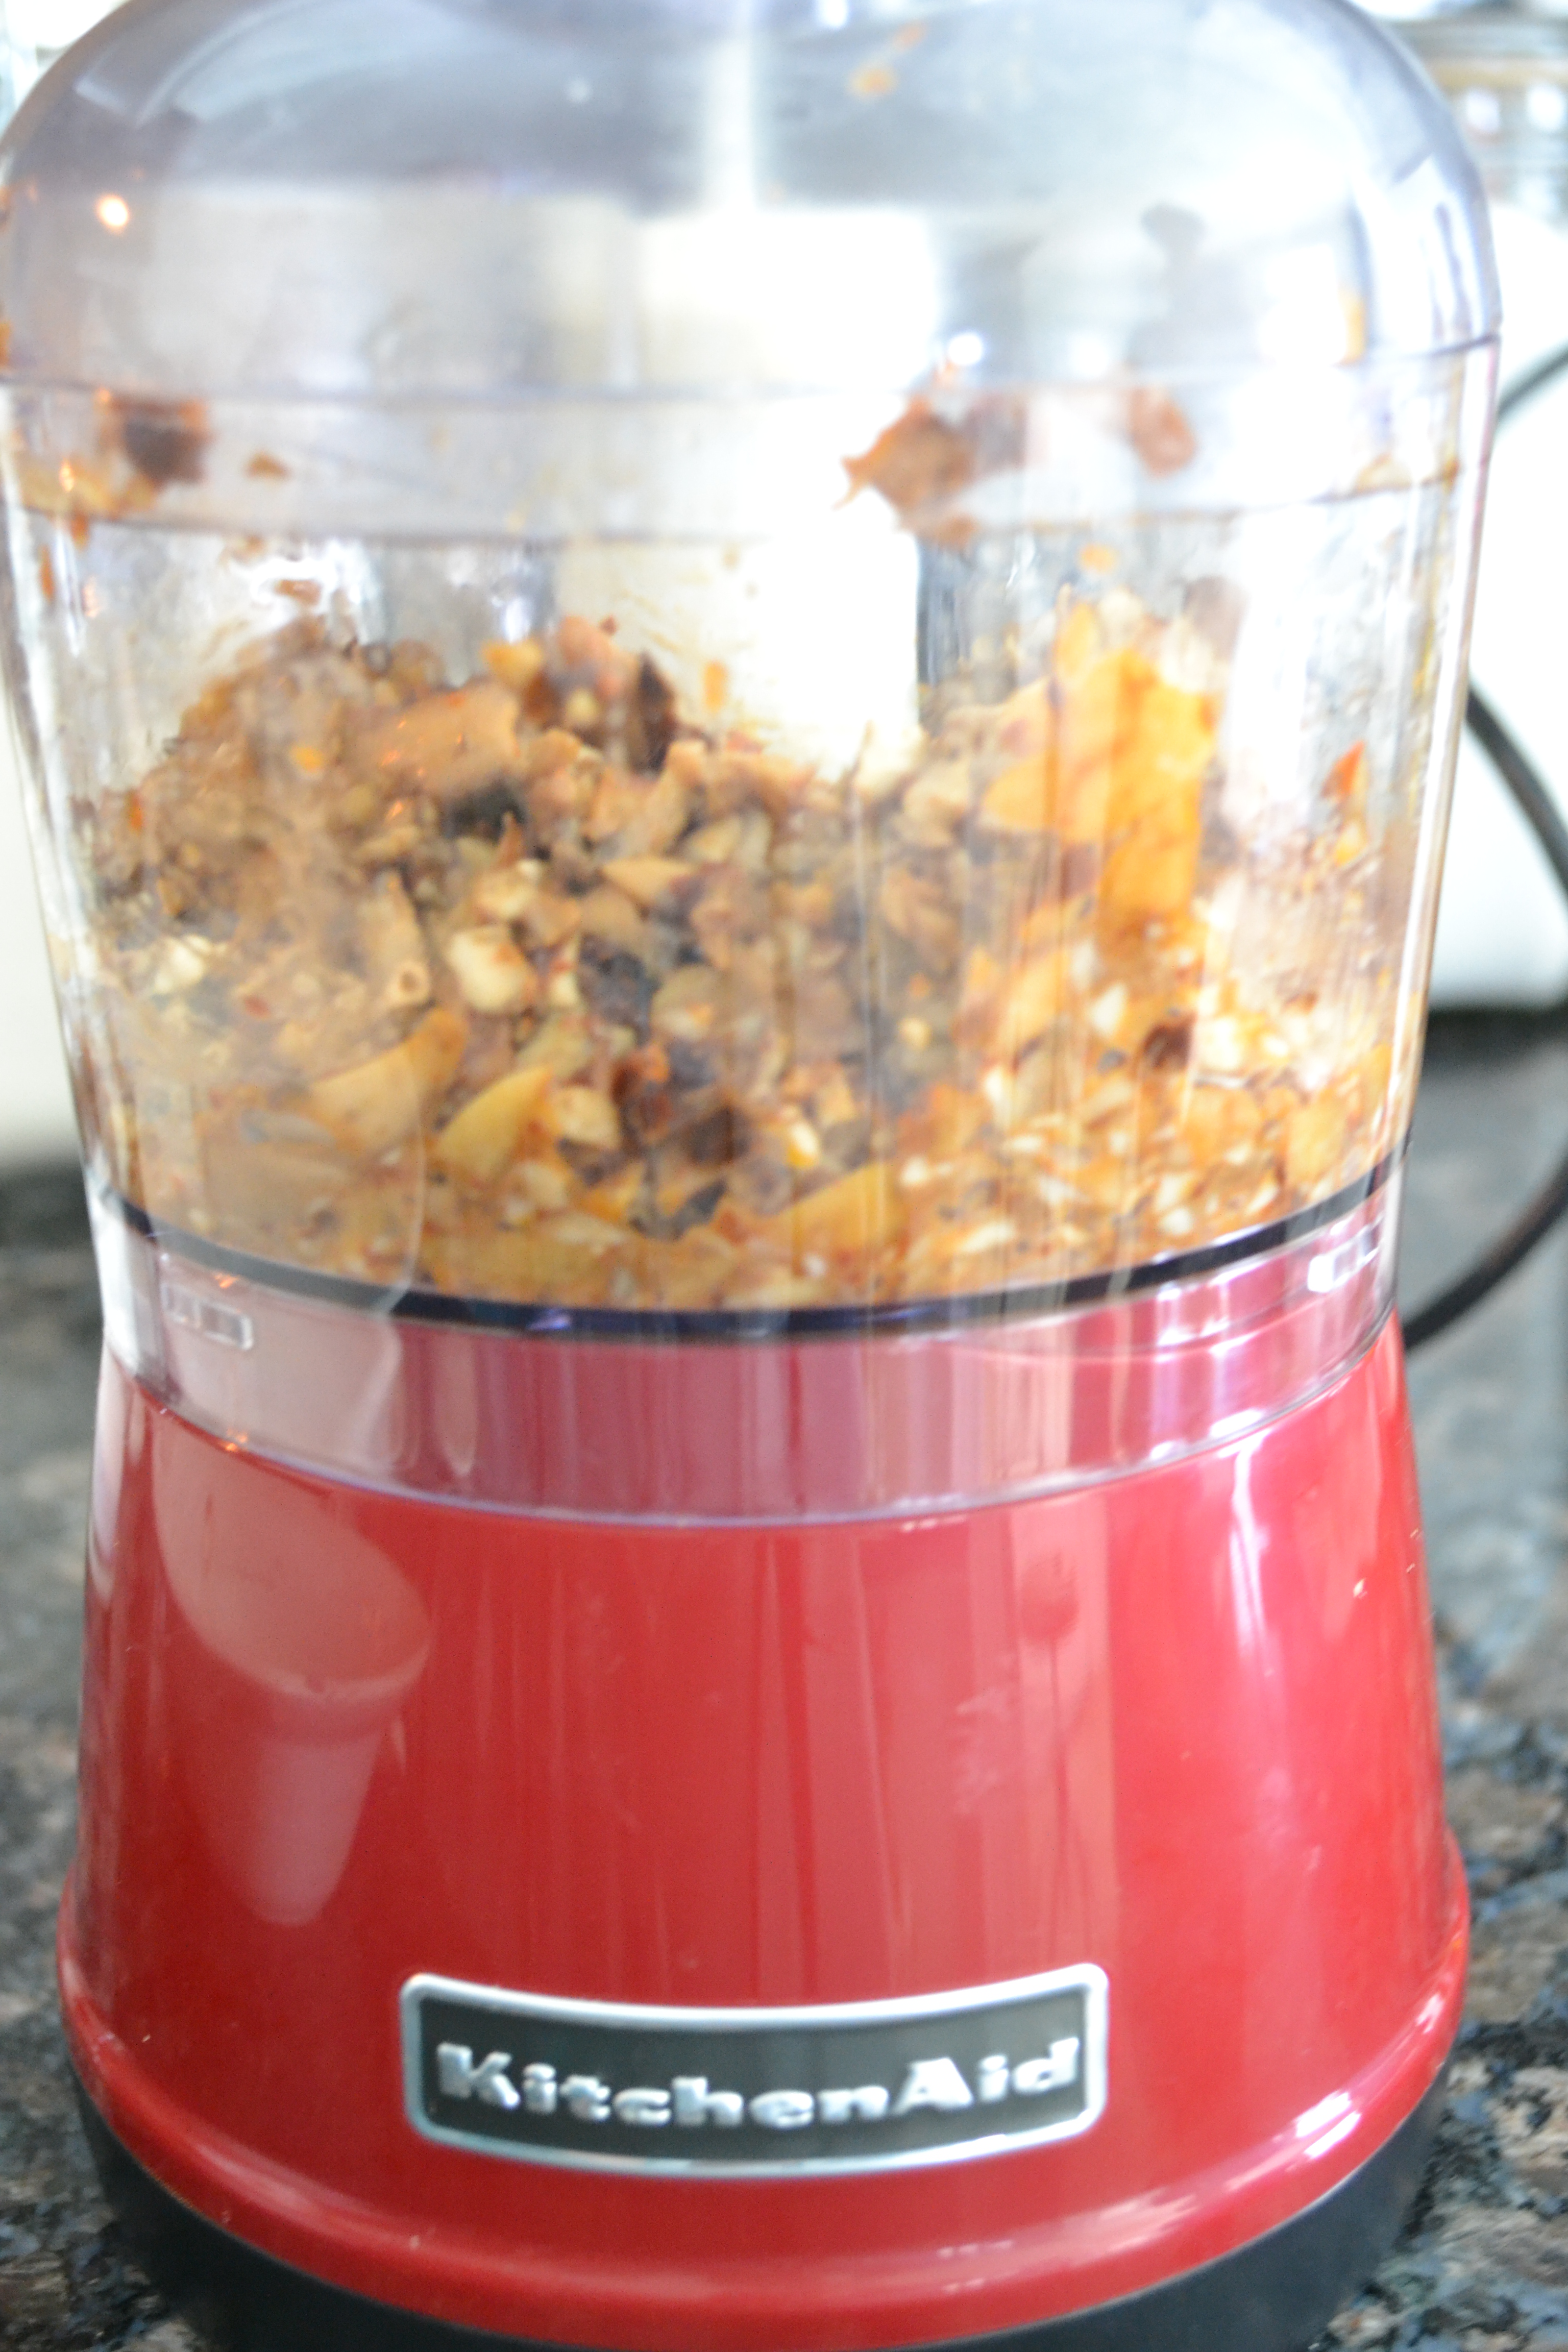
2. In a food processor, combine sauteed mixture, ricotta (a little at time), and basil until well combined. Taste often! Just because tasting is fun!

Next, we decided that this tasty filling combination would be complimented nicely by a creamy sauce:
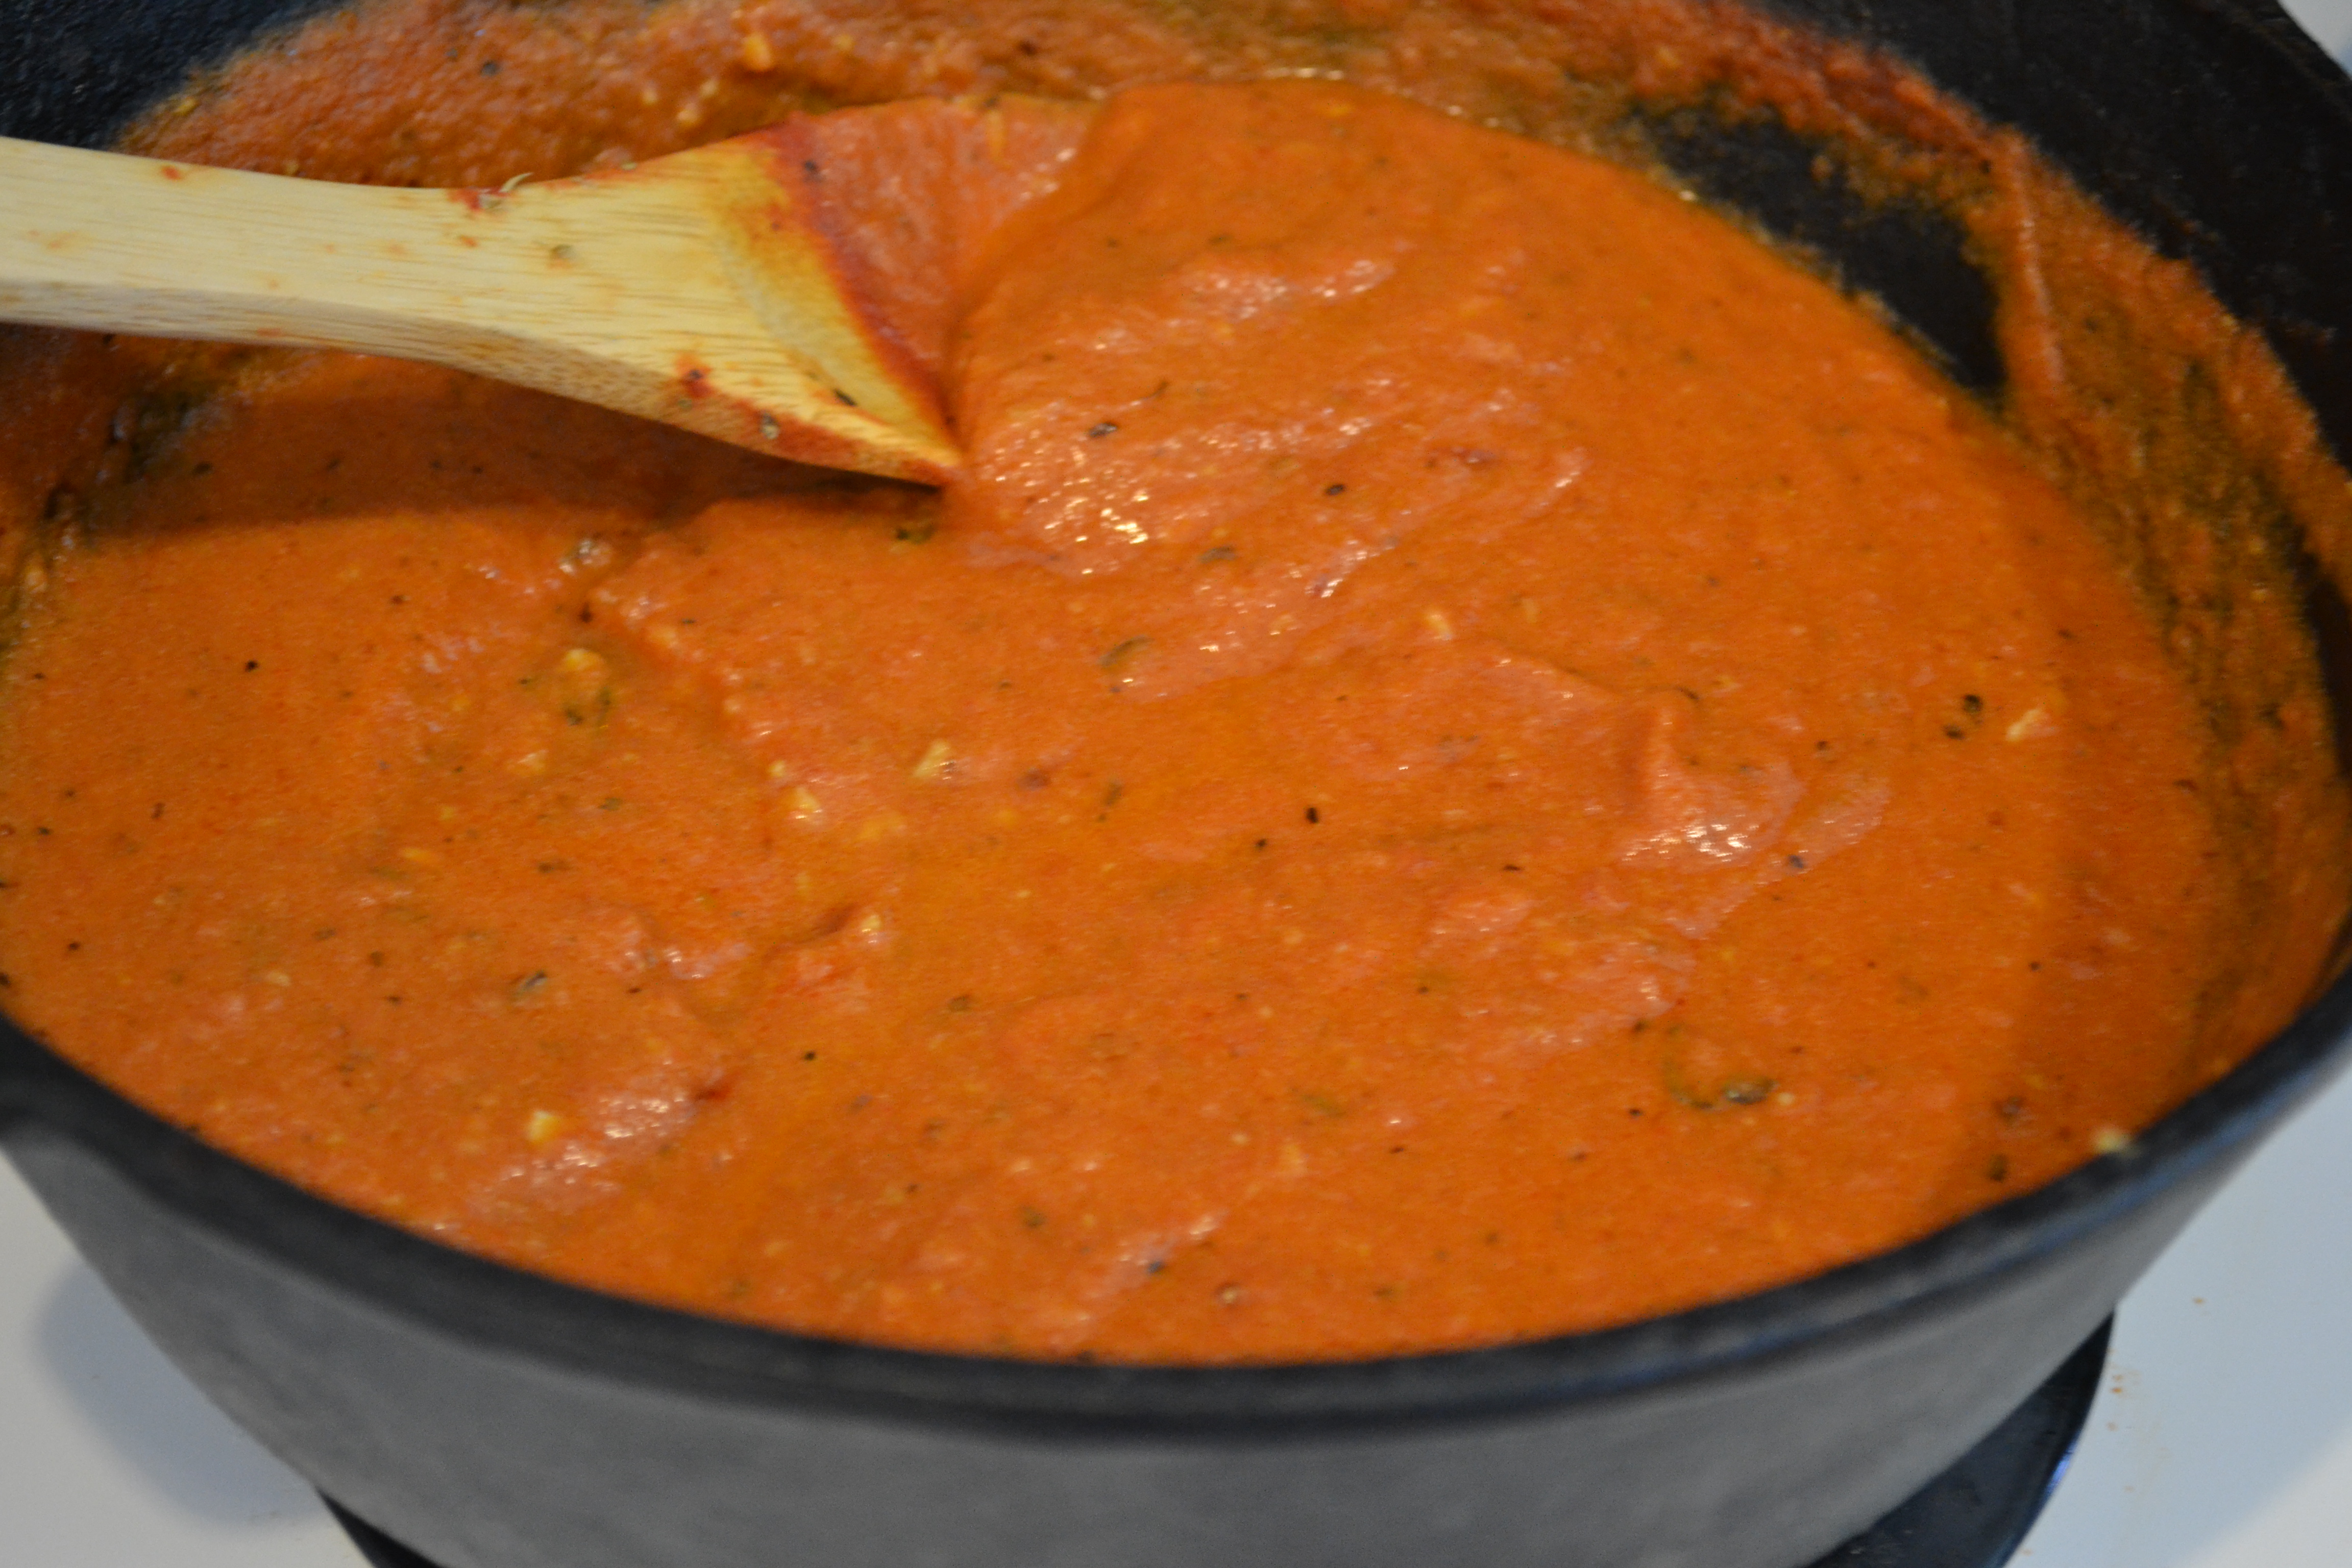
Creamy Tomato-Basil Sauce

a couple tbsps. olive oil
6 cloves of garlic, finely chopped
28 oz. or so of canned, crushed tomatoes
a glug (a couple of tbsp.) of red wine
1 1/2 tsp. dried oregano
1/4 to 1/2 tsp. cayenne pepper (depending on preference)
1/2 tsp. ground white pepper
salt, to taste
1/2 cup half and half
1. In a cast iron skillet, heat olive oil and saute garlic. Add tomatoes and remaining ingredients except for half and half.
2. Simmer for 20 to 30 minutes.
3. Add half and half. Stir to mix.
4. Use immersion blender to bring to a creamy consistency.
Finally, we were ready for the fun part.
Playing with Pasta
Follow package directions for making semolina pasta. My experience is that, rather than using 100% semolina flour, a mix of 50% all-purpose flour and 50% semolina creates a smoother texture for the pasta.

3/4 cup Semolina Flour
3/4 cup All Purpose Unbleached White Flour
2 eggs (fresh if possible)
2 tbsp. Water
2 tbsp. Olive Oil
1. Combine flours and salt.
2. Add beaten eggs, water, and oil.
3. Mix to make a stiff dough.
4. Knead 10 minutes until dough is elastic.
5. Place dough in plastic zip bag and let rest 20 minutes.
6. On a lightly floured surface, cut dough in half and roll out flat (about 1/4 in. thick).
7. Run pasta through pasta machine in two batches according to manufacturer’s instructions until pasta is at thinnest setting. Be sure to dust both sides of pasta with flour to prevent sticking. Depending on your climate, you may need to lay a slightly moistened kitchen towel or paper towel over any pasta that you aren’t currently working with. You might also just put it back into a plastic zip bag.

8. At this point, it is important to notice that my pasta isn’t perfectly straight along the edges. That isn’t really necessary. Since we were playing with pasta, I used my new little scoopy thing to add about a tsp. of the ravioli filling to each square of pasta. In the picture, you can see the ravioli cutter. It has a spring-loaded center that allows it to adjust to different amounts of filling. The fluted edges provided a good seal all the way around each ravioli, which is important when the pasta is boiling, so that the filling doesn’t escape into the water.
It isn’t necessary to use the cool little apparatus that we did. We’ve made ravioli before by spreading out a thin sheet of pasta and applying about a 1/2 tsp. of filling every 2 inches or so down the length of the pasta. Using an egg wash as glue, dip a clean finger or pastry brush into the egg and paint around each blop of filling. Either fold over the other half of the pasta to cover the filling or lay a second layer of pasta over the filling to cover. Gently press second layer of pasta around filling, trying to remove as much air as possible from your ravioli. Seal around with your fingers and cut each ravioli out. There will probably be lots of scrap pasta. I always resquish, reroll, and use to make another batch.
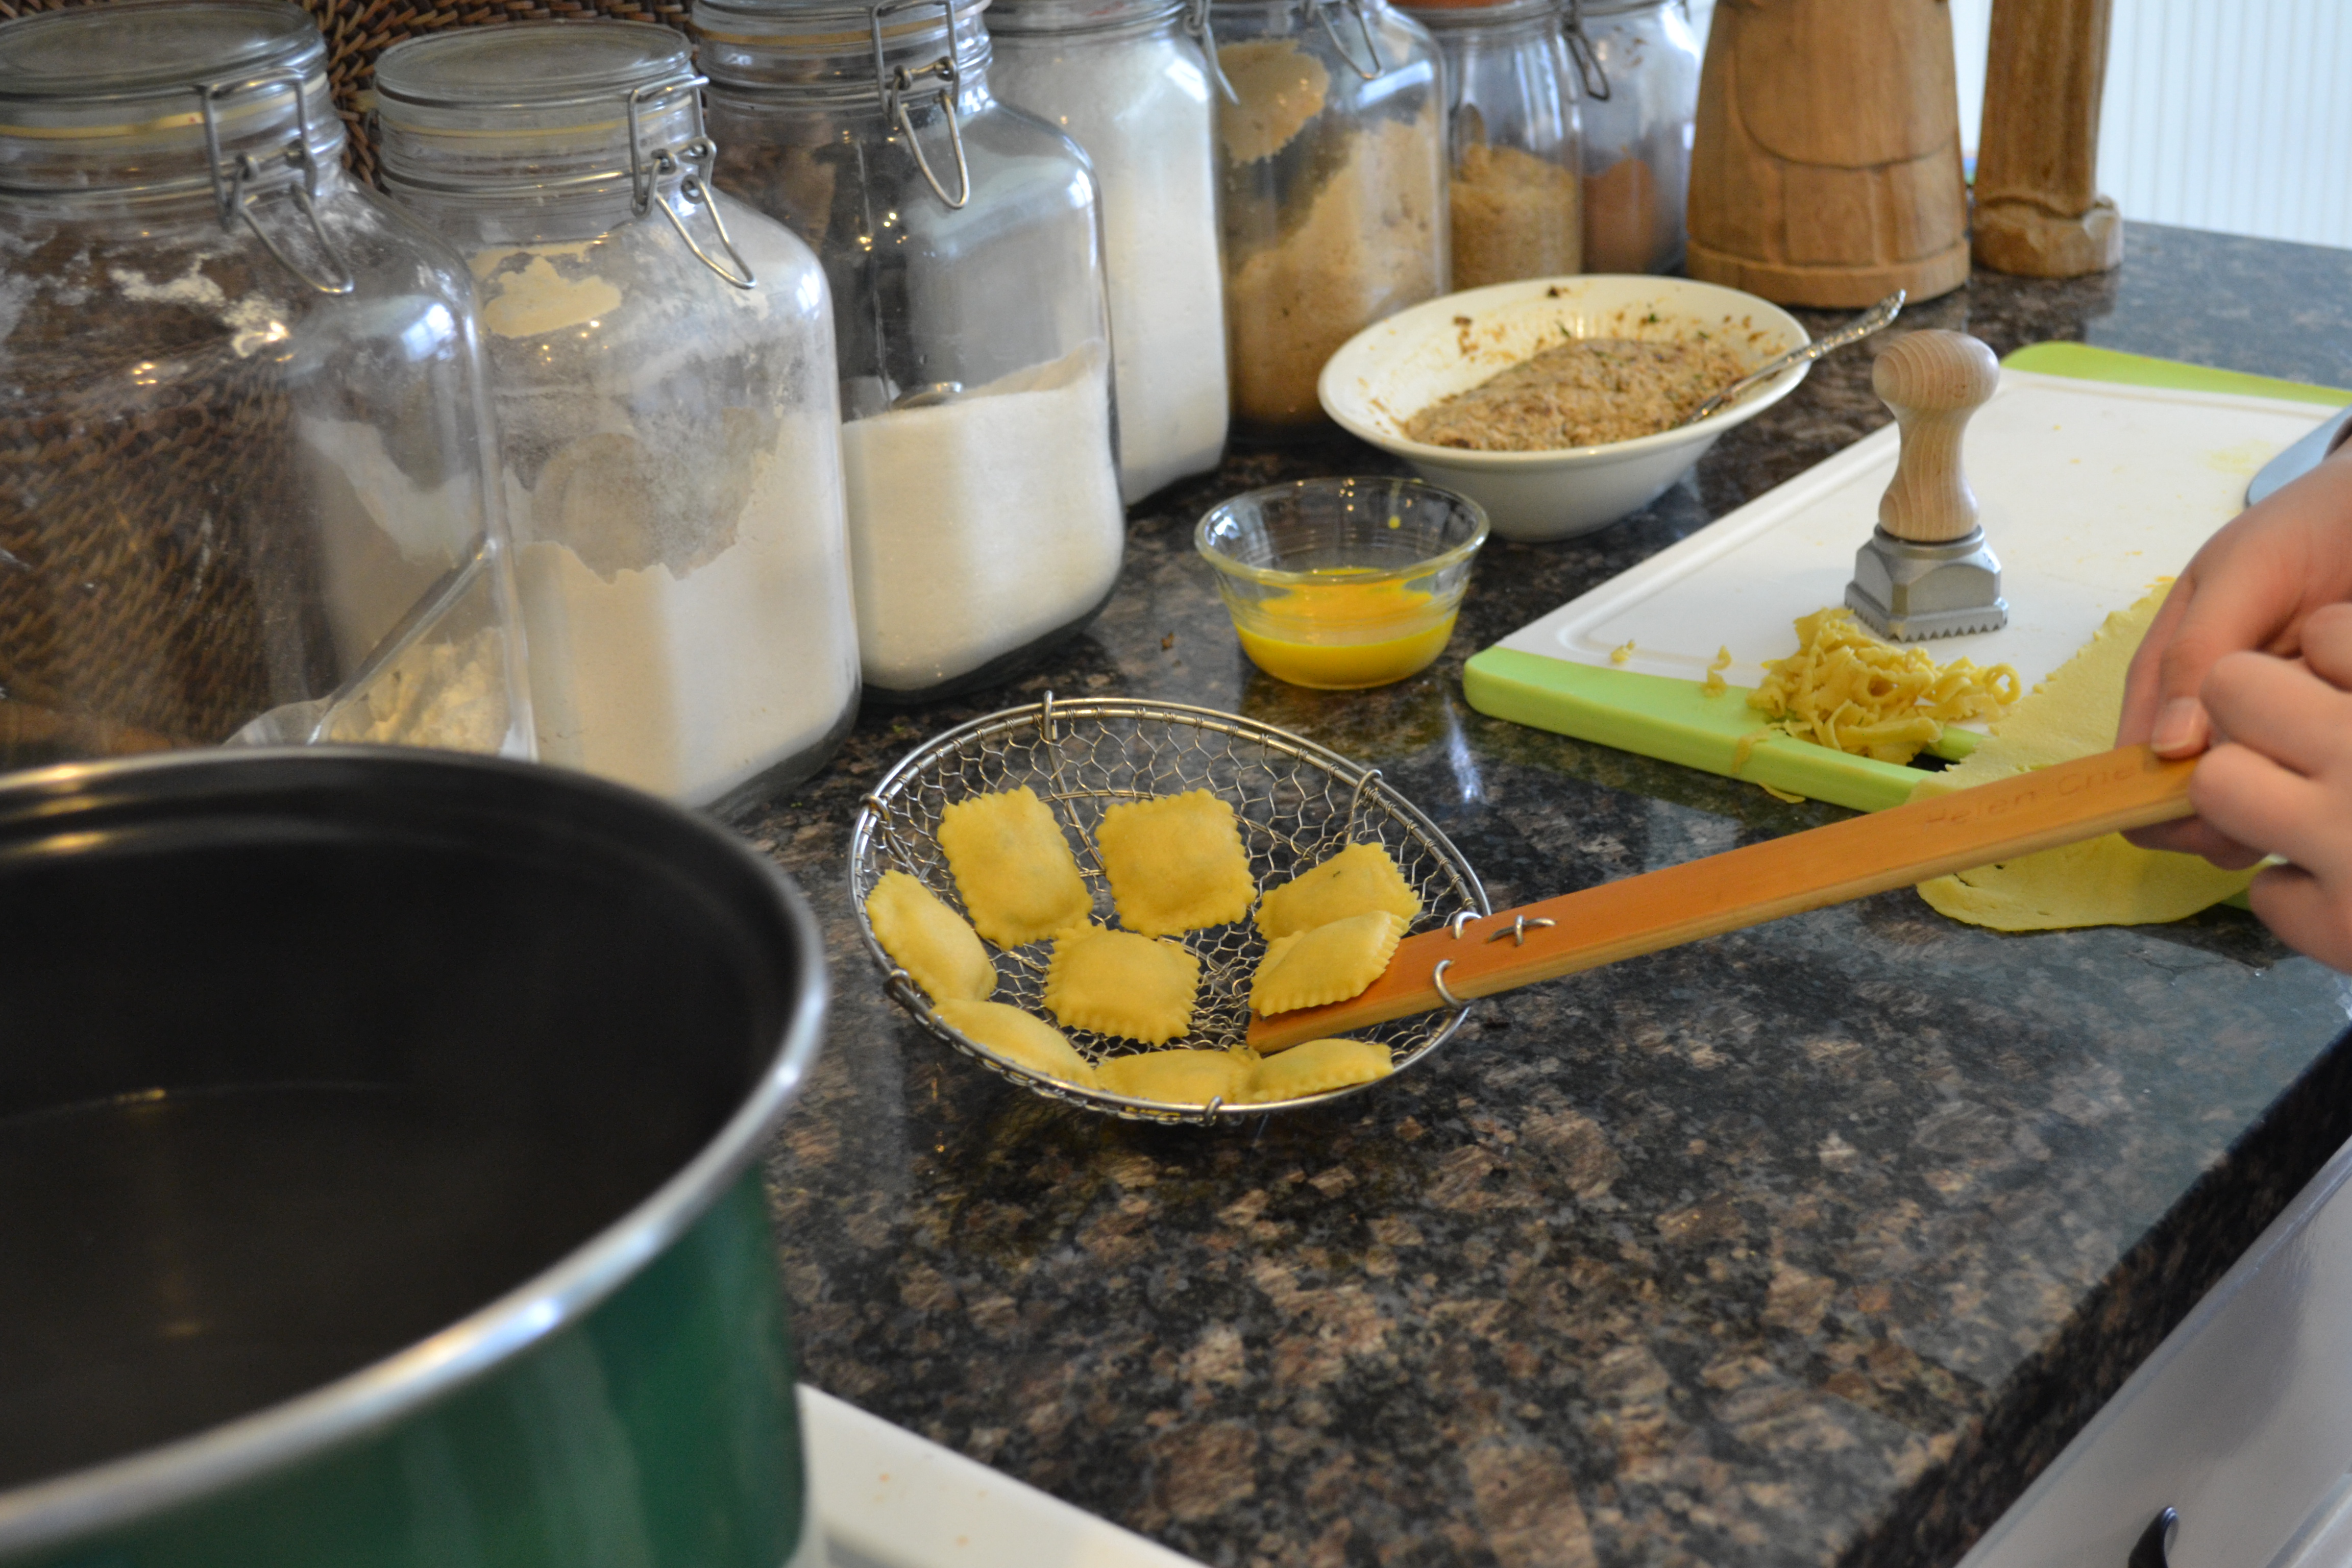
9. Bring a large pot of water, with a little olive oil, to a rapid boil. Using a slotted spoon or spider (see picture of the one I received for Mother’s Day 2010) add ravioli, a few at a time, so they don’t stick together. Reduce heat to medium.

The ravioli will sink initially, so gently stir to prevent sticking to the bottom of the pot. It will take only about a minute or two for the ravioli to be done. It takes no time at all for fresh pasta. You’ll know they are ready to be removed because they begin to float to the top of the water.
10. Remove to a plate. Gently dab the bottom of the spoon or spider with a dry kitchen towel or paper towel to remove excess water.
11. Pour fabulous Creamy Tomato-Basil Sauce over ravioli and relish the moment!
Chinese Venison with Broccoli and Sugar Snap Peas

No, this is not an authentic recipe. No, I don’t know if the Chinese eat venison at all. I DO know that this is a recipe that uses venison in its purest form, seared and deliciously rare. It also incorporates Asian flavors like fresh ginger, garlic, sesame, red pepper flakes and soy sauce that compliment the meat. That is VERY important. Like most of my dishes, this one has evolved. It started out as a recipe from a friend who prepared it using beef for her family. It required the dredging of beef strips in flour and flash-frying. If you prefer it that way, go ahead.
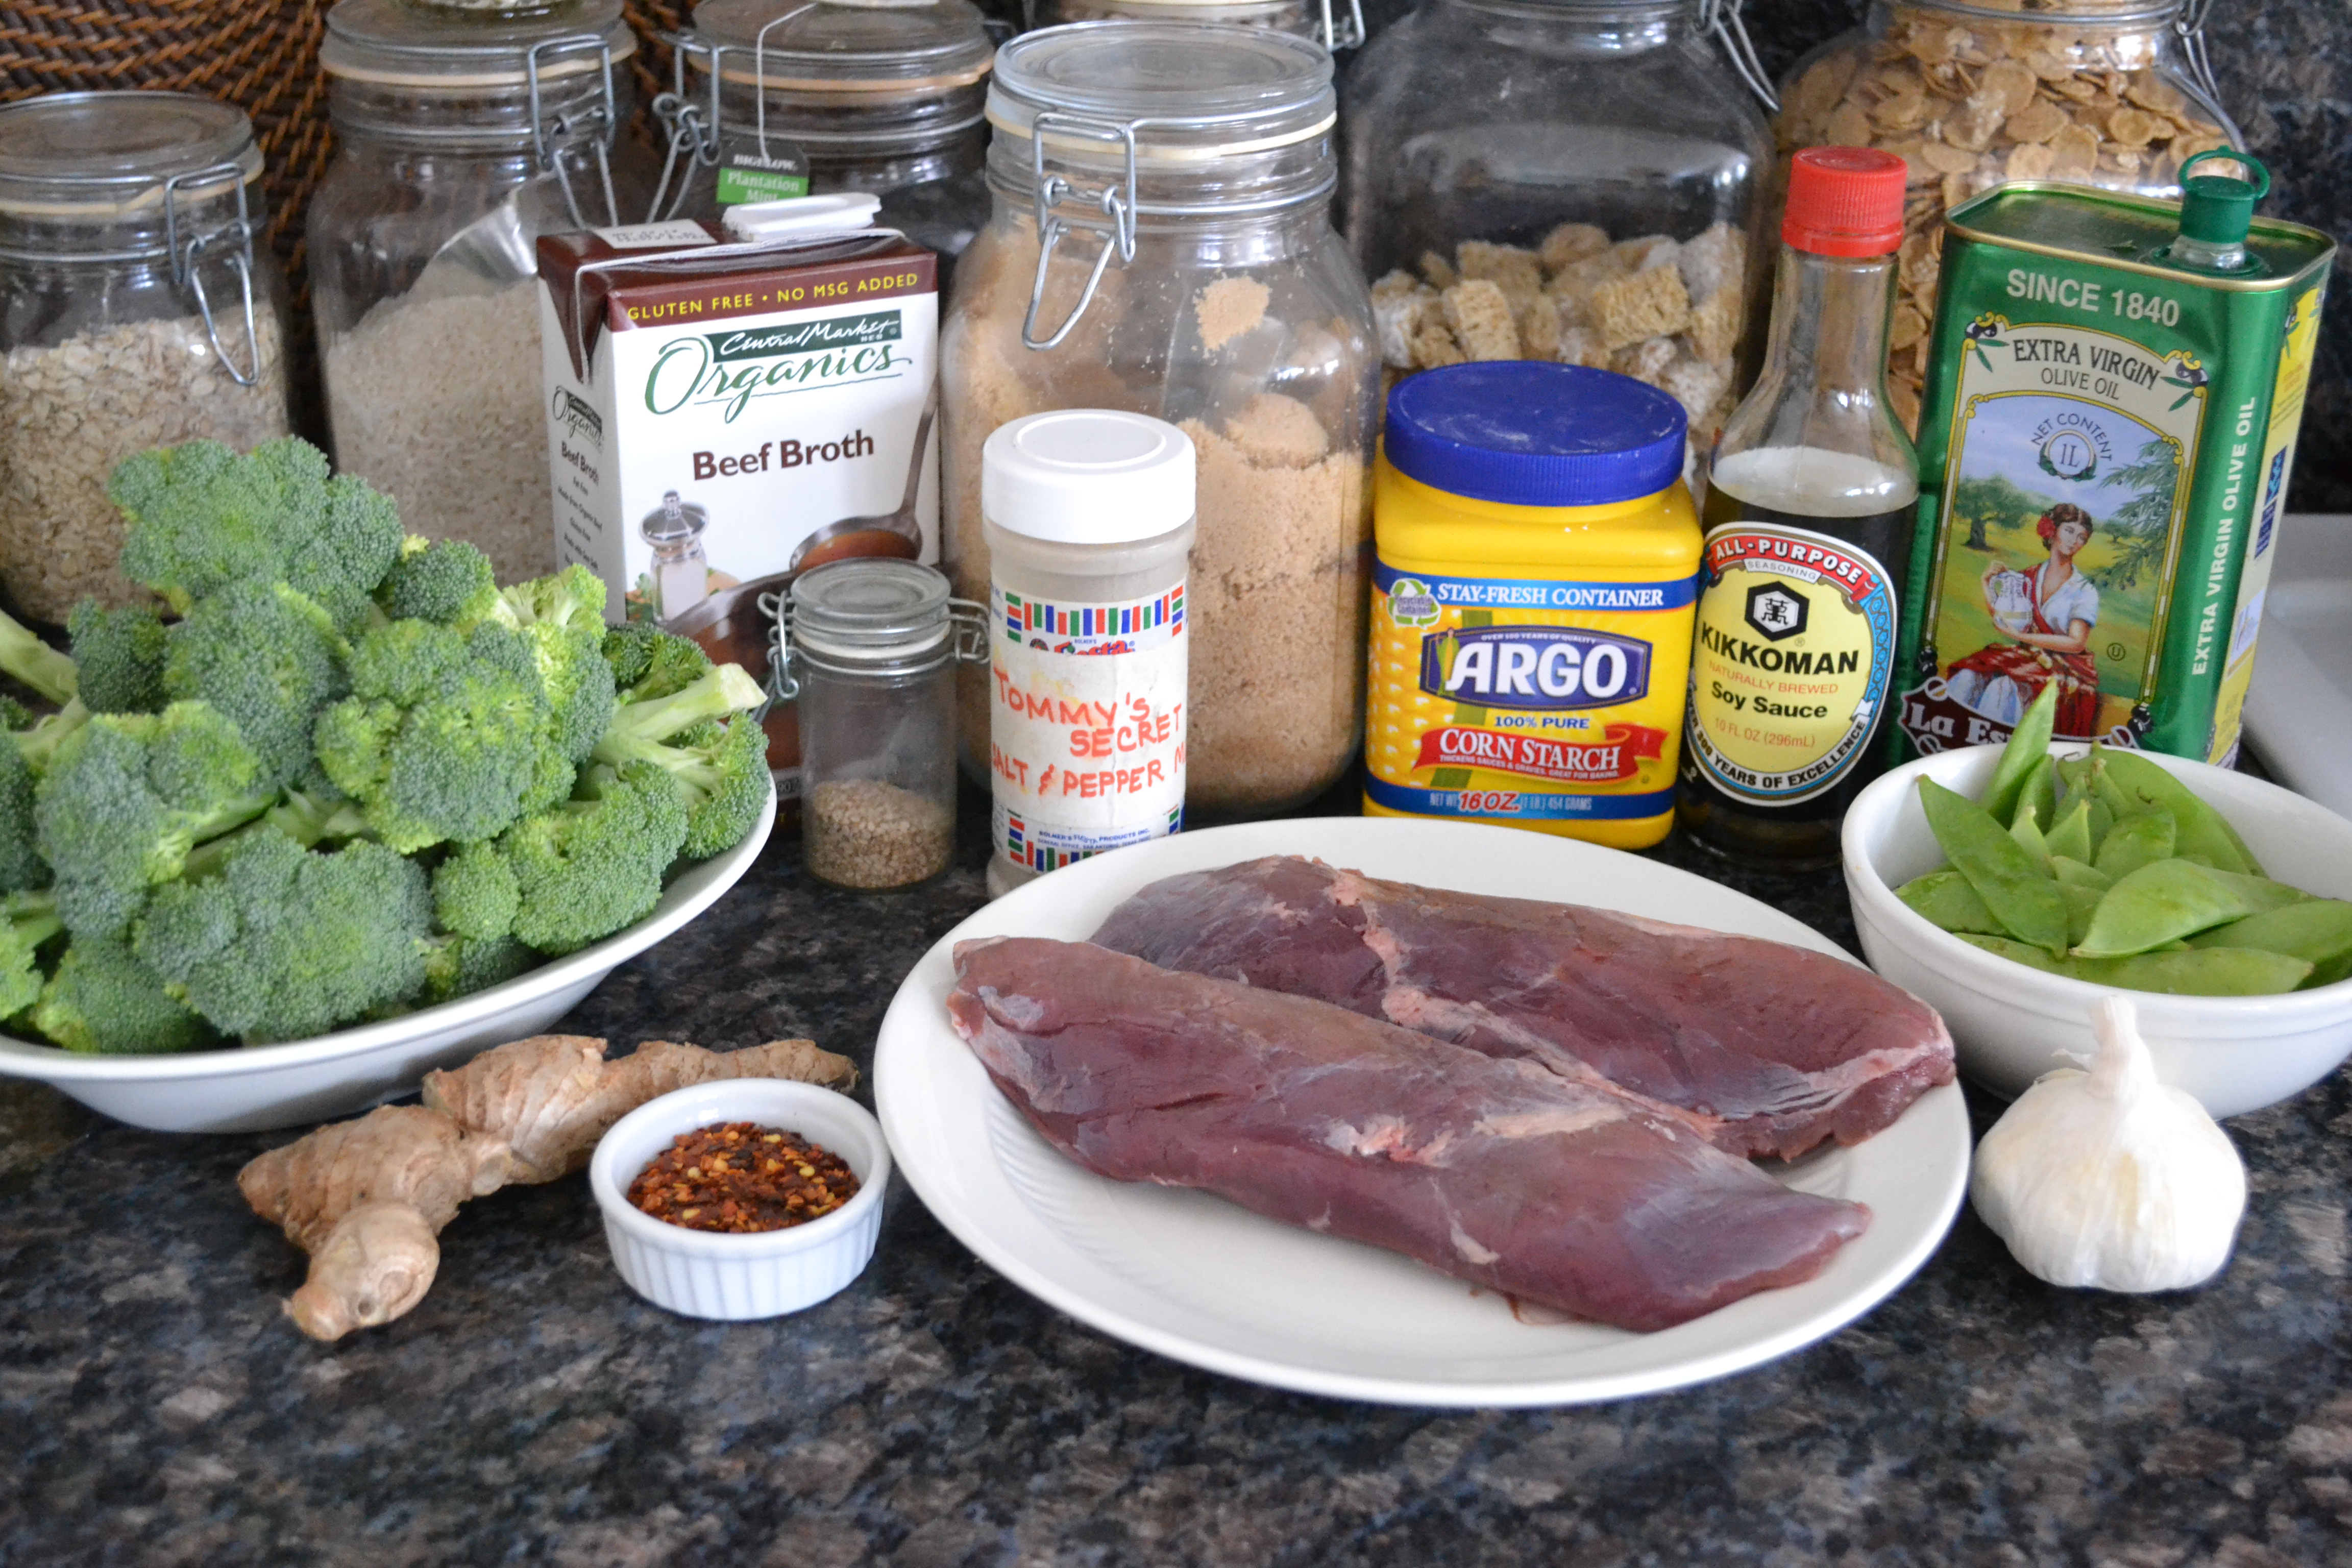
You will need:
one venison tenderloin, cleaned of sinew and fashia
salt & pepper mix
oil
1 bunch broccoli crowns
2 handfuls sugar snap peas
1 bunch chives, green parts chopped in 1 inch slices (cut on the diagonal if you want it to look pretty and if you’re O.C.D. like I am)
2 tbsp. chopped garlic
Preheat oven to 350°. Season tenderloin liberally with salt & pepper mix. Add oil to the bottom of a deep cast iron skillet.and heat oil on high. Sear tenderloin on all sides until beautifully crusted.

Place in oven-safe dish and bake for 10-15 minutes. While meat rests, steam broccoli and sugar snap peas just until tender crisp, about 15 minutes.
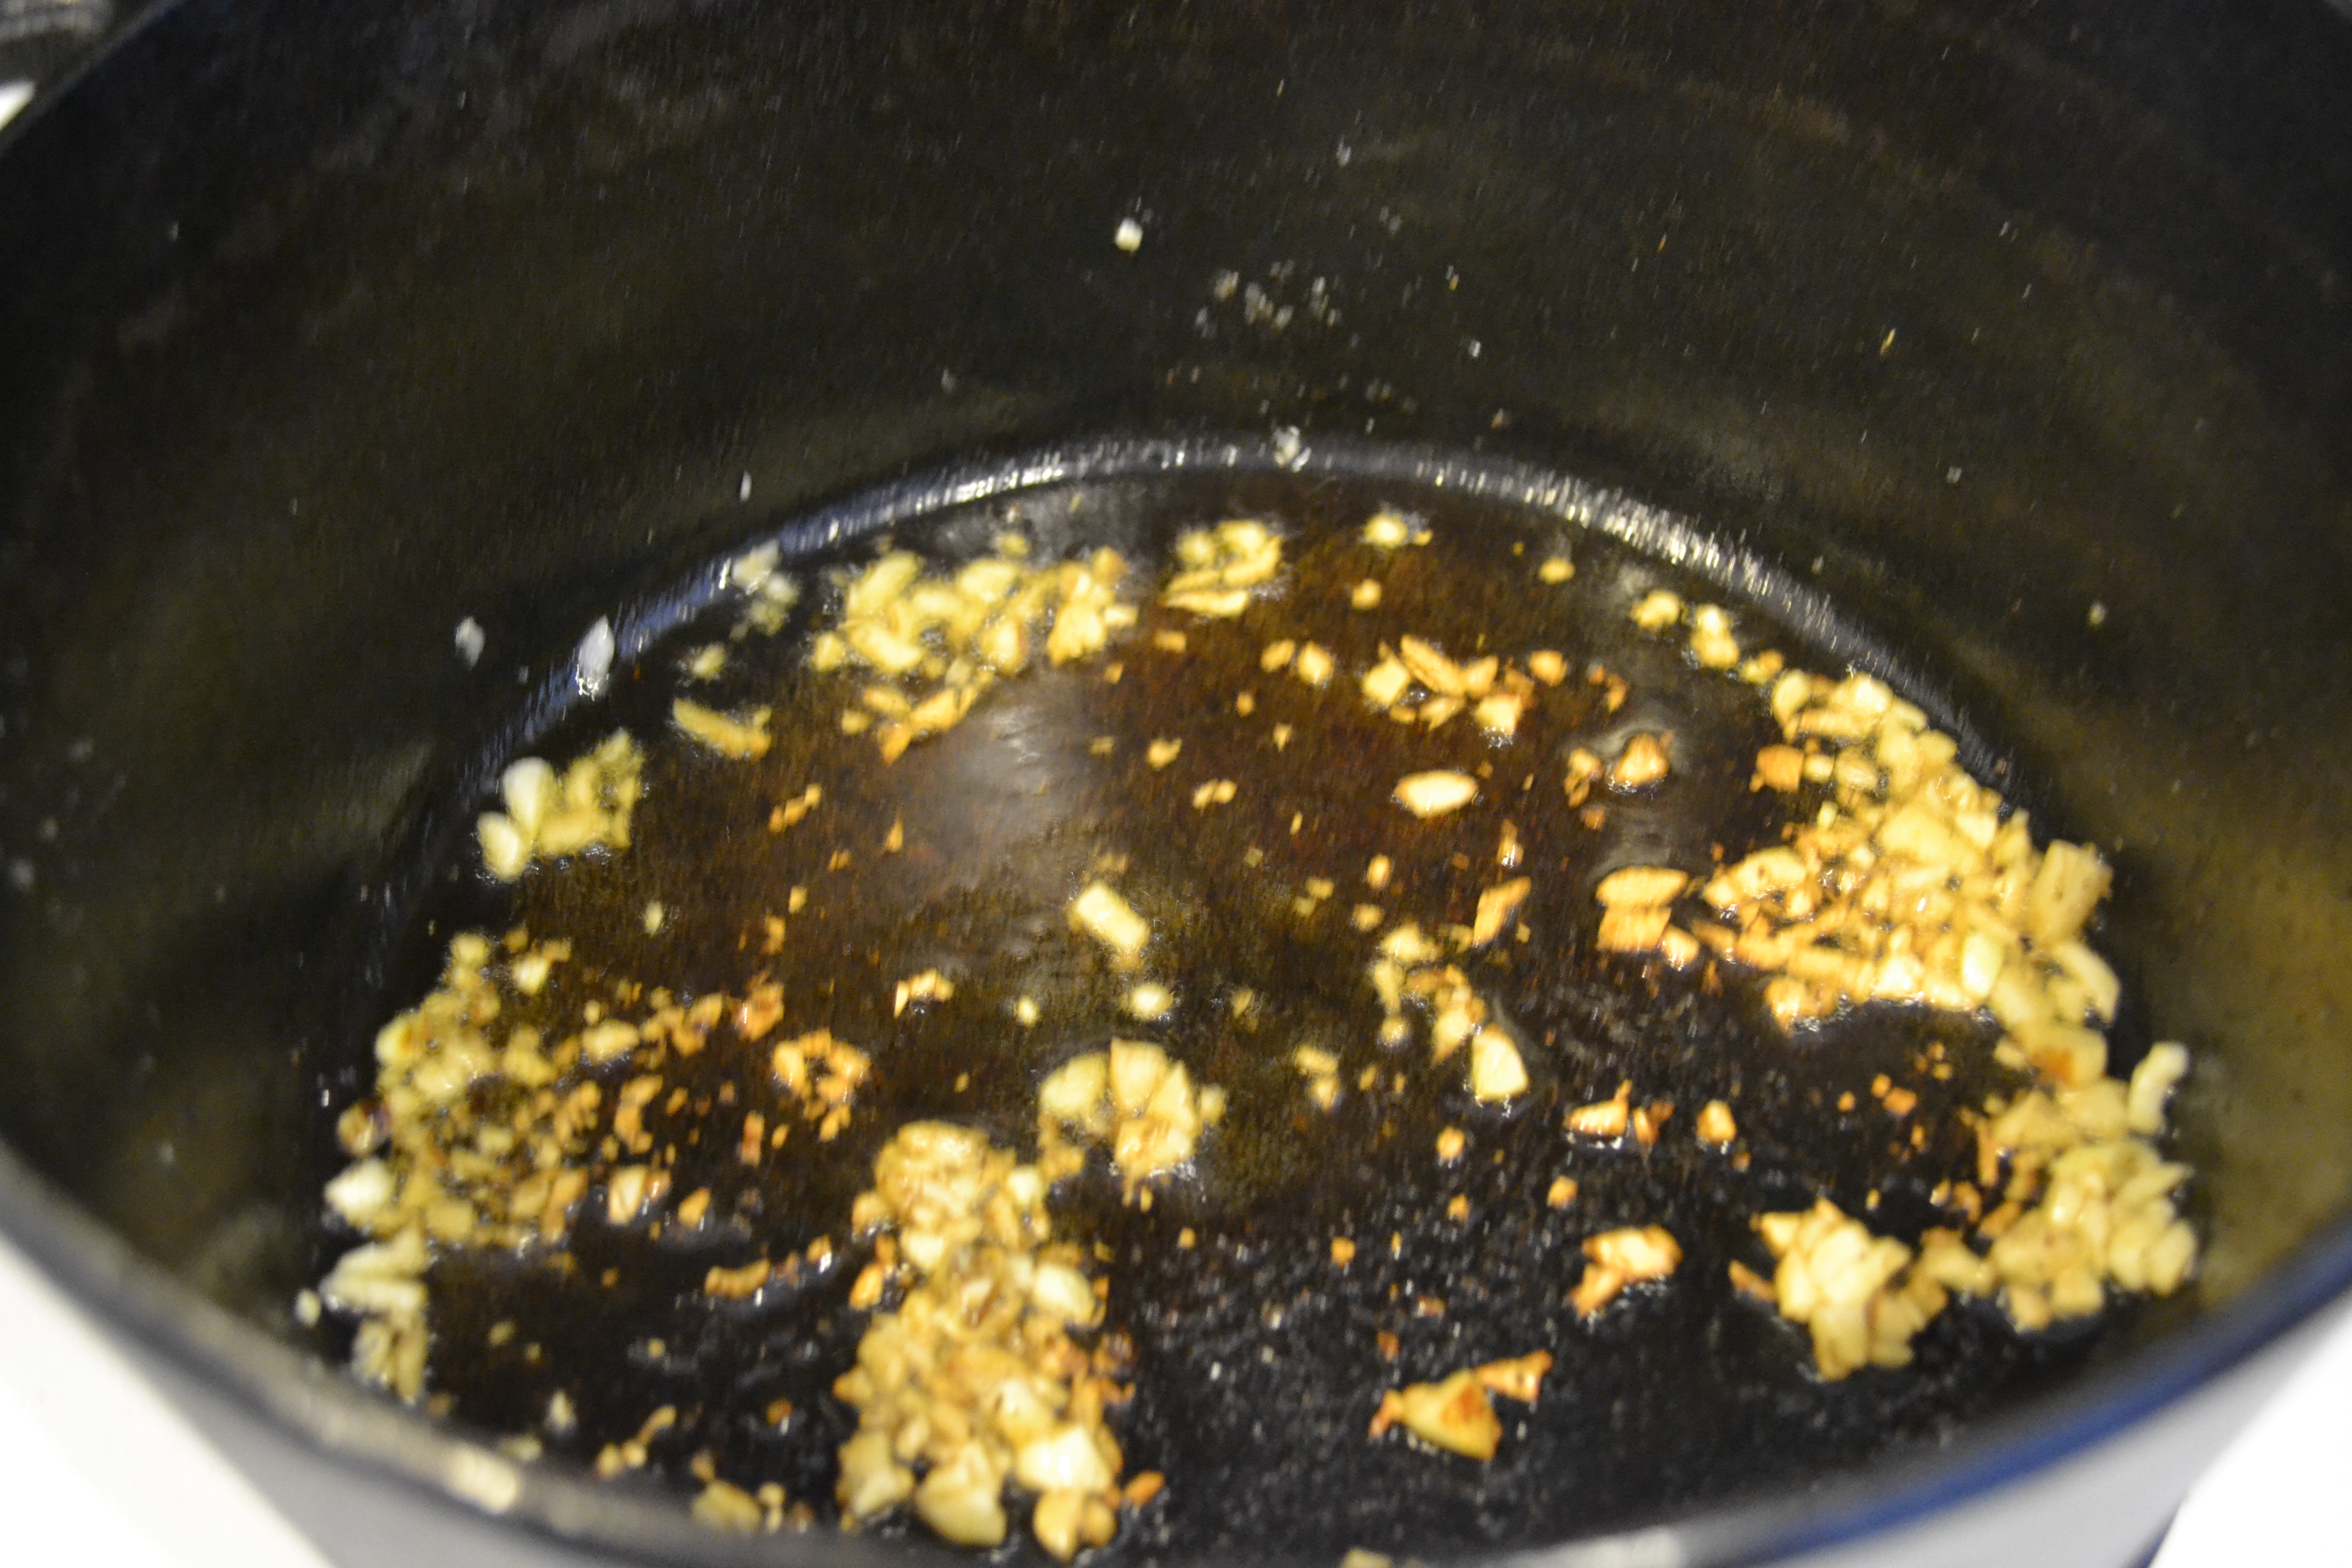
In the same cast iron skillet, saute′ garlic and chives.
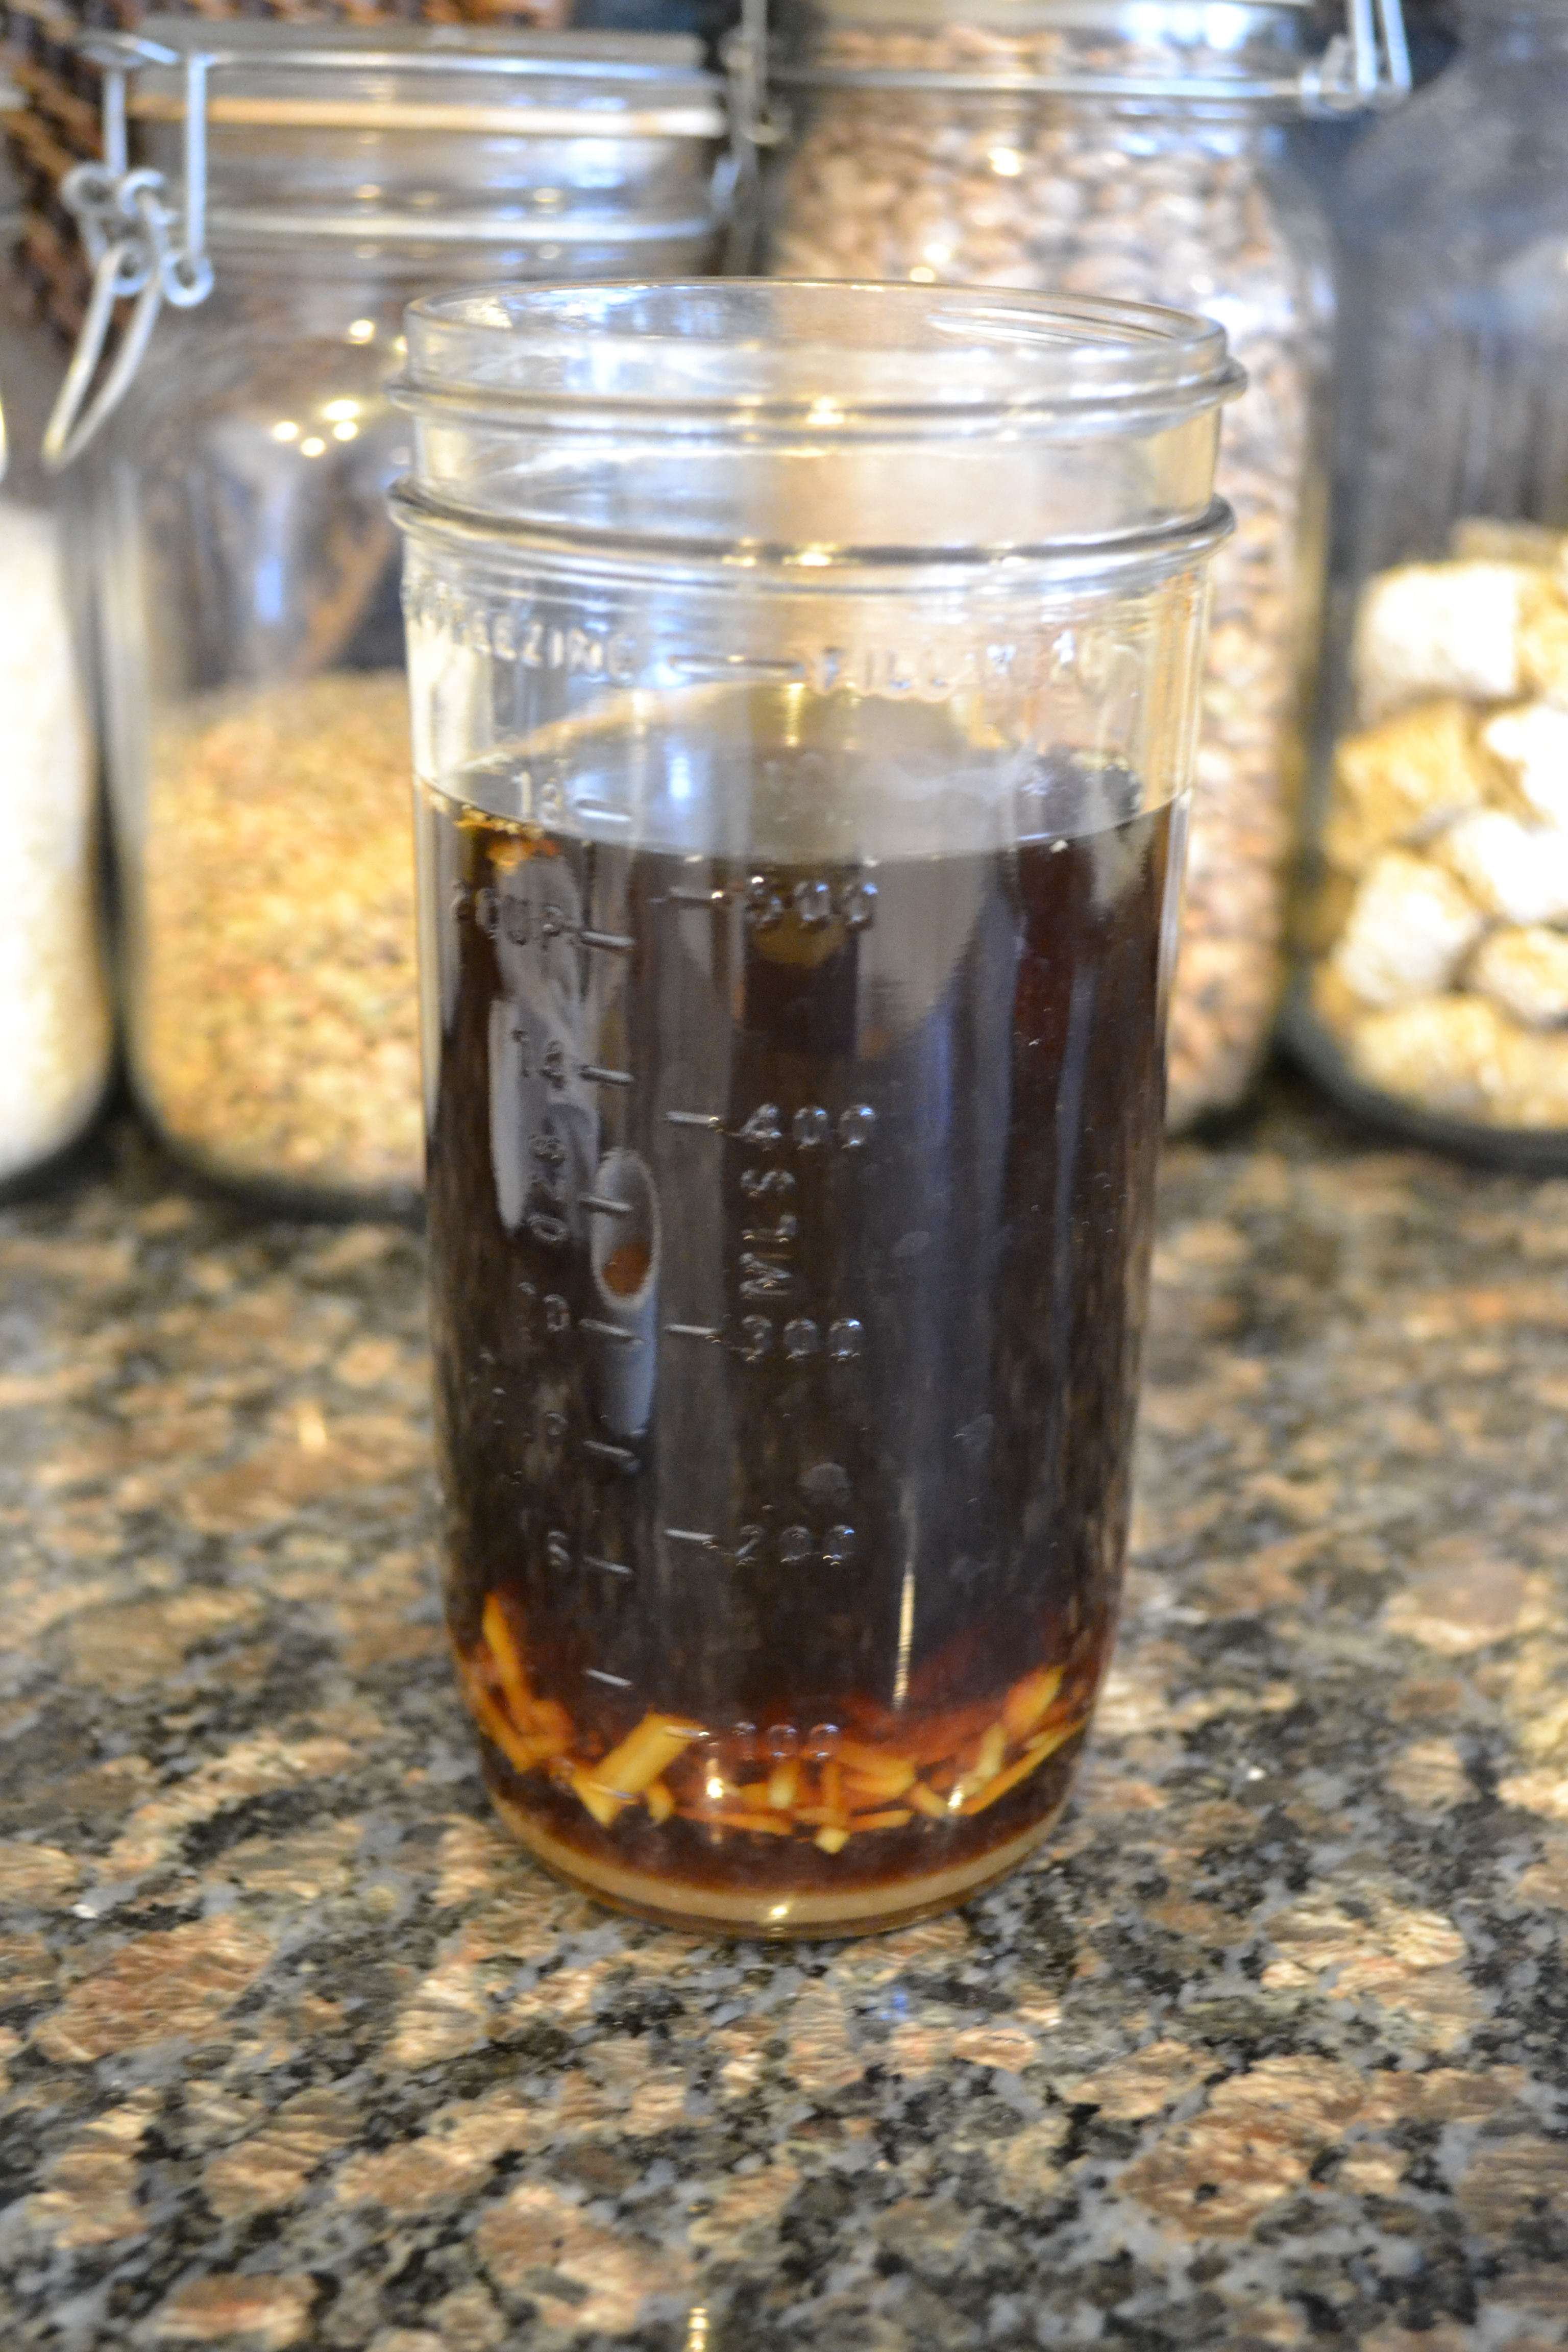
For Sauce
In 2-cup jar, combine and shake:
1 3/4 cups beef stock
2 tbsp. brown sugar
1 1/2 tbsp. chopped fresh ginger
1/4 cup soy sauce
2 tbsp. corn starch
Add later:
Sprinkling of red pepper flakes
Sprinkling of sesame seeds
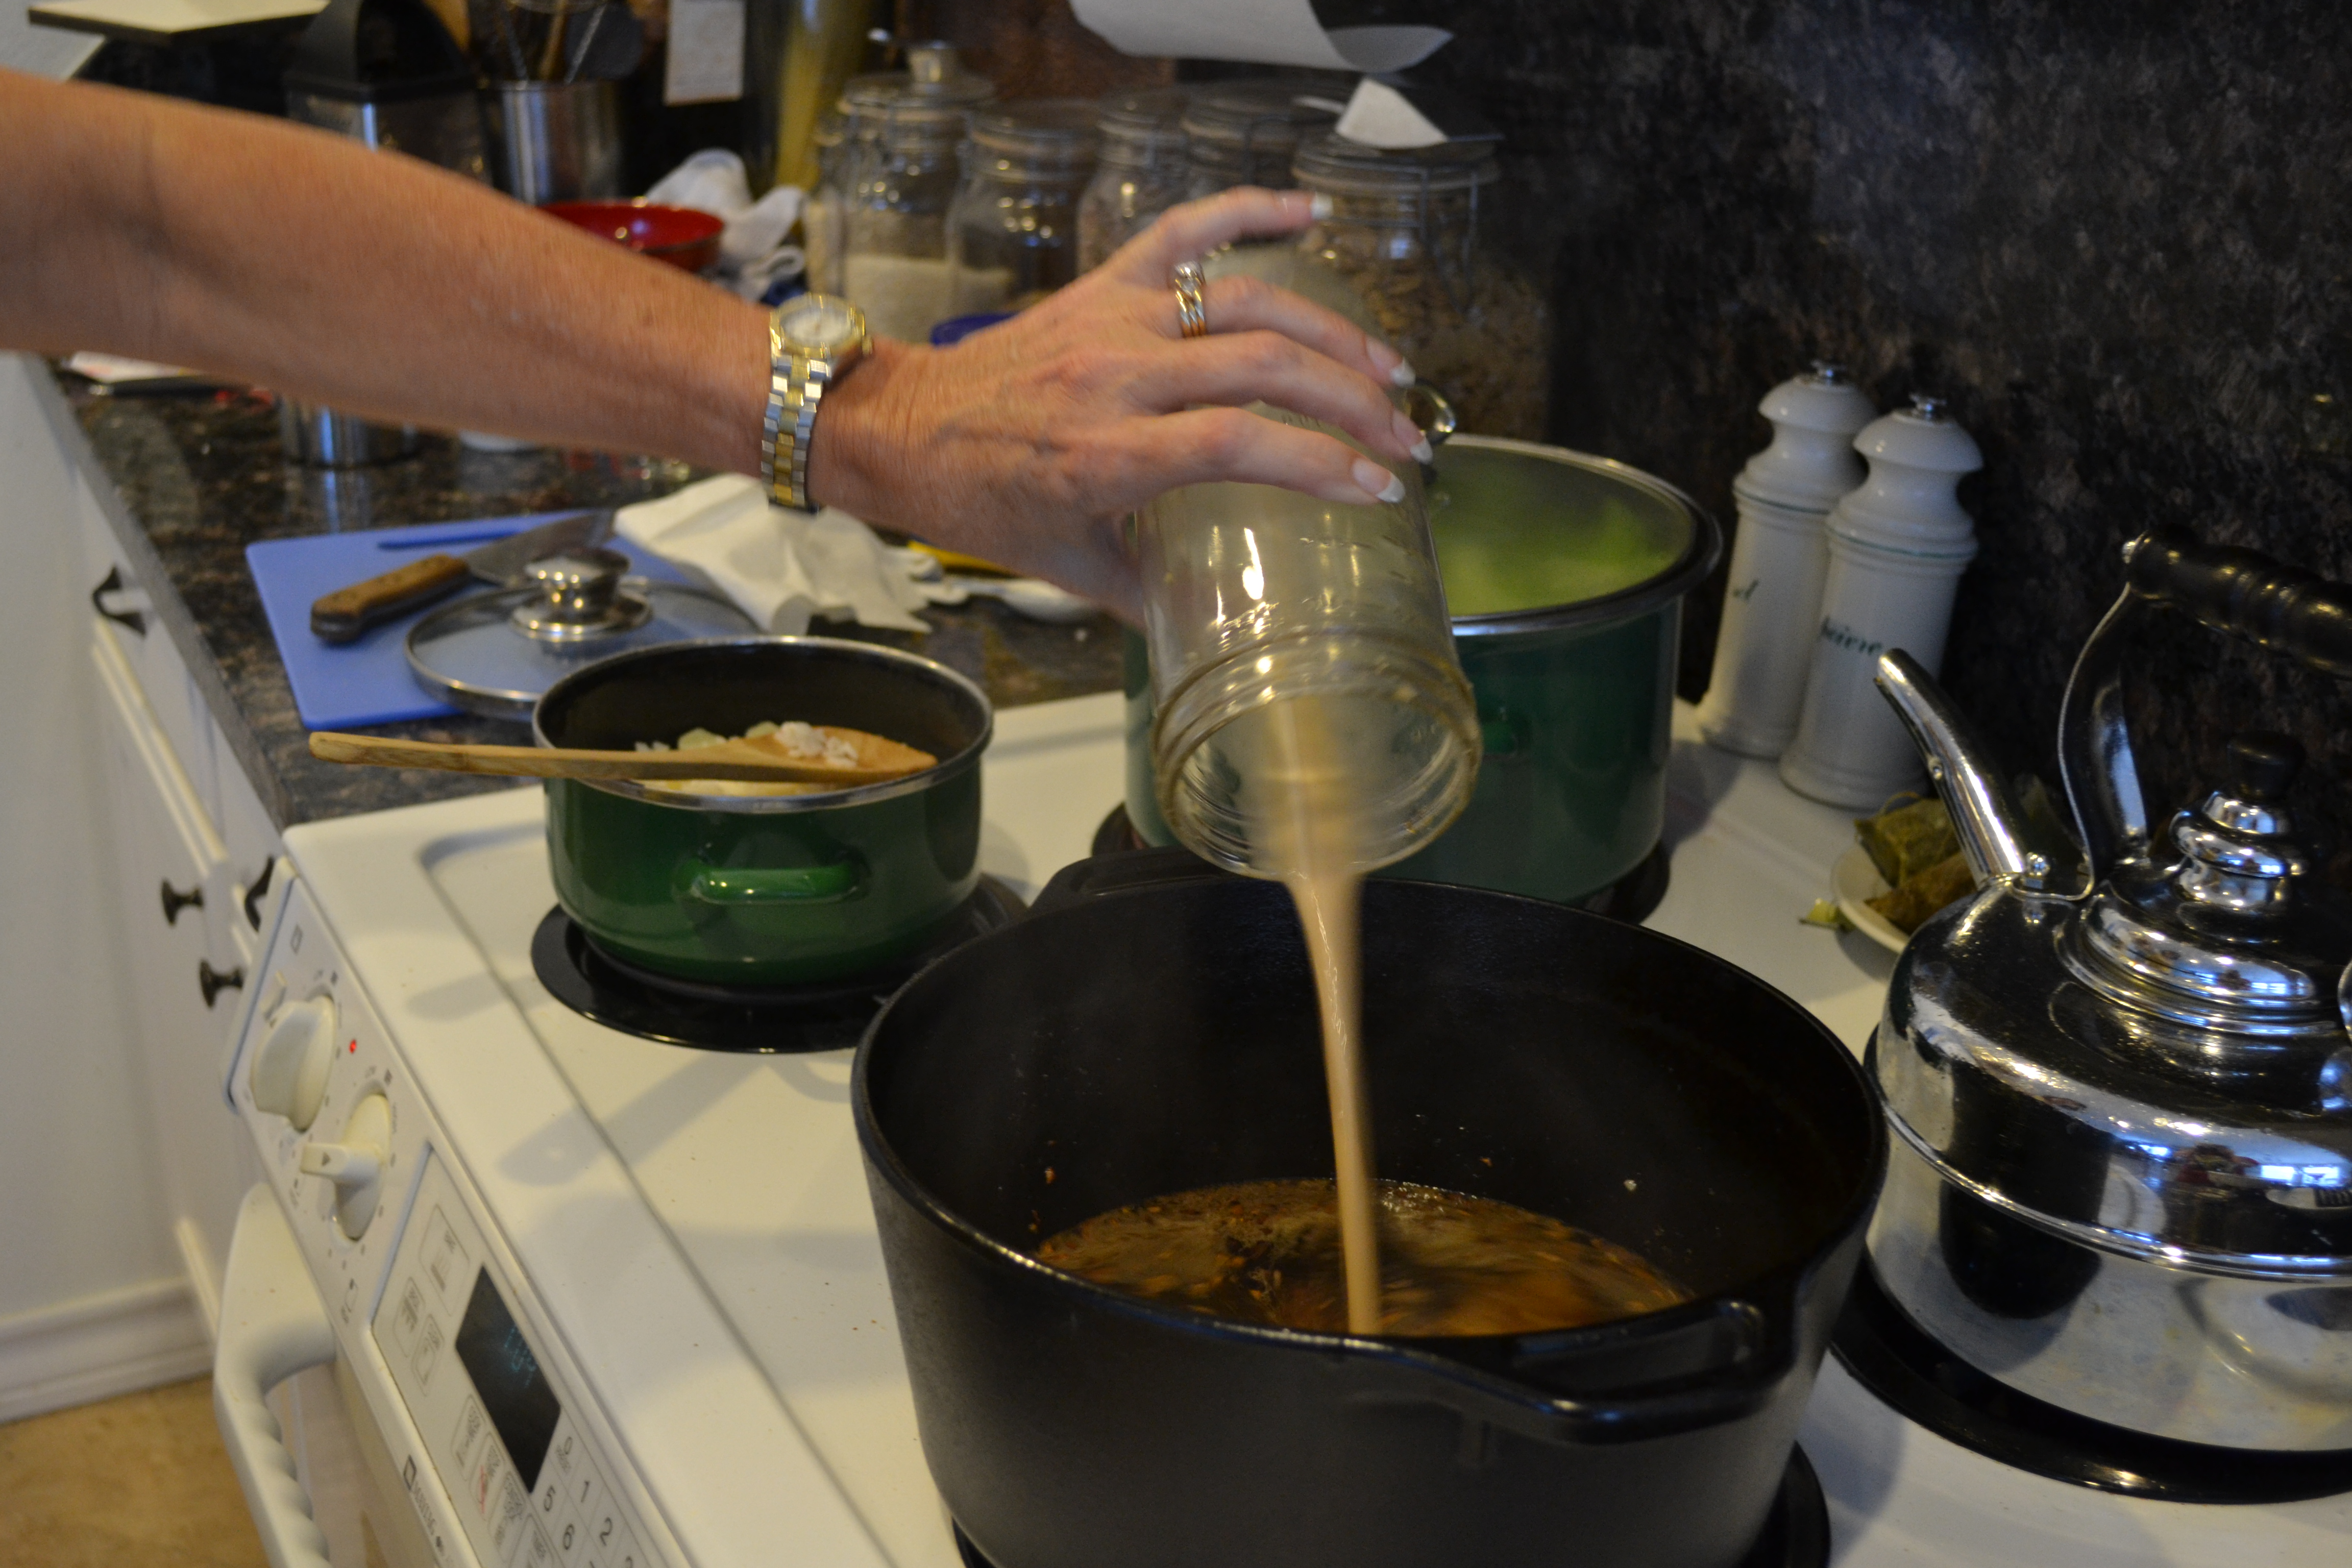
Pour all but 1/2 cup into skillet. To the remaining 1/2 cup, add cornstarch and shake. Add to skillet and stir. Turn on he at to medium high.
Add steamed veggies and red pepper flakes . Continue stirring until sauce thickens. Add sliced tenderloin. Stir to coat with sauce. Add red pepper flakes and sesame seeds. Serve over rice. Enjoy.
Rubbish Muffins Revisited
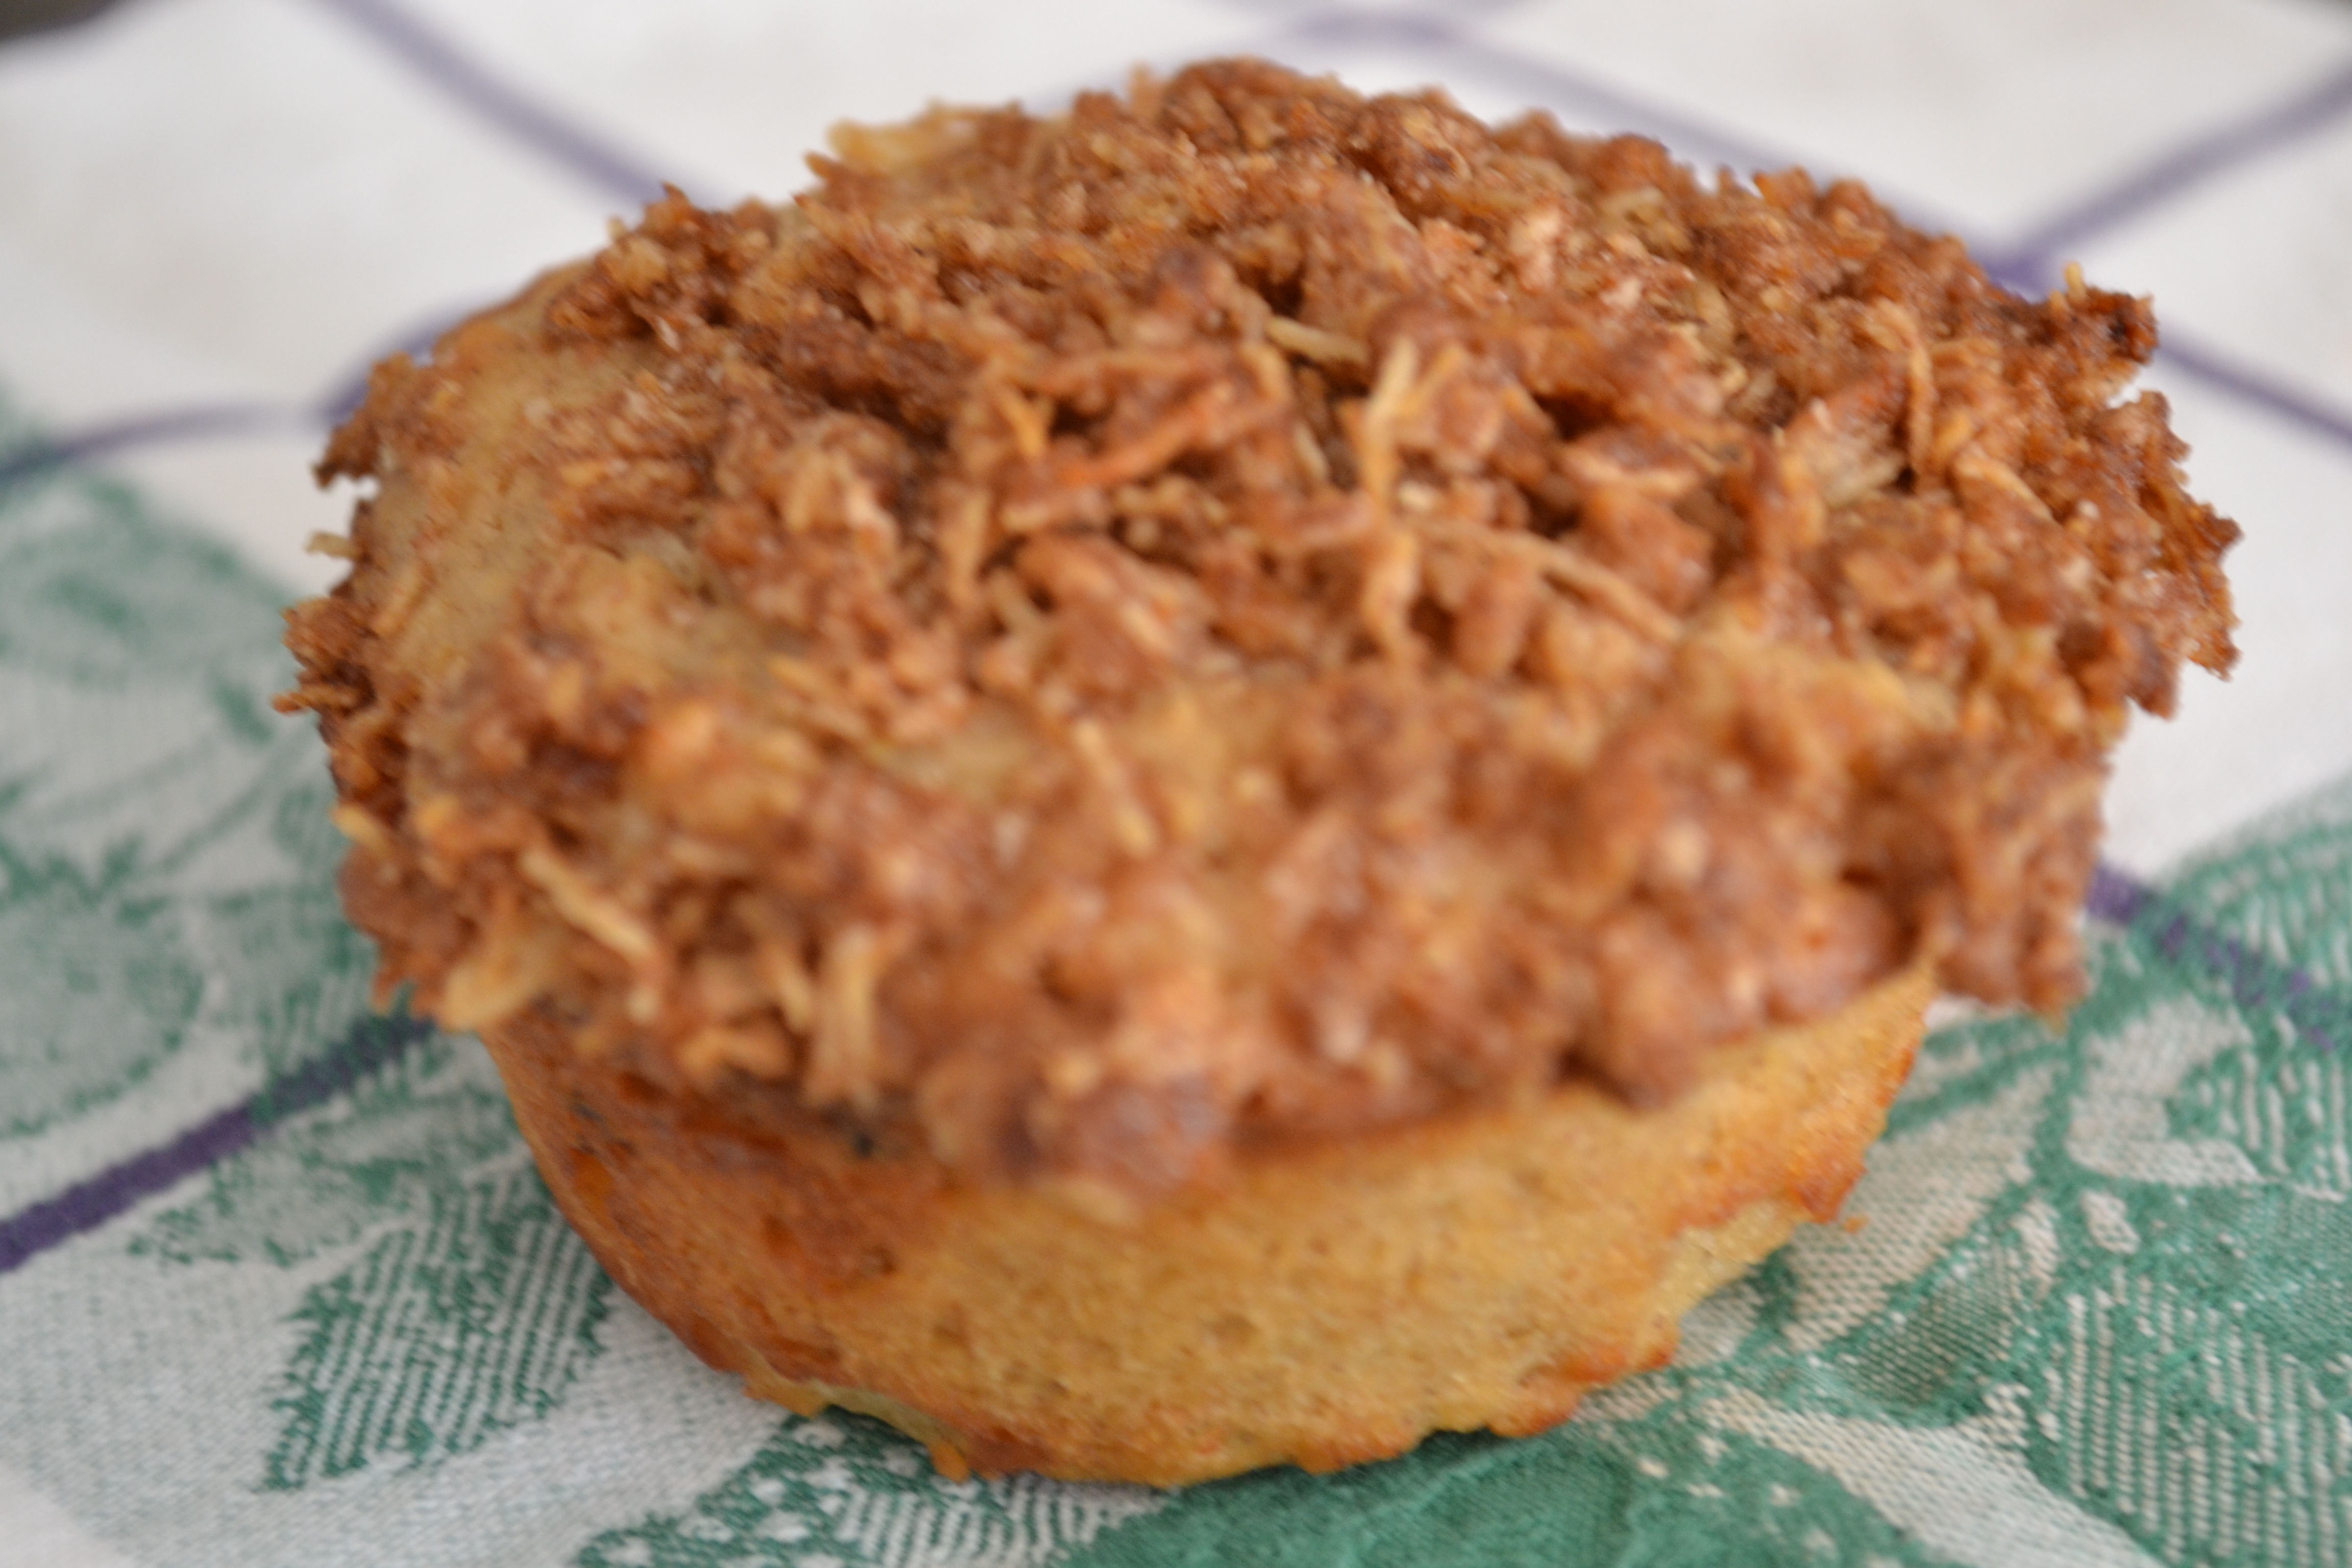 We in the Deerslayer household were very pleased with the Cranberry-Rubbish Muffin results. I made them again this morning. It was a perfect day for rubbish muffins; fresh pot of coffee, chance of rain, a new batch of cereal crumbs. Most of my recipes are a work in progress. This morning, I made several changes to the muffins that turned out well and added to the healthy aspect as well (always a plus). I hope my readers will agree that the changes are good ones.
I substituted 1 cup of white, whole wheat flour for the 1 cup of all-purpose flour. I used King Arthur Brand. I also added 1/2 tsp. salt.
I used 2/3 cup of dried cranberries instead of 1/2 cup and added 1/2 cup of pecans.
The muffins were very hearty and the extra cranberries and pecans were nice.
Pecan Crusted Venison Steaks with Mustard Sauce
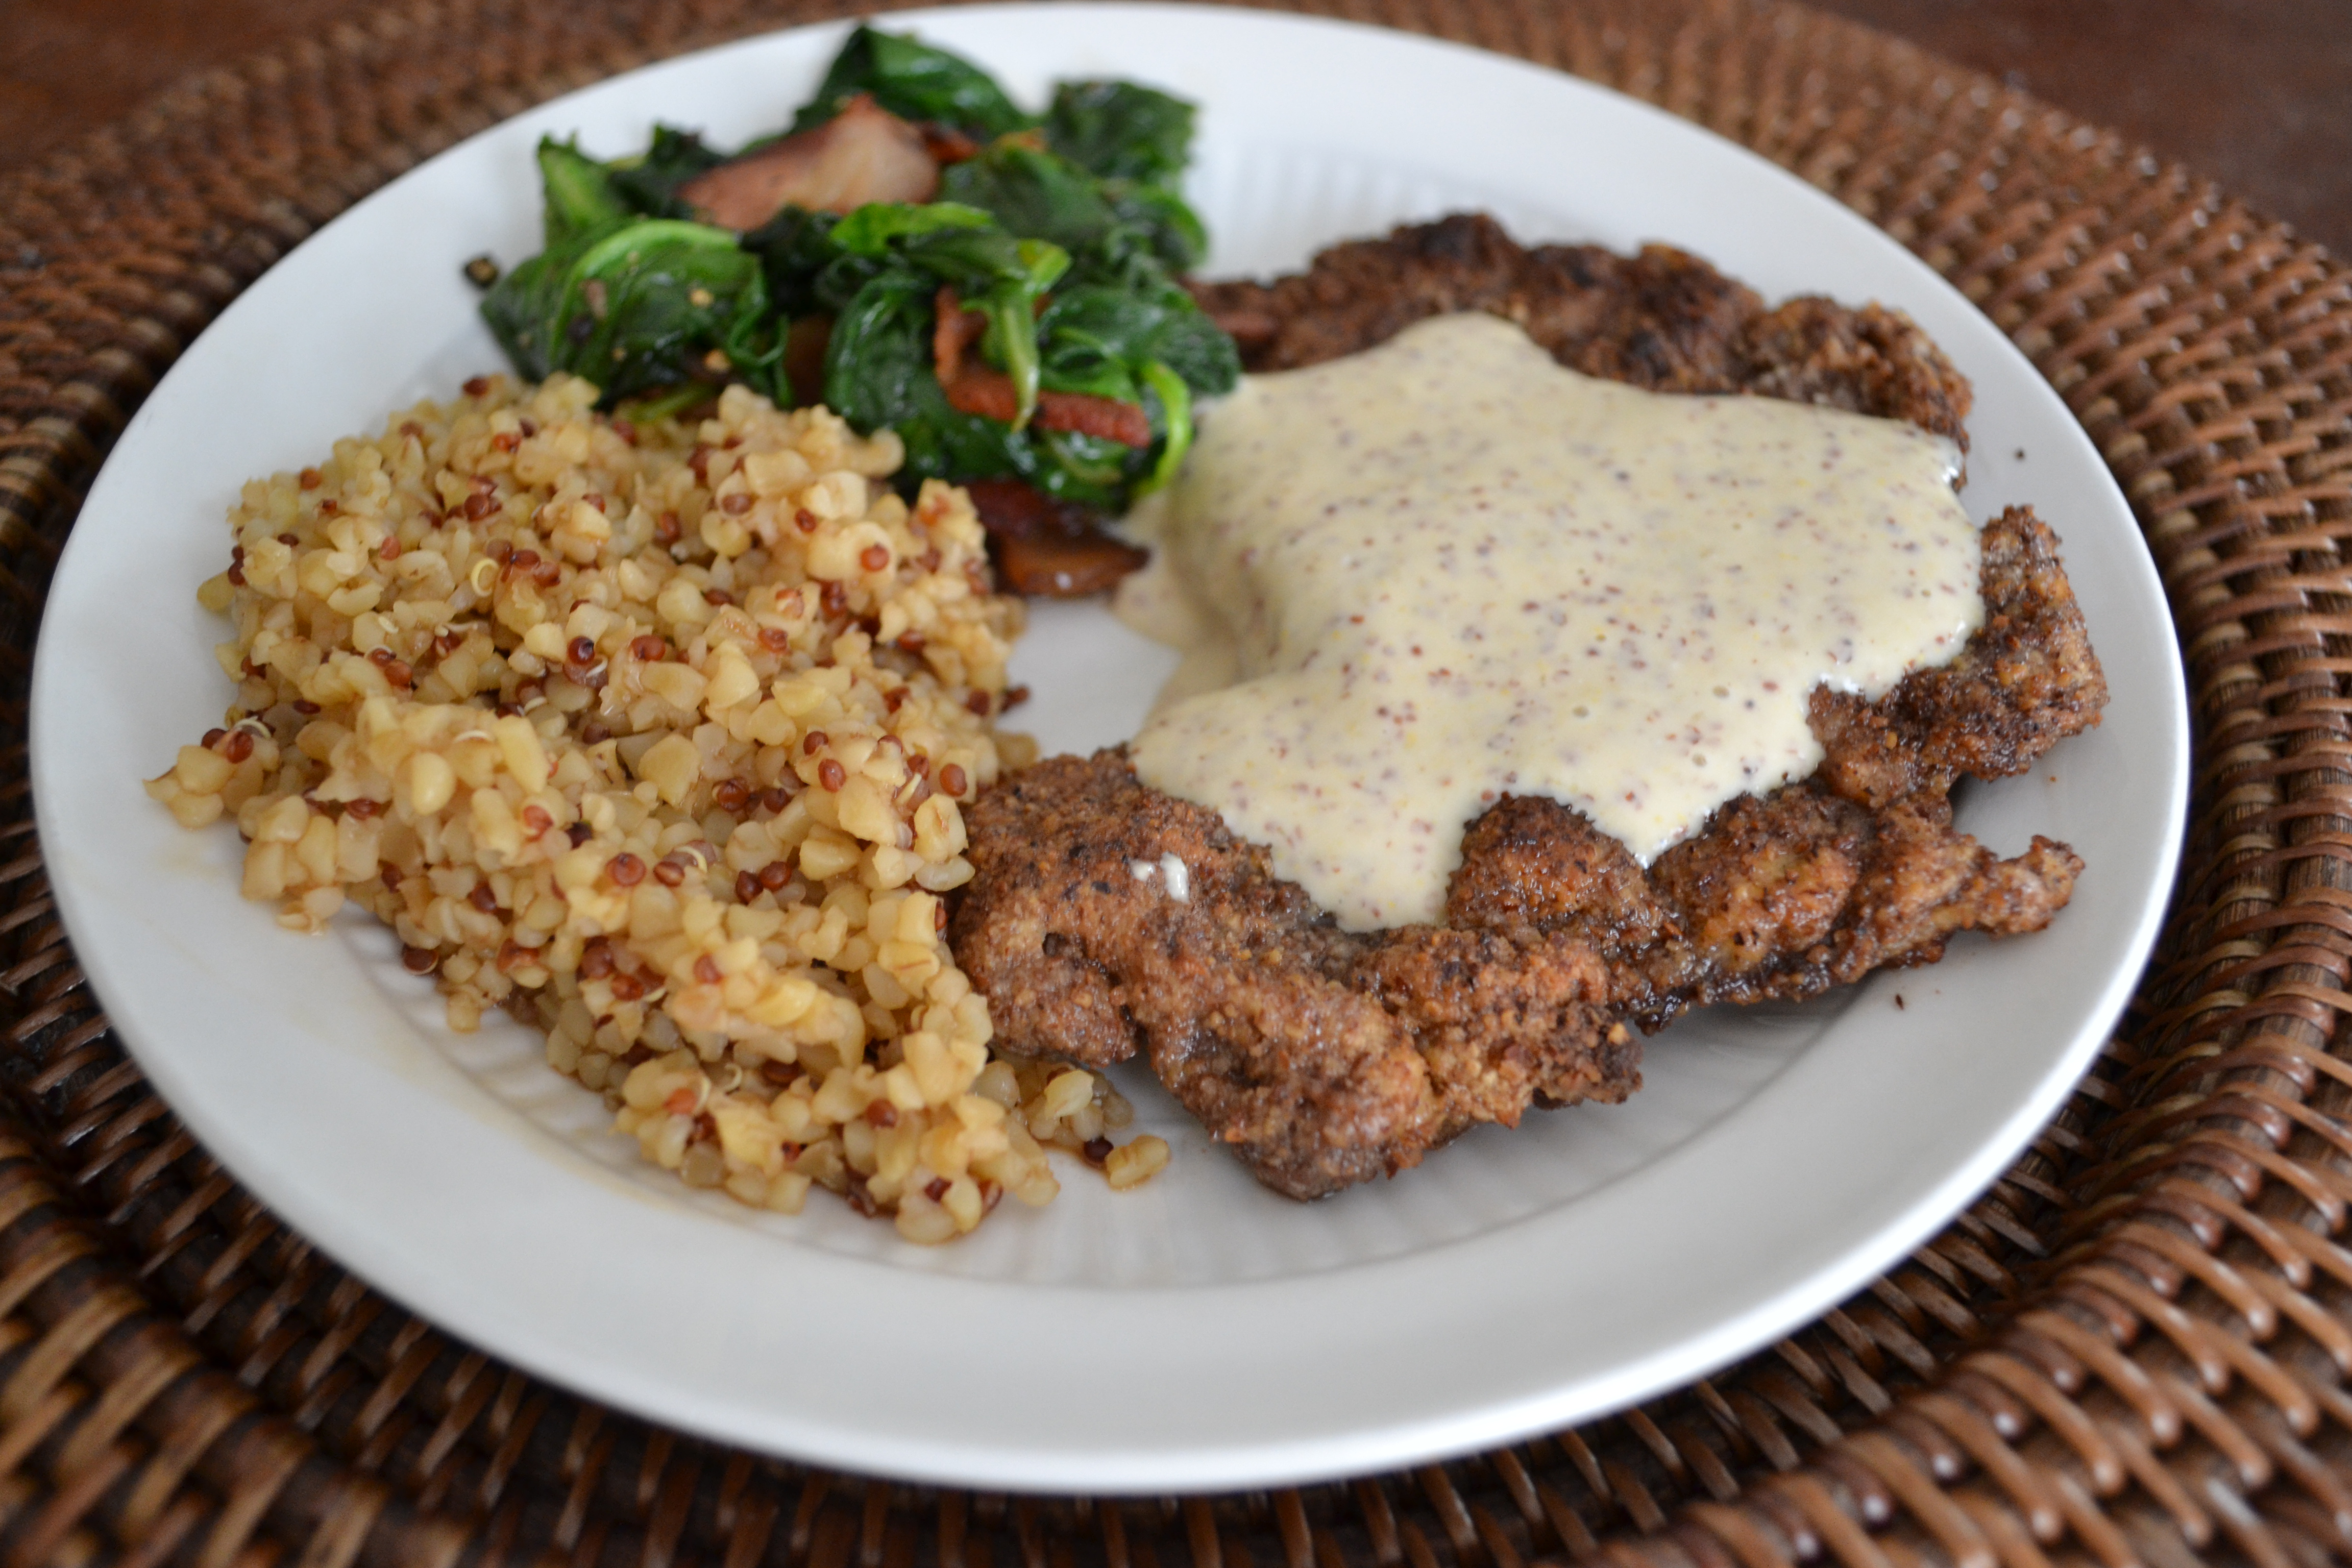 I was so excited when I came up with this recipe the other day. It turned out well enough that I’d be willing to serve it to guests. Once again, while it’s relatively simple, it requires the ability to “think outside the box” regarding what can be done with wild game. I was particularly pleased that it didn’t require backstrap or tenderloin. For this recipe, I used the large,oblong muscle from a hind quarter. See my January entry entitled “Bacon-Wrapped Garlic Venison Roast” for a tutorial on processing out a hind quarter.
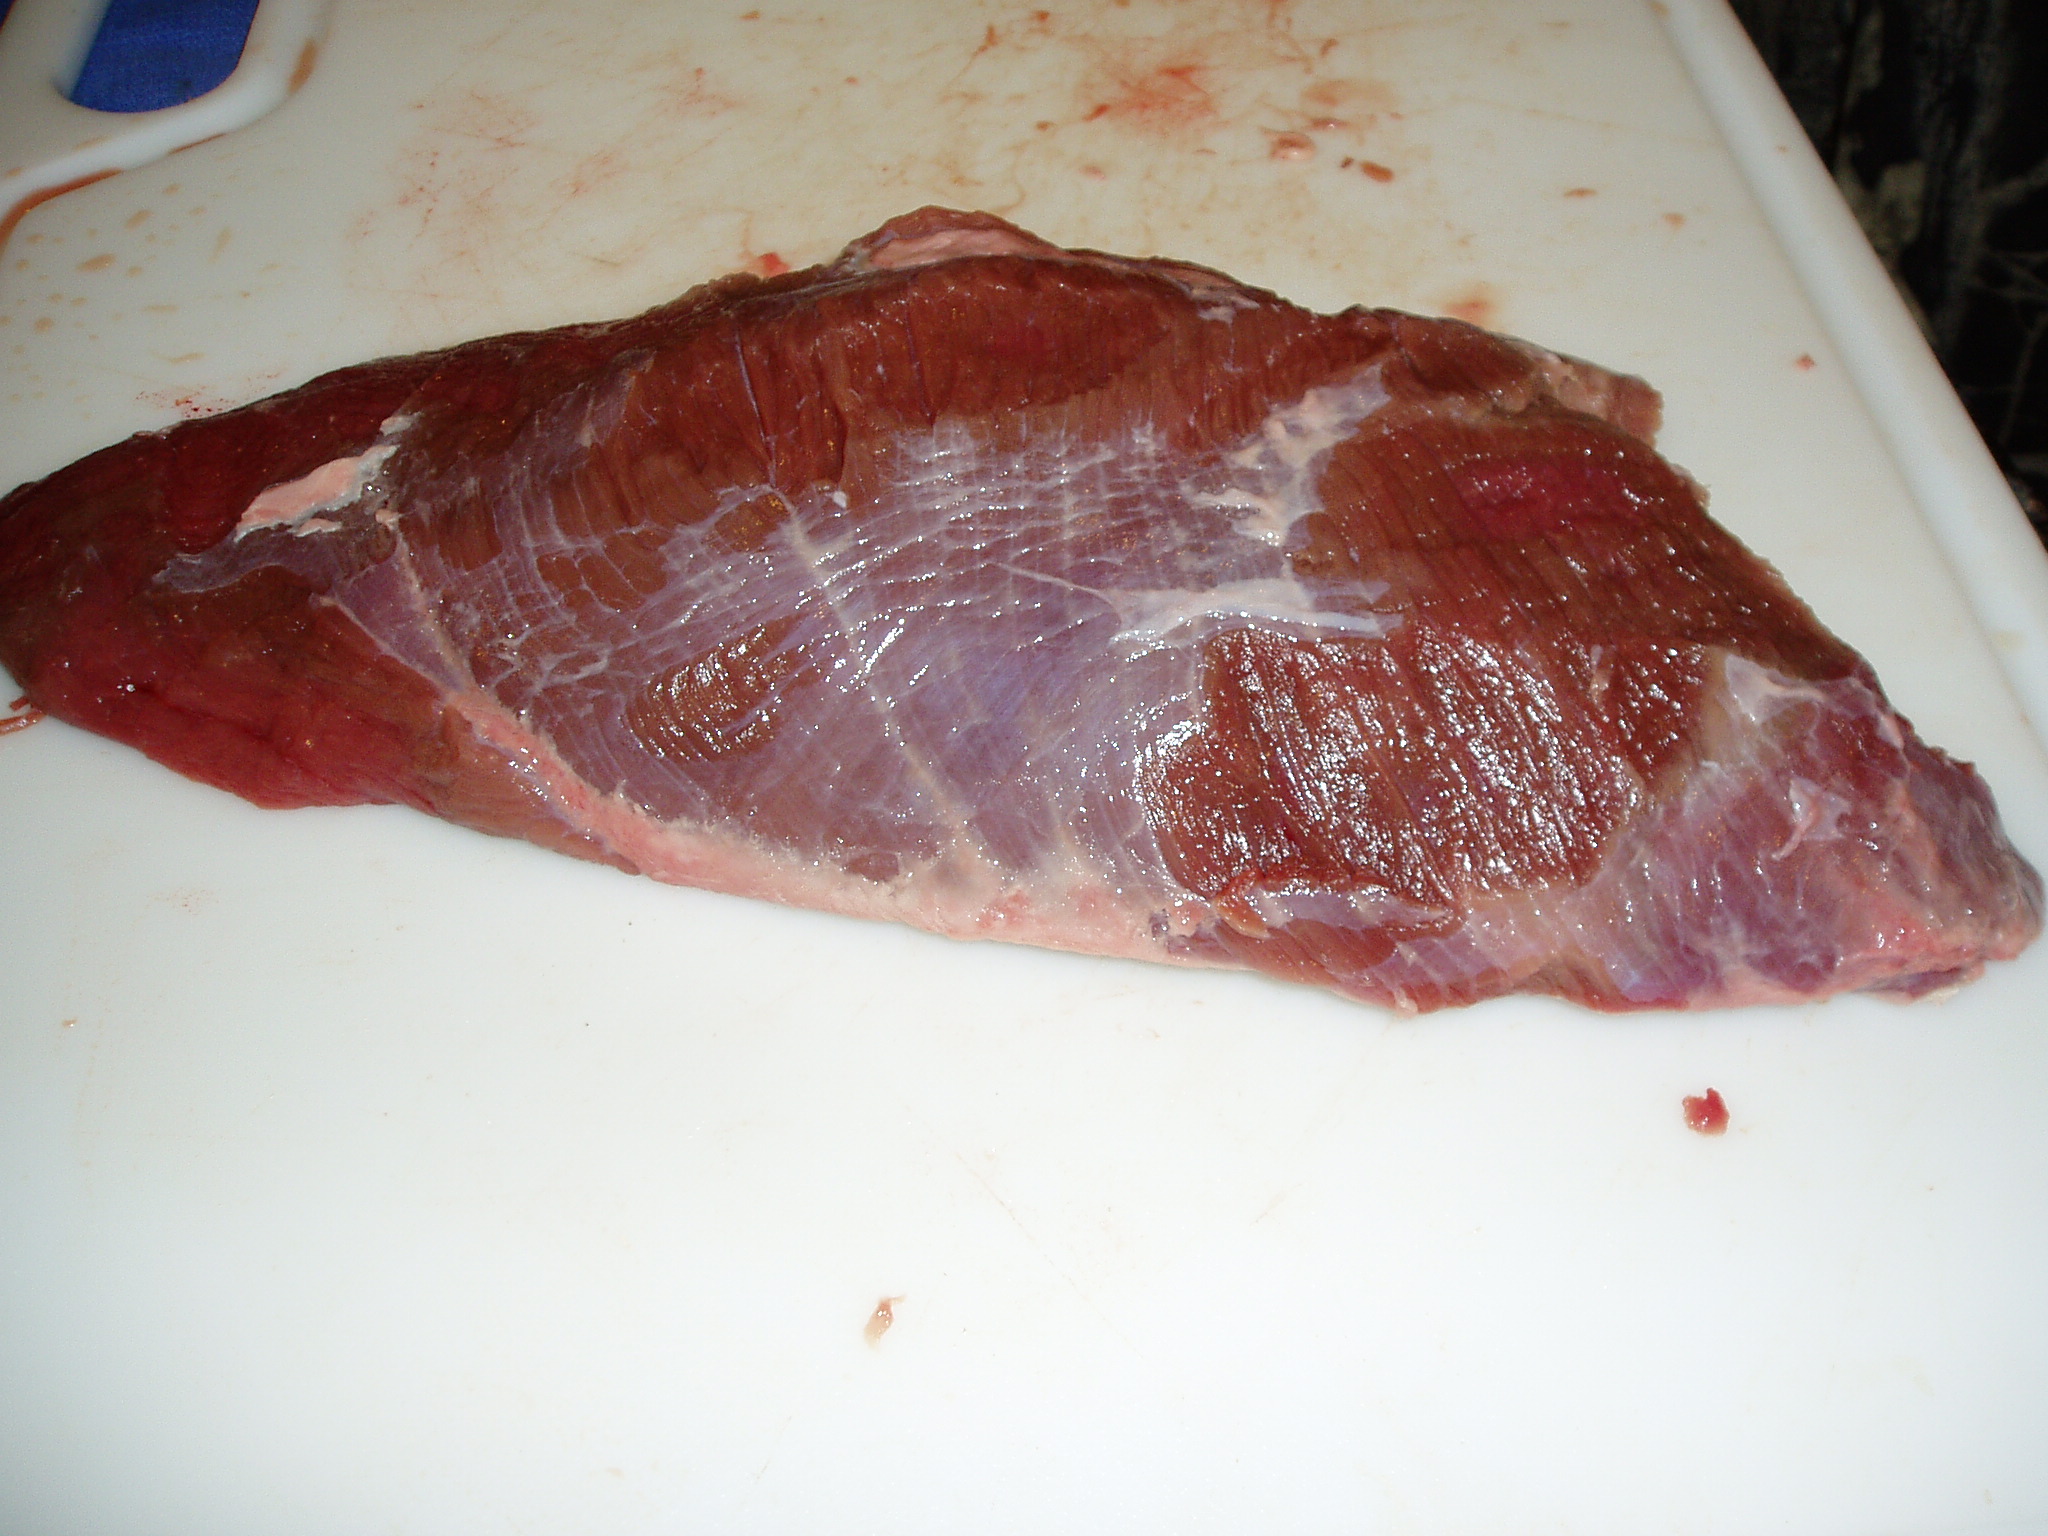
Pecan Crusted Venison Steaks

5 or 6 pounded venison steaks
fresh ground pepper & kosher salt
1/3 cup canola oil
1/4 cup pecan oil (if you can find it)
3 eggs
1 1/3 cups flour, divided
2/3 cup ground pecans
1. Pound out 5 or 6 venison steaks from a hind quarter muscle. I always pound out my steaks in a plastic bag. It’s less messy and the steaks seem to hold their shape better without becoming torn up.
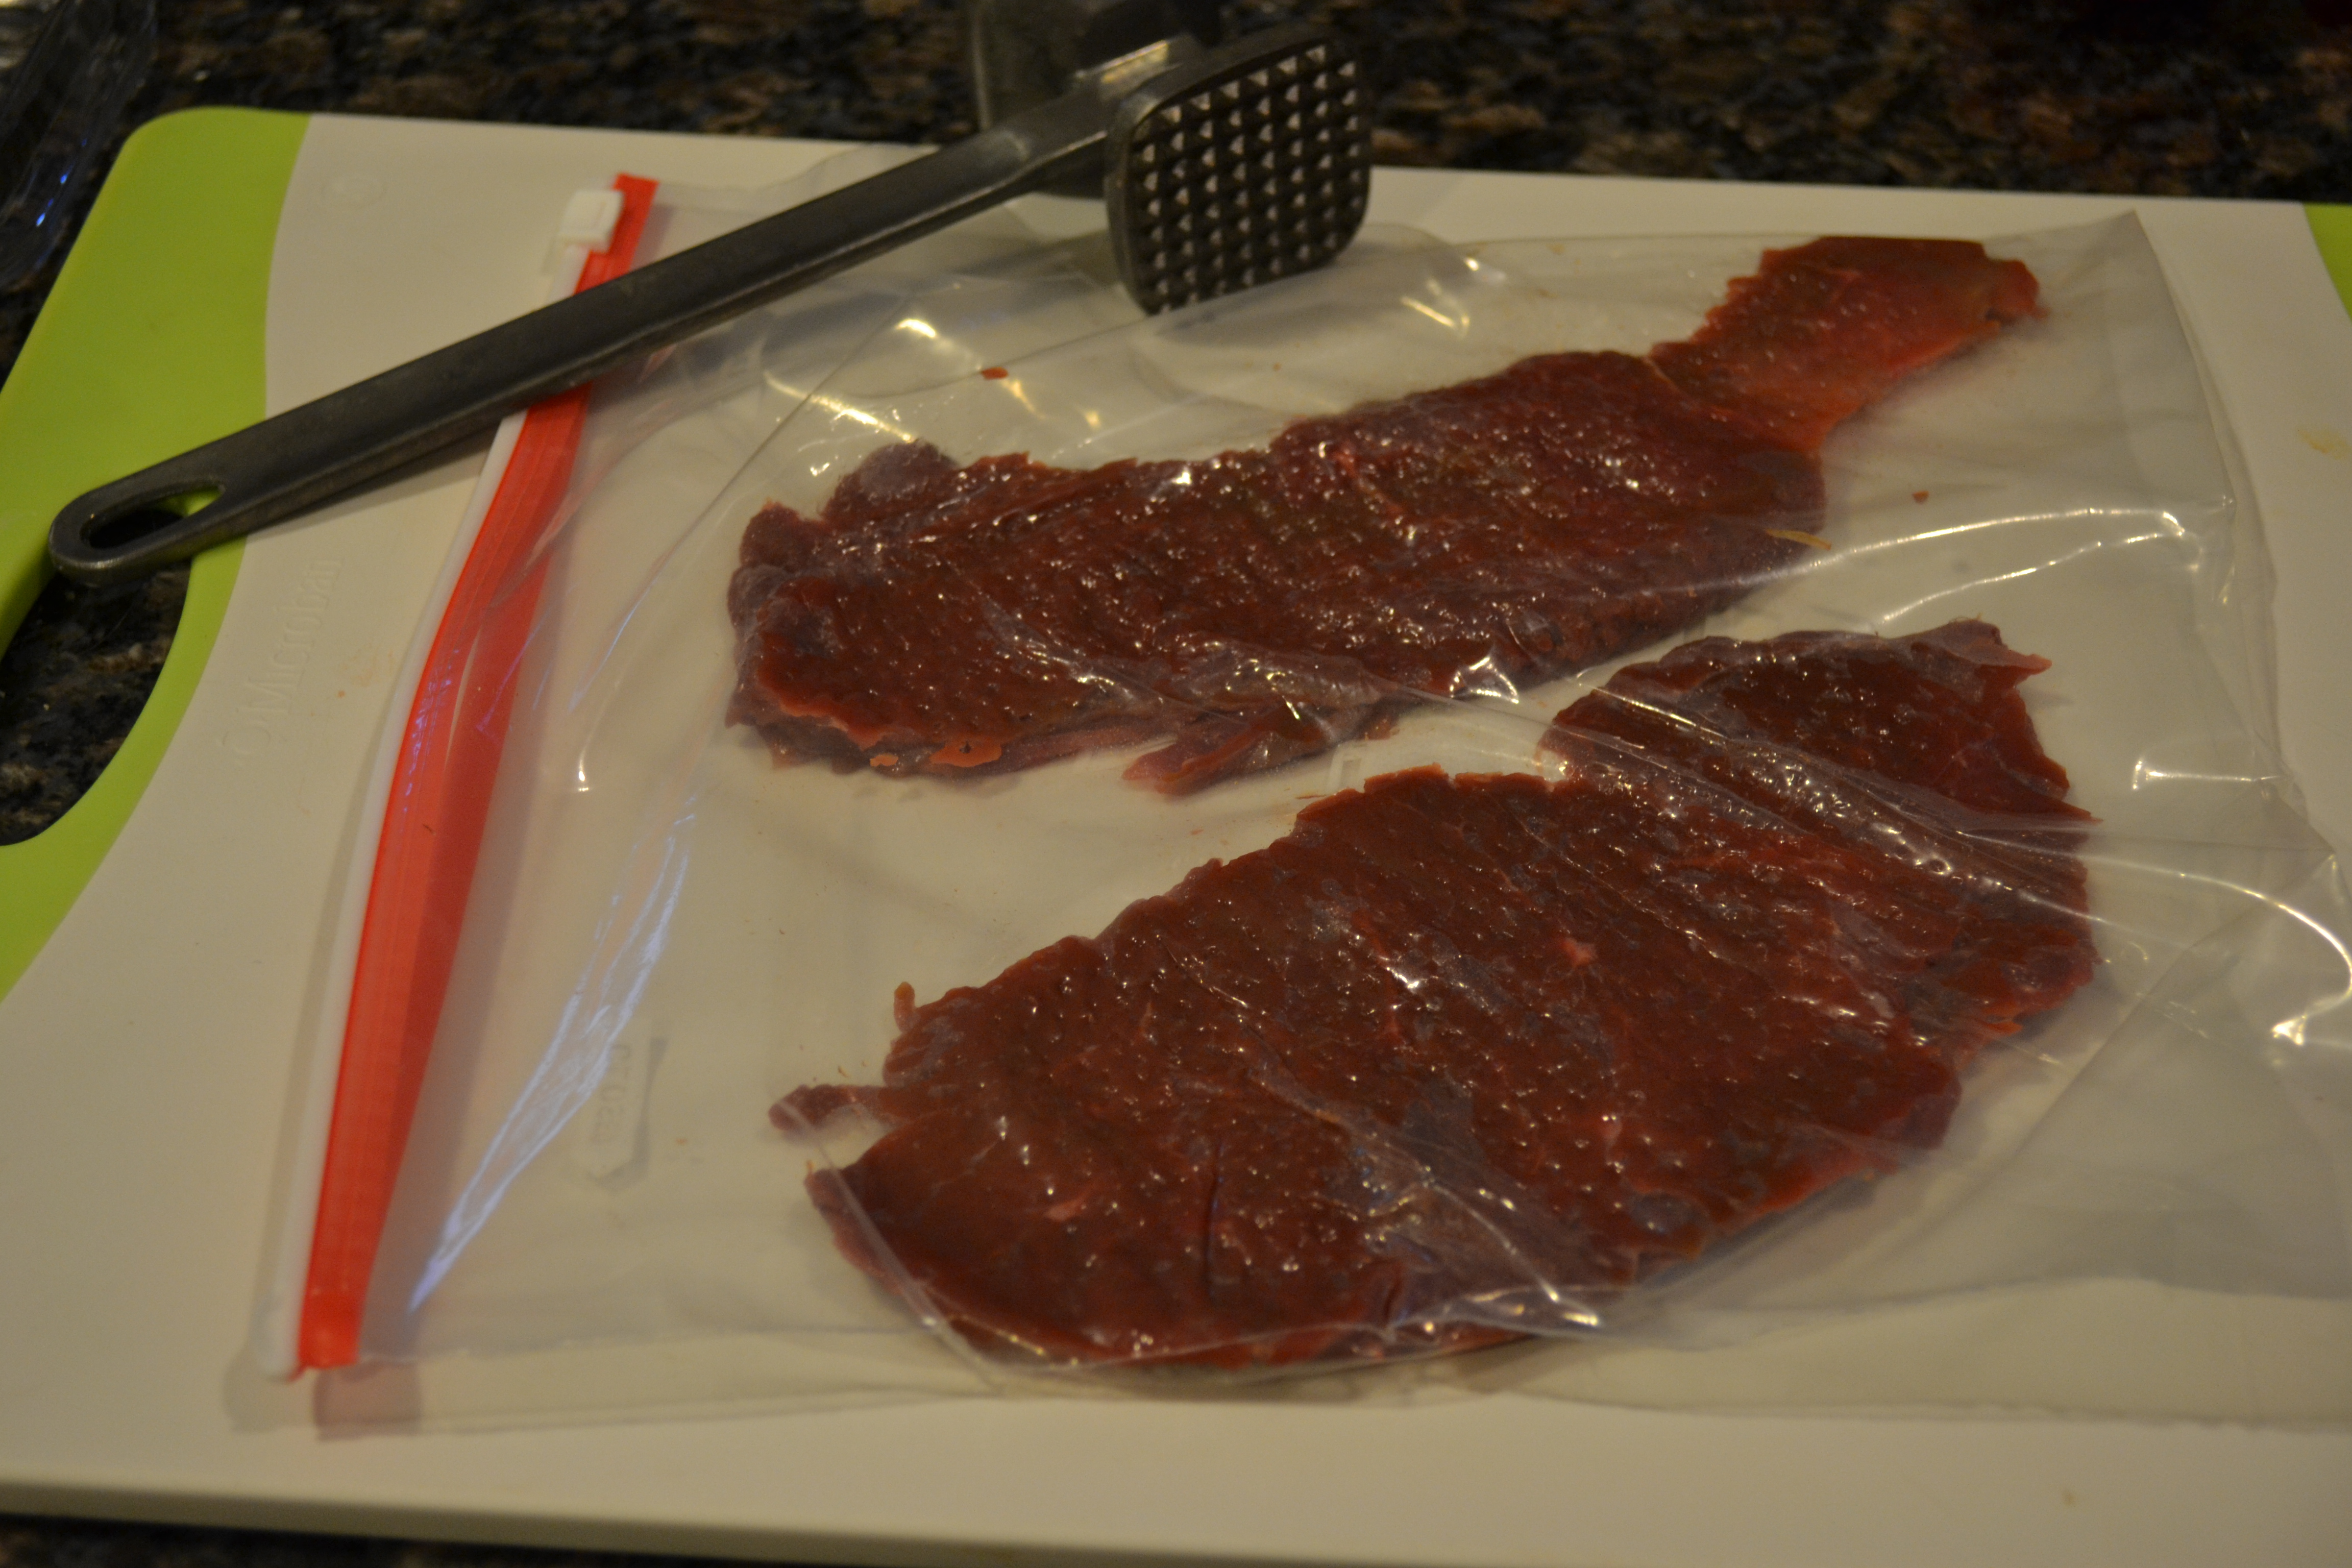
Of course you could prepare this recipe with backstrap but I was pleased to find another recipe that lends itself so nicely to the use of the lesser used cuts of meat.
2. Season steaks with kosher salt and fresh ground pepper.
3. Pour about 2/3 cup of flour onto a paper plate.
4. On another paper plate, mix remaining 2/3 cup of flour with ground pecan meal.
5. Lightly whisk eggs in a pie plate. I always wrap a rubber-band several times around the handle of the fork that I use, near the end, to whisk eggs even for things like french toast. It prevents the fork from sliding into the mixture.
6. Pour canola and pecan oils into heavy cast iron skillet. If you can’t find the pecan oil, the recipe can be prepared with just canola or cooking oil. I happened to have the pecan oil and it seemed to add a depth of flavor to the steaks.
7. Create a work station for dredging steaks in plain flour, dipping in egg, dredging in flour/pecan meal mix and setting aside to rest before frying.
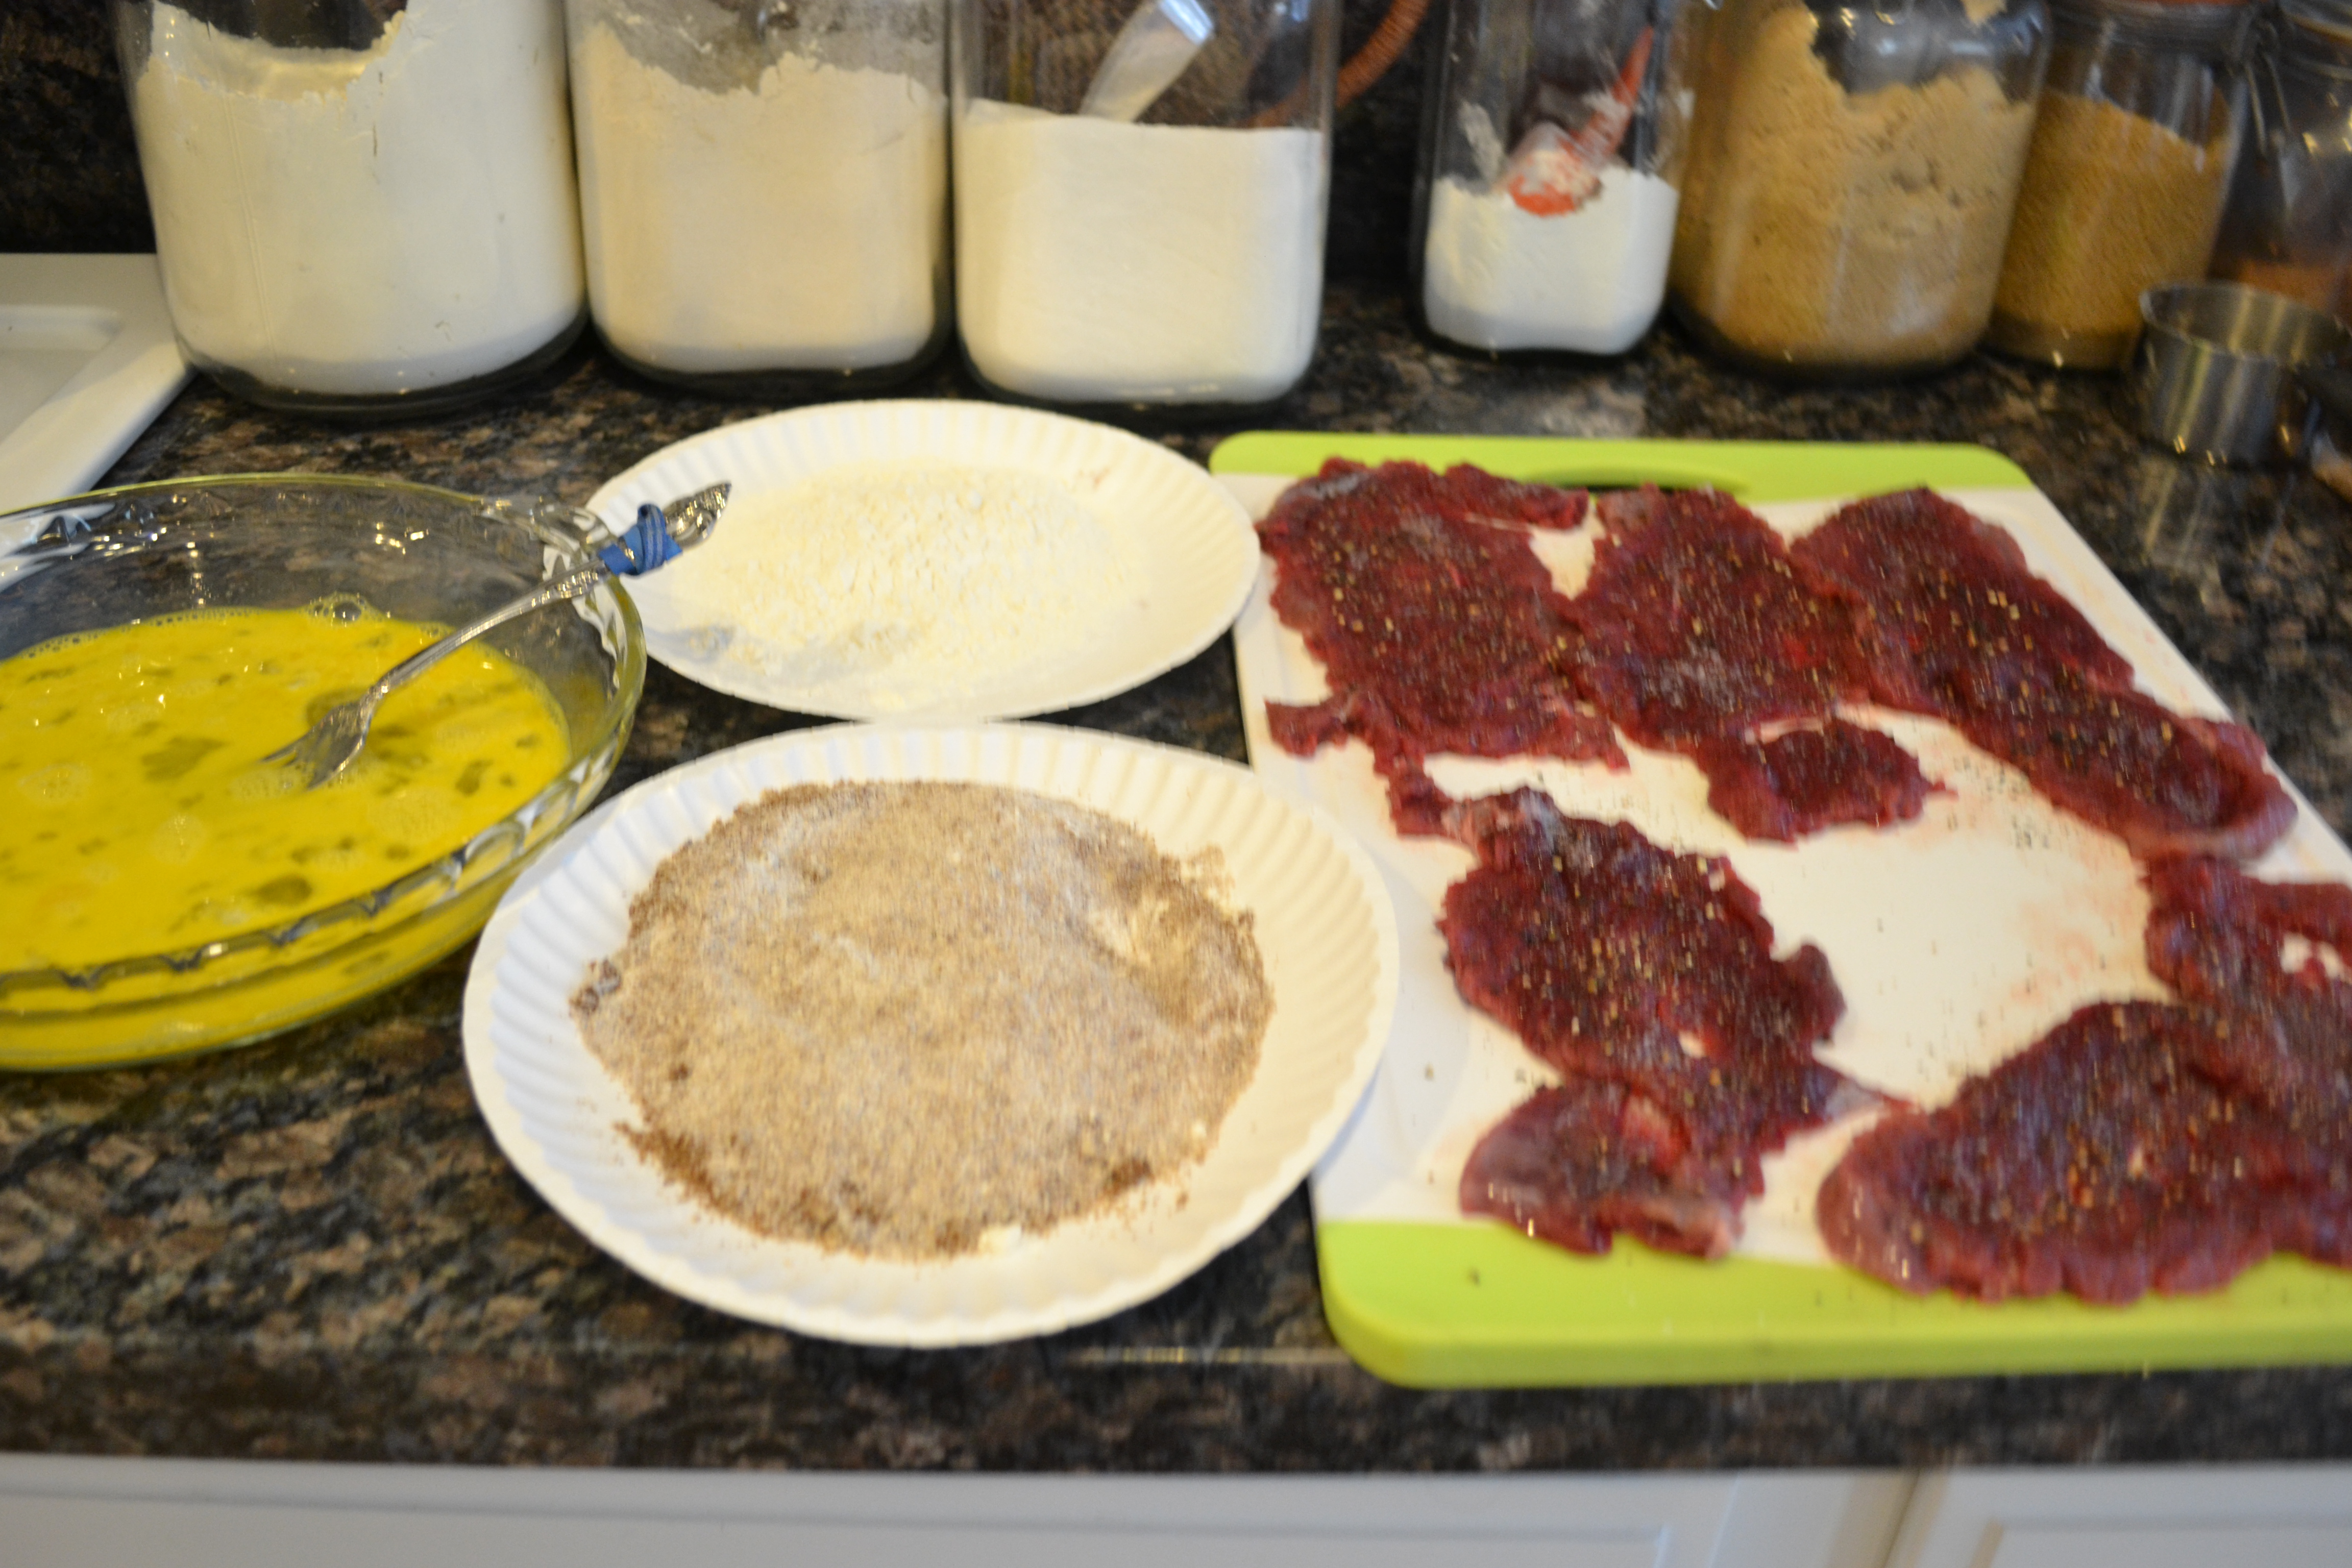
8. Dredge each steak in plain flour, egg (allow to drip), flour and pecan mixture, then return to cutting board to rest for several minutes before frying. I find that allowing the steaks to rest with the coating on helps keep a nice crust on the meat. Before I fried the steaks, I patted a little extra flour & pecan mixture on each.
9. Heat oils to medium high. Fry steaks in skillet until golden brown on each side but be careful not to overcook. Remember that this is venison and that it is better cooked medium rare. Place in an ovenproof dish and set in a warm oven until sauce is prepared.
Mustard Sauce

1/4 cup beef stock
1/4 cup plain Greek yogurt
2 heaping tbsp. course ground mustard
salt & pepper to taste
1. Place beef stock, yogurt, and mustard in a blender. Mix, taste, add salt & pepper if needed.
2. Pour into a saucepan. Warm on stovetop. Usually, I use the Plochmann’s Coarse Ground Mustard. Since I couldn’t find it at the market, I bought the Grey Poupon Course Ground. It worked just fine except that it definitely has a saltier taste. I didn’t need to add any salt to the sauce.
3. Serve over pecan crusted steaks. I served mine with quinoa and sauteed spinach with bacon and caramelized red onions. Enjoy!
If I Could Save Time in a Bottle…
the first thing that I’d like to do … is buy several cases and hide them under my bed!
This little hint has turned into a real time saver. Every so often, I slow-cook up a roasting pan full of venison and/or wild pork (Check out how to do it in my entry, “Come and Take It”). About a week ago, I cooked up about 10 pounds of wild pork. I divided it into one-pound portions, bagged it up, and froze it.
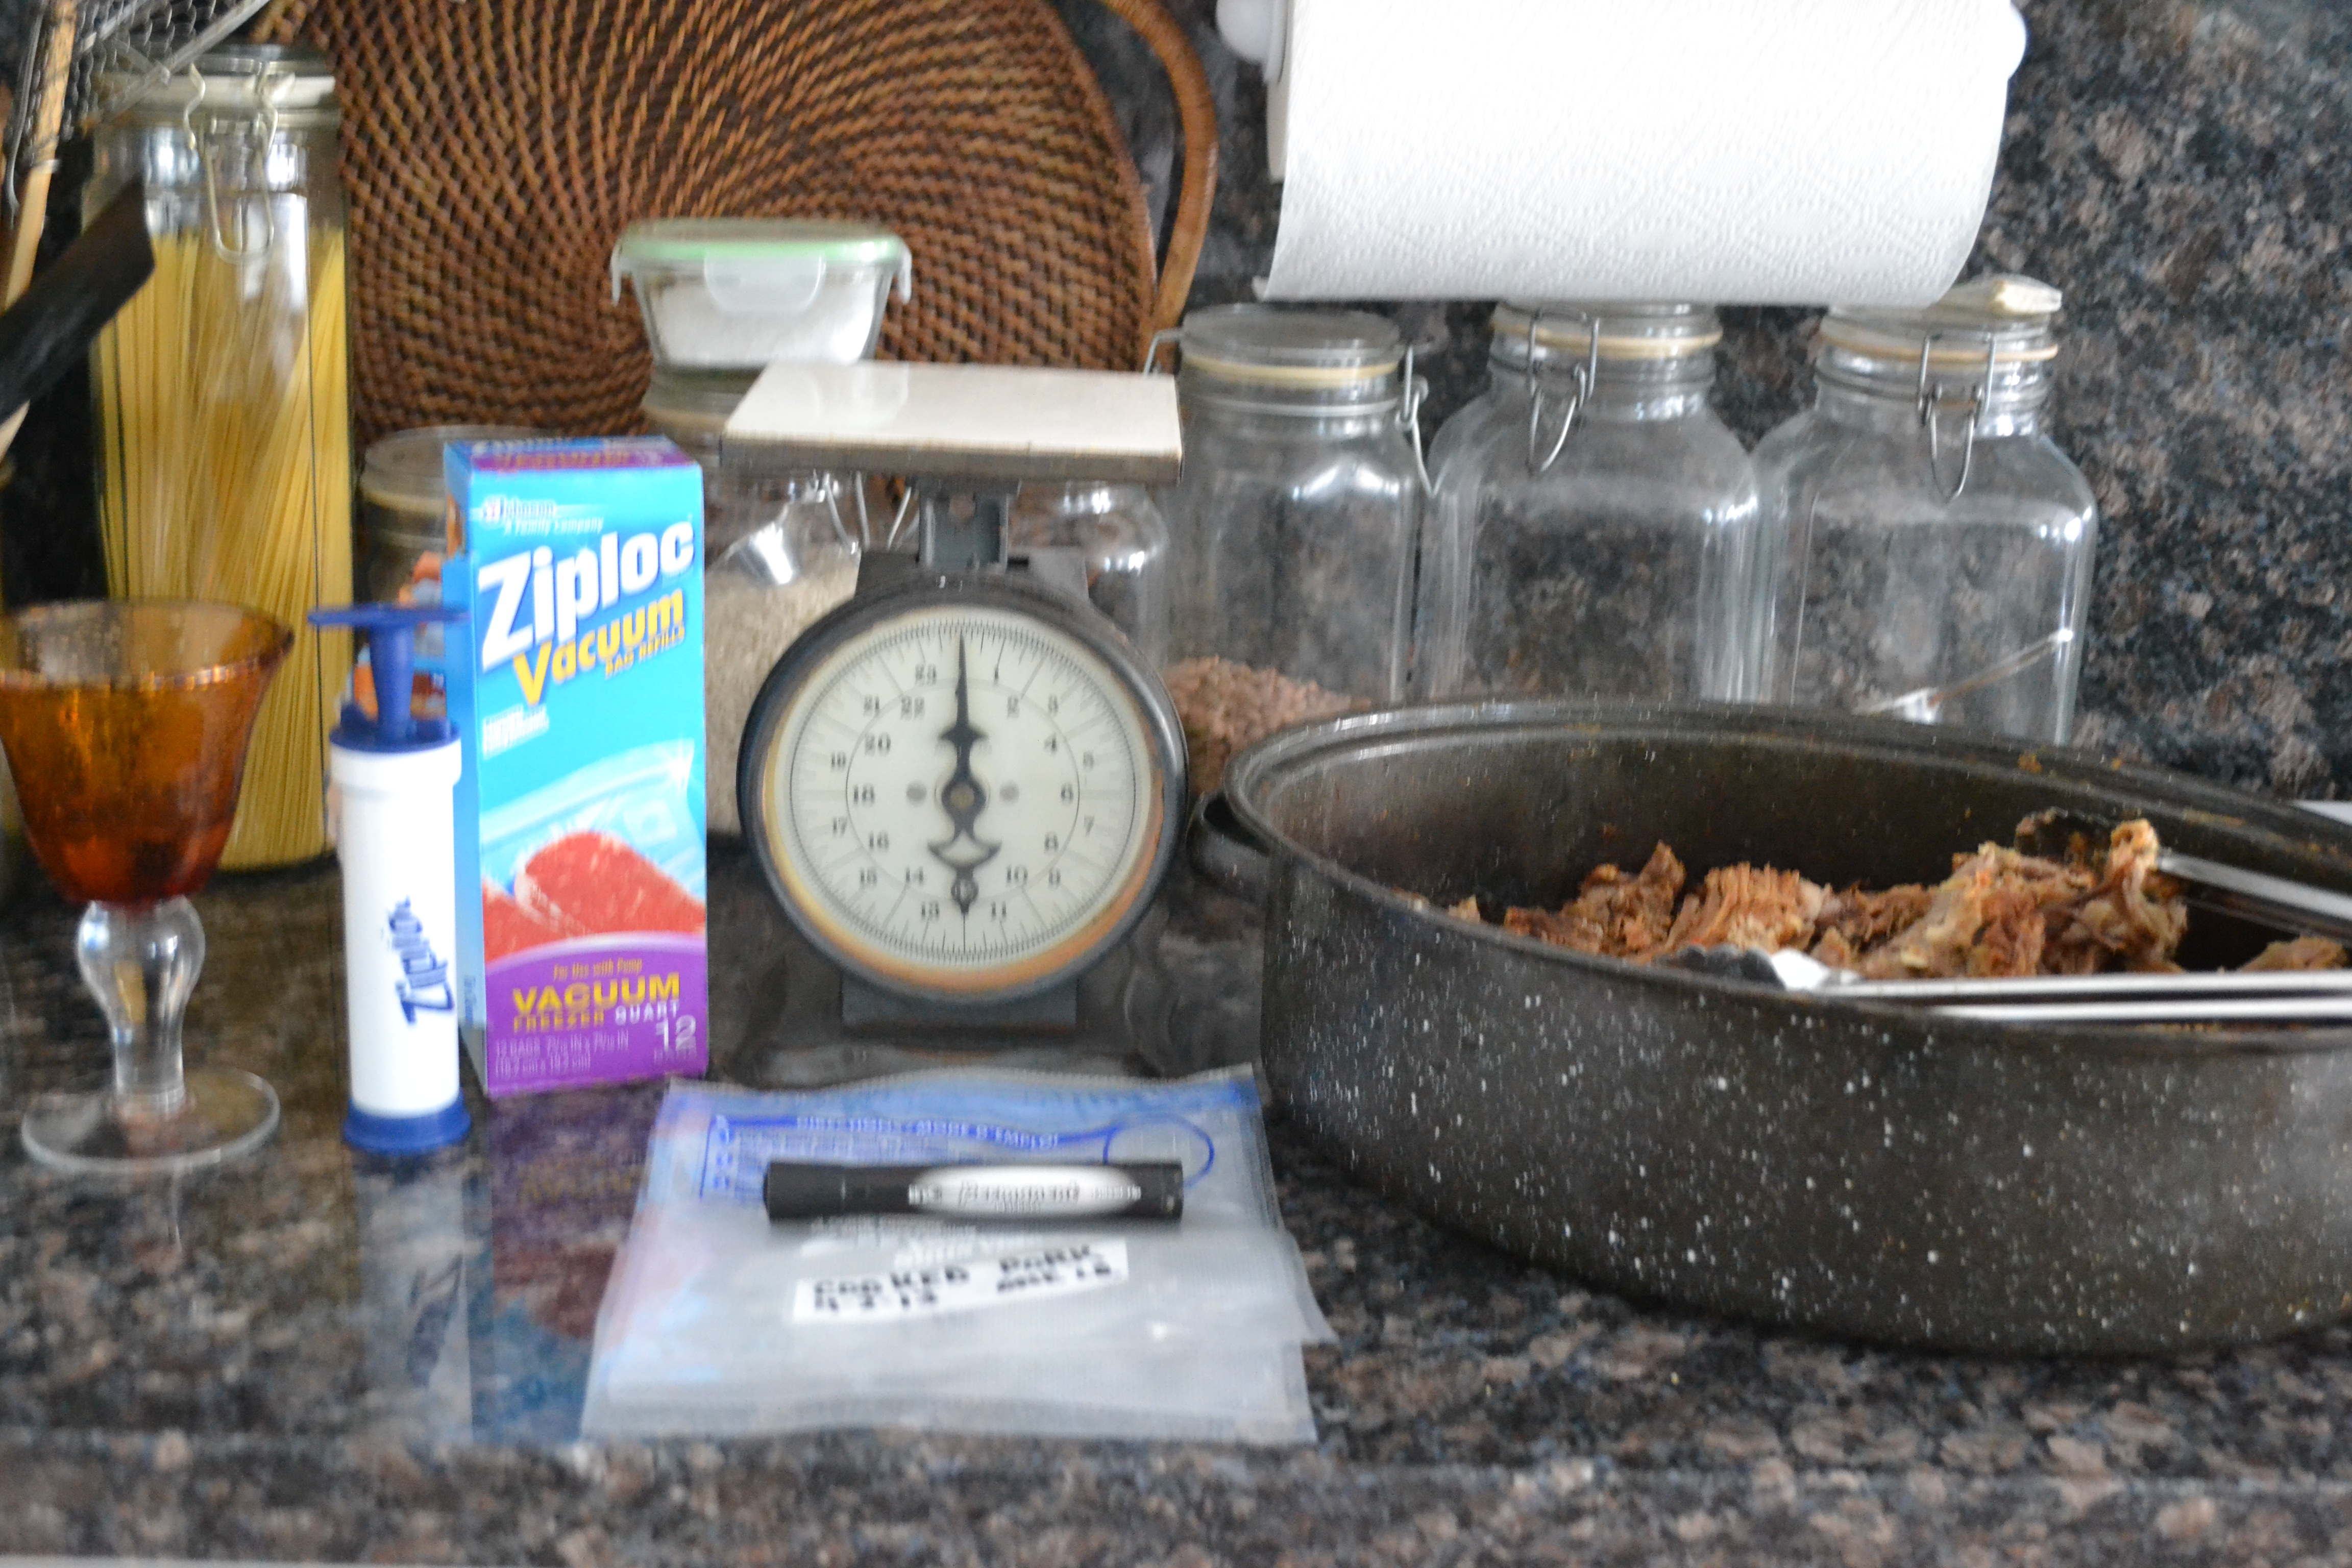
Zip-lock has a product that sucks the air out of the special bags. (The glass of wine is optional but present in most of my kitchen ventures.)
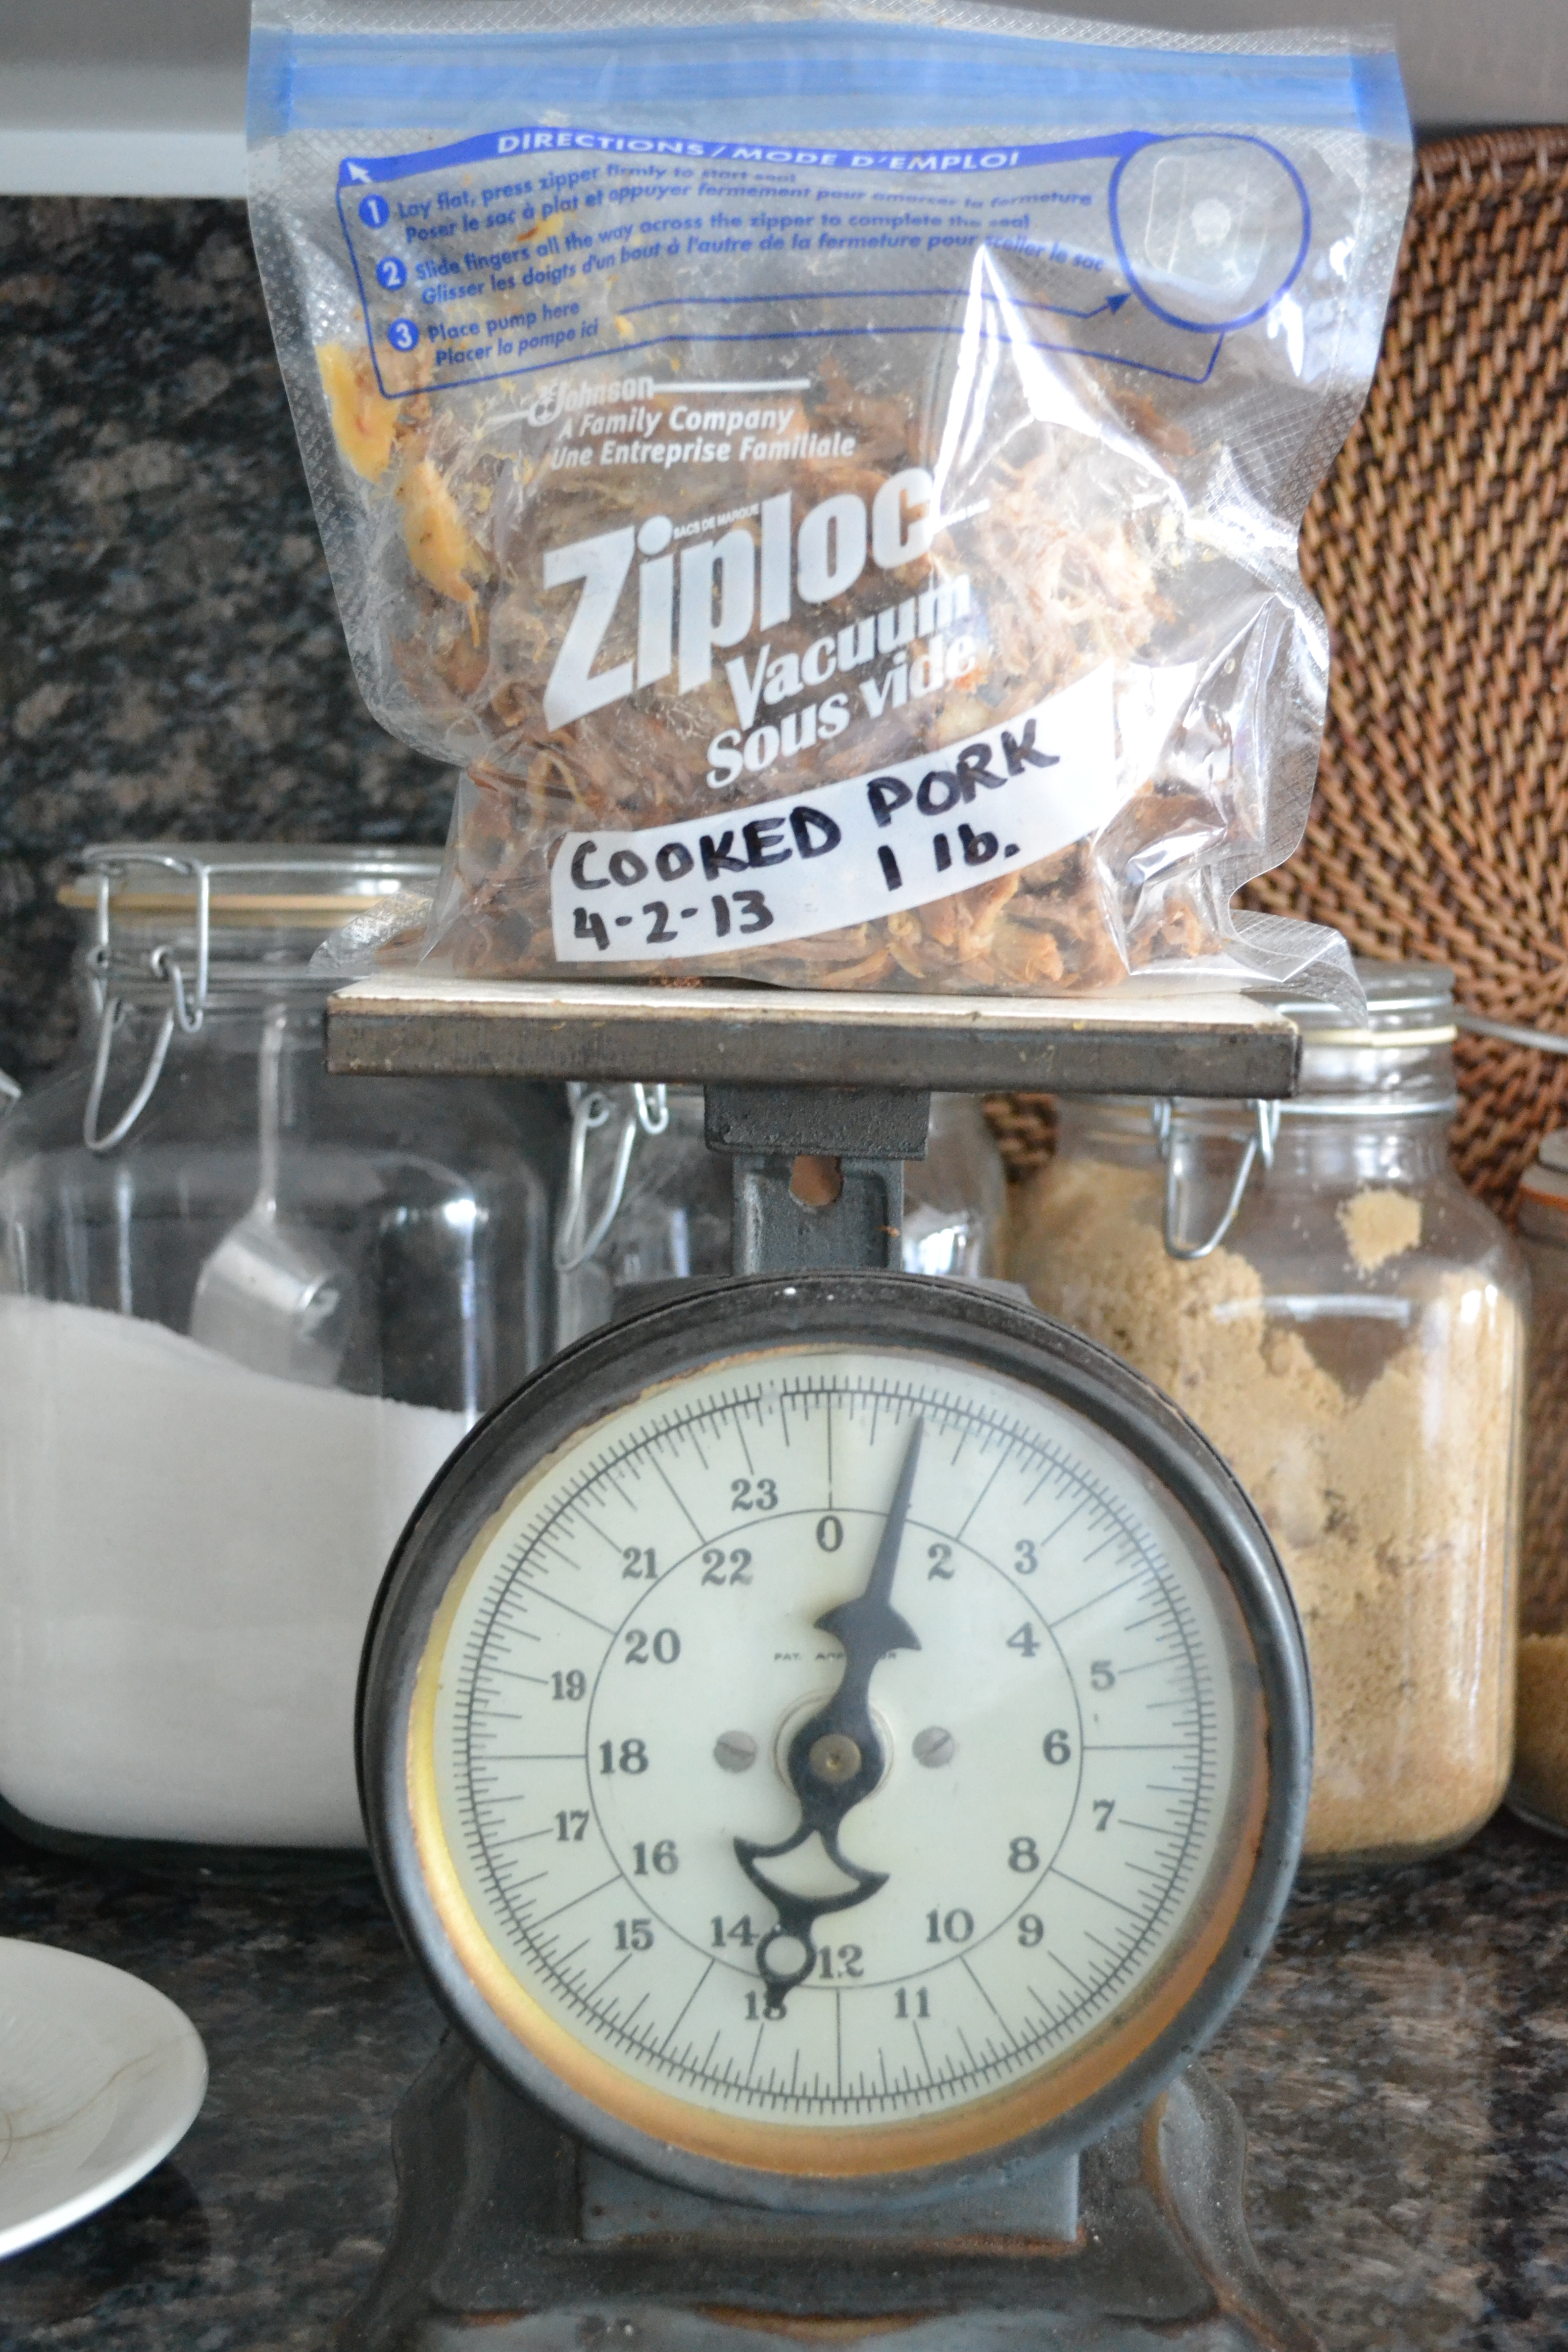
Most of my recipes use about a pound of meat.

This little gadget is so much faster than pulling out the vacuum-sealer. The special bags are available in two sizes. I always stock up right before hunting season. As I cook up meat later in the year, however, I also use these bags for packaging up portions of cooked meat for recipes such as Wild Pork and Guinness Stew, Enchiladas with Creamy Poblano Sauce, Pulled Pork Sandwiches, Venison Pot Pie, and many others. It’s so easy to thaw out a bag of meat in a bowl of water while I grab the other ingredients. Hope this saves you some time, too.
